

Baking a vintage heart cake is more than a kitchen project—it’s a heartfelt gesture wrapped in nostalgia, perfect for a birthday, valentine’s day, valentine’s day, mother’s day, or any sweet celebration. In this in‑depth tutorial, you’ll learn the exact tools, timing, and flourishes that turn batter into a show‑stopping dessert. From carving the heart shape to mastering a silky buttercream finish, we’ll guide you step‑by‑step so you can wow guests with a delicious centerpiece worthy of any occasion.
Table of Contents
Why Bake a Vintage Heart Cake to Celebrate Life’s Sweet Milestones?
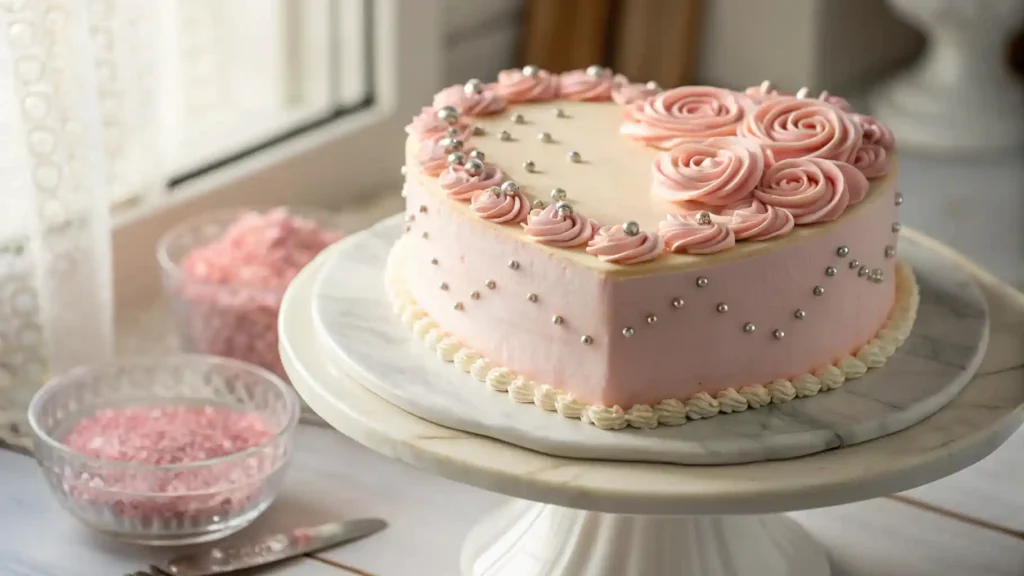
A vintage heart cake feels instantly special because its silhouette signals affection before anyone tastes a crumb. That iconic curve at the top of the heart invites guests to gather, snap photos, and celebrate. Unlike a generic round cake, this throwback cake design leans on pastel palettes, frilly borders, and playful piping that echo retro bakery windows. By the time your knife slips through the first cake layer, you’ve set a mood of warmth and whimsy.
Beyond looks, the flavor combinations are limitless. Match vanilla sponge with strawberry‑jam filling, or pair a rich chocolate cake with light‑pink raspberry frosting. Because you can tweak layer height, syrups, and fillings, you get a tailor‑made cake recipe that tastes exactly how you imagine. Guests remember the personal touch, and hosts love how one heart‑shaped cake doubles as décor and dessert.
Finally, a heart cake is wonderfully versatile. It suits weddings, showers, anniversaries, and Tuesday night “just because” dinners. Whether you bake one for pickup or schedule local delivery, its message is as clear as its curves: someone cared enough to craft something beautiful.
Which Ingredients Bring Vintage Charm and Flavor to This Cake?
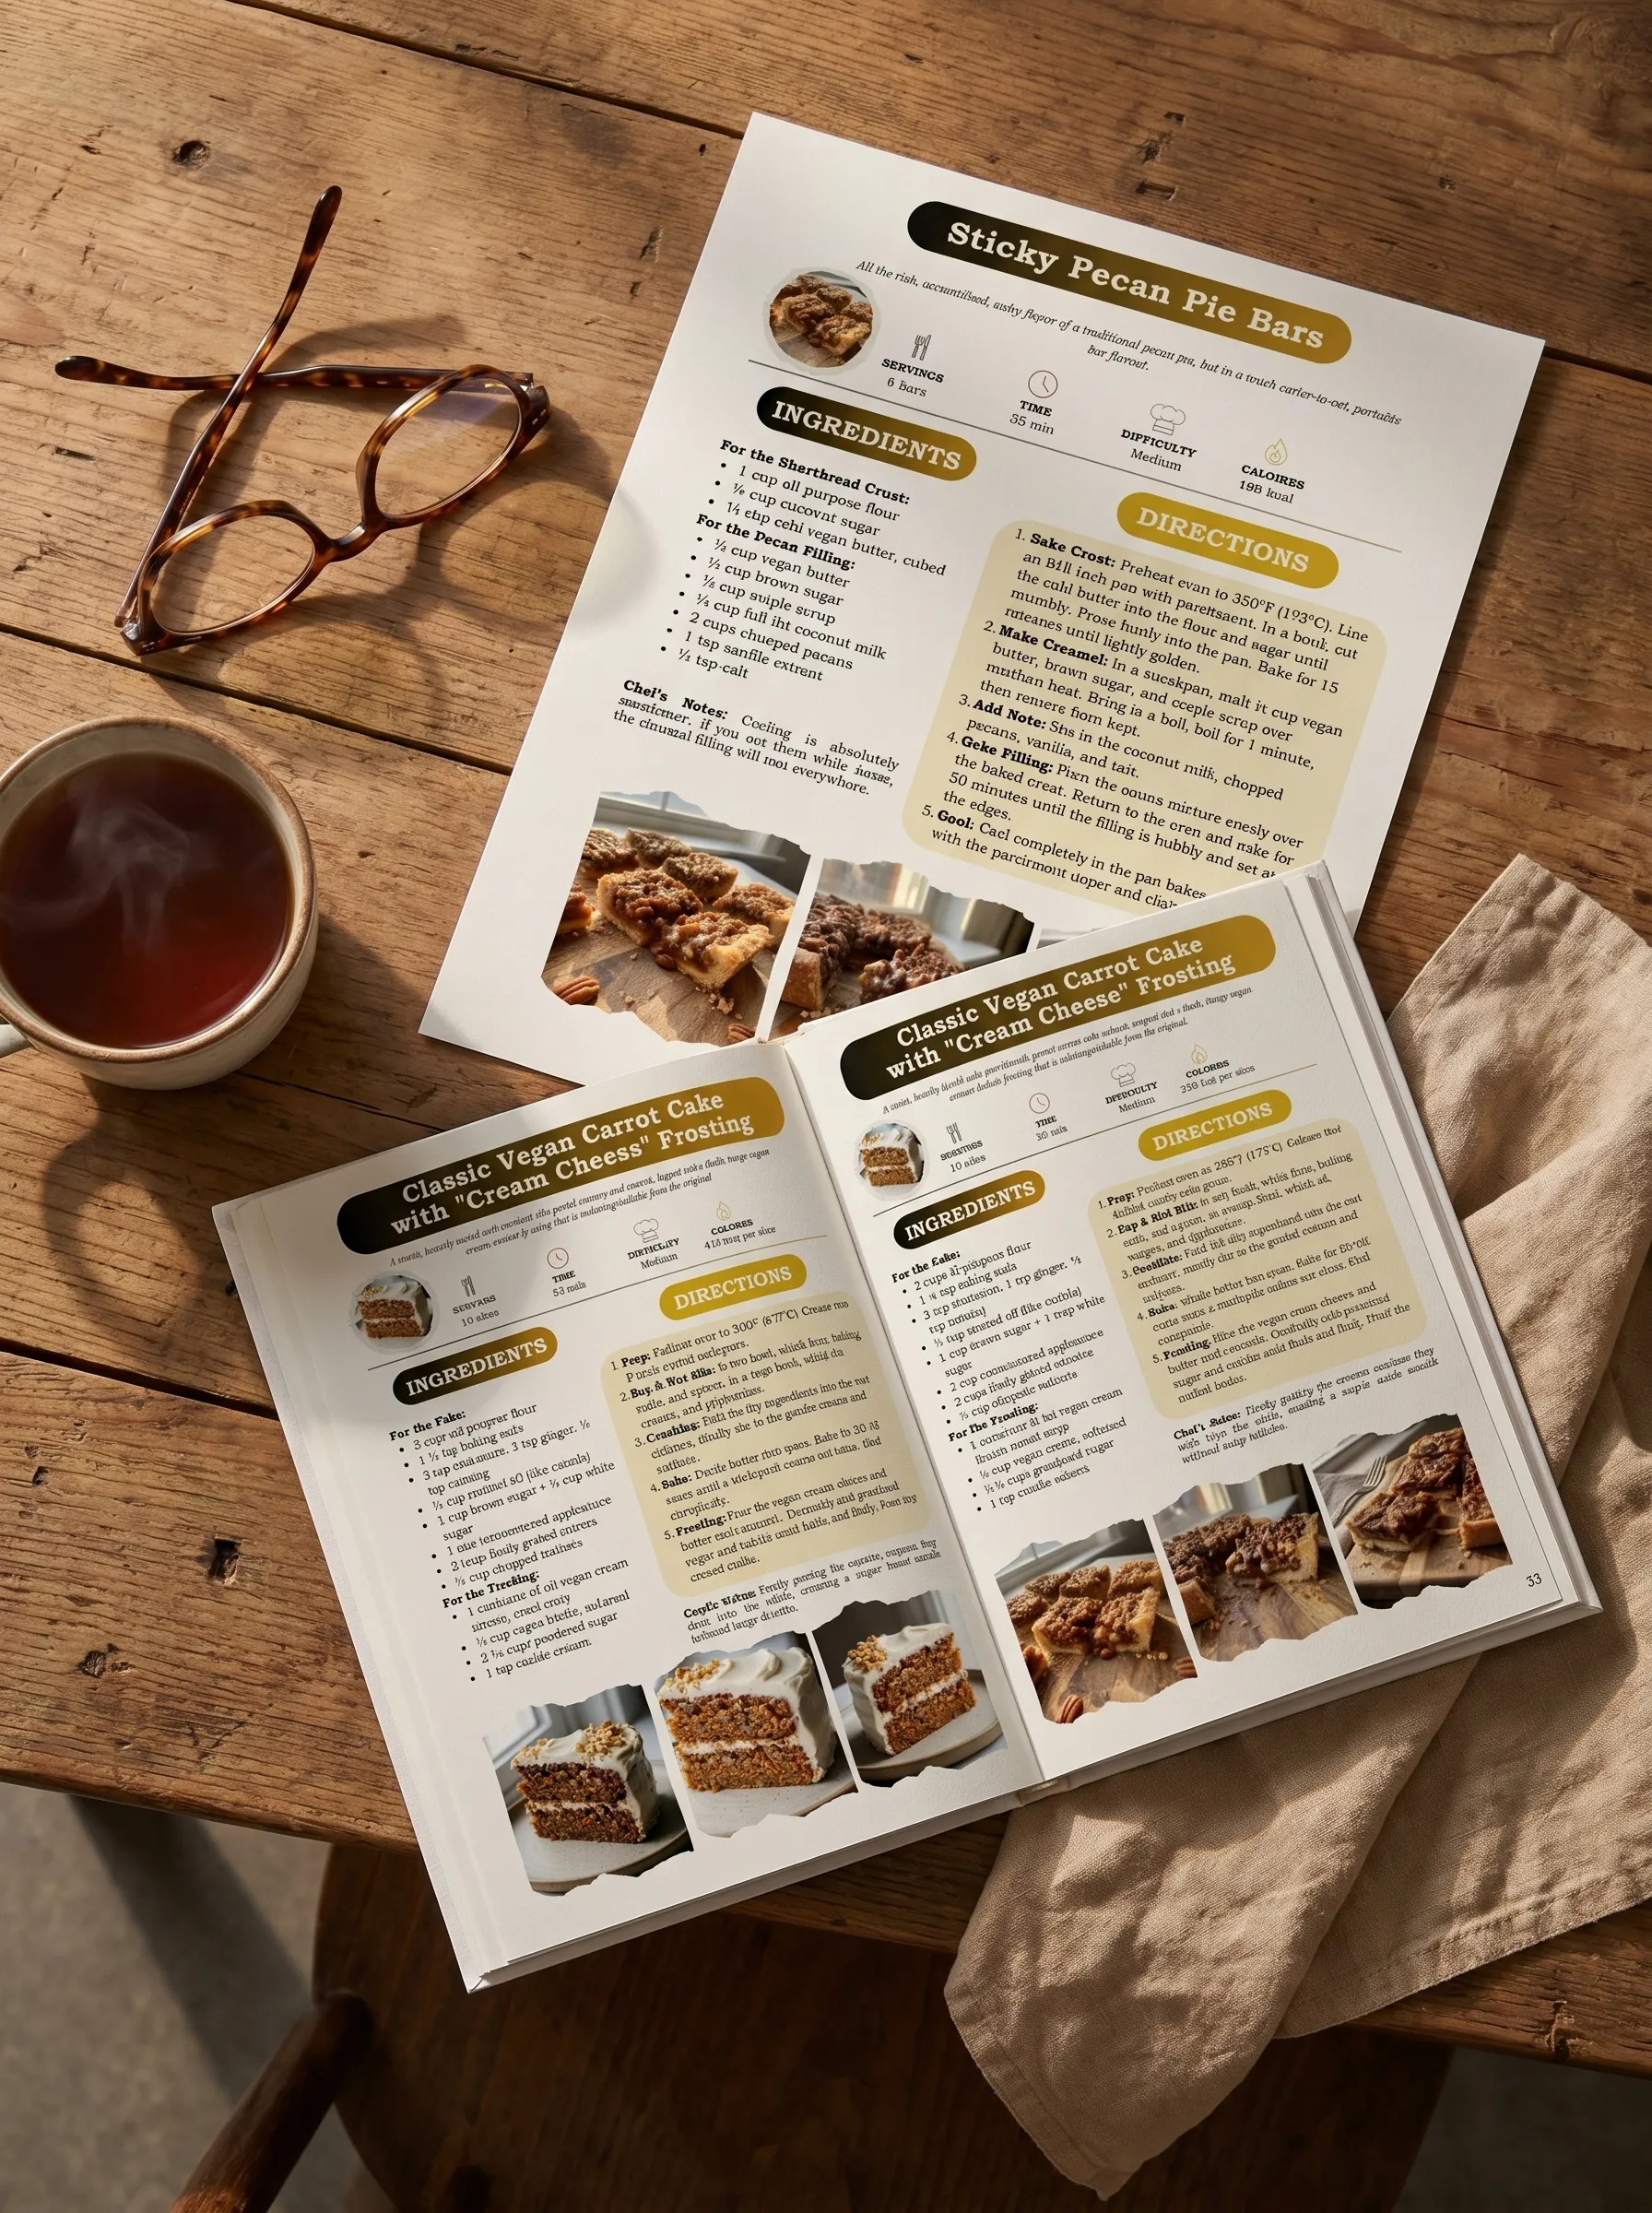
The vintage heart cake recipe relies on pantry staples dressed up with nostalgic accents. Gather everything before you pre‑heat so each cake layer bakes evenly.
For the vanilla–strawberry base (makes one 8‑inch square and one 8‑inch round cake):
- 2 ⅔ cups sifted cake flour
- 2 teaspoons baking powder
- ½ teaspoon fine salt
- 1 cup unsalted butter, room‑temperature
- 1 ¾ cups granulated sugar
- 4 large eggs, room‑temperature
- 1 tablespoon pure vanilla extract
- 1 cup whole milk, room‑temperature
Optional chocolate variation: swap ½ cup flour for Dutch‑process cocoa to create a dual‑tone flavor contrast.
Buttercream & filling:
- 1 ½ cups unsalted butter, softened
- 6 cups confectioners’ sugar, sifted
- ¼ cup heavy cream (plus a splash more as needed)
- 1 tablespoon vanilla bean paste
- Pink gel coloring for that retro vibe
- ½ cup smooth strawberry jam (for a bright middle note)
Decorating extras: silver dragees, soft‑baked cookie crumbs, fresh berry slices, and piping gel—all optional, all fun.
These staples yield a tender crumb, a silky buttercream, and the pastel finish that defines a true vintage cake.
How Do You Make and Assemble the Layers from Pan to Frosted Cake?

- Mix & bake. Cream butter and sugar until fluffy, beat in eggs one at a time, then alternate dry ingredients with milk. Divide batter equally into your prepared square and round tins; bake at 350 °F (175 °C) for 26‑30 minutes. Cool 10 minutes, turn out, and chill flat.
- Carve the shape. Slice the round in half, butt the halves against two adjacent sides of the square to form the classic curve, then trim the points so all edges align.
- Build structure. Level domes with a serrated knife, brush syrup, spread jam, and stack. Lock crumbs under a thin layer of frosting—the crucial crumb coat—and chill 15 minutes.
- Final frost. Cover the entire surface in pink buttercream, smoothing the sides and top with a bench scraper.
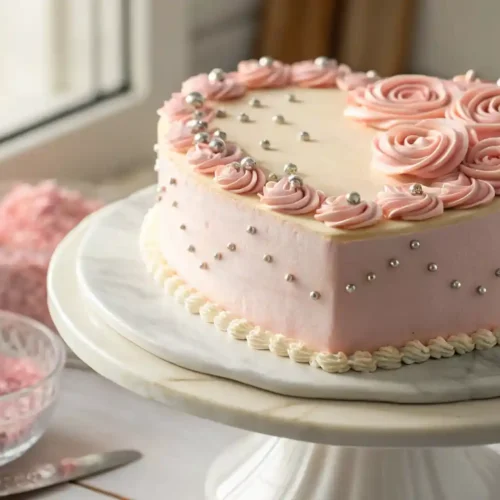
- Pipe & finish. Using a star tip, pipe a graceful shell border, then dot rosettes across the top of the cake. Add dragees and berry fans for sparkle. The result is a fully frosted cake ready to wow any gathering.
Follow this concise process and your custom showpiece will hold up to slicing, serving, or even same‑day delivery without a hitch.
What Pan, Tools, and Tip Numbers Guarantee a Crisp Heart Shape?
Start with a sturdy eight‑inch pan set: one square and one circle. When you slice the circle in half and tuck those halves against two sides of the square, you create an instant heart shape—no specialty tin required. A light‑colored aluminum surface promotes even browning, protecting the sides and top from over‑darkening.
Essential equipment list:
- Offset spatula for smoothing a thin layer of icing.
- Serrated knife for leveling.
- Large piping bag fitted with an open‑star tip (Wilton 1M) to effortlessly pipe rosettes.
- Bench scraper to polish the surface of the cake.
- Cooling rack so air circulates around the bottom of the cake and prevents sogginess.
For extra precision, trace your assembled template onto parchment, cut it out, and place it under the rack as a visual guide while you decorate. The outline also helps beginners judge how high to build each layer and where to start the signature shell border.
How Do You Build Moist Layers and Keep Every Cake Crumb Where It Belongs?
Begin with two baked sponges—whether fluffy vanilla or rich chocolate—and cool them completely before carving. Shave domes with your serrated knife until the cake layers sit flat. Brush each tier with simple syrup for moisture, then spread filling with an offset spatula, staying one half‑inch from the edge to reduce ooze.
Next comes the crumb coat, a protective veil that traps stray bits. Spread a thin layer of frosting over the sides of the cake and chill for 15 minutes; the cool surface stiffens crumbs so they never mar your final finish. Think of this as priming a wall before paint—essential for a smooth, professional look.
When stacking, offset the seams of parchment or acetate strips to keep frosting from squishing out. Always glance at the bottom of the heart to be sure those two rounded joints are plumb; even a slight tilt reads crooked once you add border swirls. Chill once more before you start frosting the cake in earnest.
Frost, Pipe, and Decorate: Turning Buttercream Into a Timeless Cake Design
Now the magic. Tint classic American buttercream a soft light pink—nothing screams vintage cake quite like pastel frosting. Using your bench scraper, cover the sides and top until every contour fades into one unbroken field of color. Then swap to your open‑star tip and pipe a shell border along the rim. That gentle wave frames the piece and hides any imperfections at the junction of the layers.
For extra flourish, pipe petite rosettes in concentric rings, dropping silver dragees at intervals. Scatter crumbled cookie crumbs across the top of the cake for texture. A few sliced strawberry fans cue diners to the fruity notes inside, while fondant scrolls stamped “Love” underscore the retro vibe. One final dusting of edible glitter crowns your frosted cake.
Because butter melts fast, keep a fan off and lights low once you finish. Even better, assemble near serving time or store in a cool box until guests arrive.
Storage, Freeze, Pickup, and Local Delivery: Protecting Your Heart‑Shaped Jewel
Need to prep days ahead? After the crumb coat sets, wrap the unfrosted layers in plastic and freeze up to one month. Thaw overnight in the fridge before final frosting. Fully decorated cakes survive two days chilled, but flavors shine brightest at cool room temperature, so remove the box 60 minutes before slicing.
For order fulfillment, line a tall bakery box with a nonslip mat and insert a cardboard round larger than the heart‑shaped footprint; this keeps the bottom of the cake stable during transit. Whether you manage delivery yourself or rely on a courier, mark the lid “THIS SIDE UP” and “REFRIGERATE.” Offering local delivery within 10 km gives customers peace of mind, especially in hot climates.
If the party venue is far, suggest clients book refrigerated transport or plan an onsite finish. Let them know you’ll stay near your phone should anything shift—you can often talk them through minor repairs with an offset spatula and extra icing.
Custom Cake or DIY? Ordering, Budgeting, and Enjoying Near Any Occasion
Some hosts prefer to order a custom cake from a trusted bakery, especially when guest counts soar or schedules tighten. Pros guarantee consistent texture, balanced sweetness, and flawless finish. They also handle tricky delivery windows, ensuring the heart cake lands intact.
DIY bakers, on the other hand, save costs and savor creative freedom. Provided you block out practice hours and stock every supply from pan to parchment, homemade opens doors to bespoke details: grandma’s secret syrup, hidden‑jam pockets, or stenciled names on the top of the heart. It’s hard to beat the applause when you reveal you baked it yourself.
Whichever route you choose, remember the goal: gather loved ones around a beautiful vintage heart cake, slice slowly, share stories, and savor each bite. Nothing bonds friends faster than crumbs on plates and frosting on lips.
Vintage Heart Cake Tutorial
Ingredients
For the vanilla–strawberry base (makes one 8‑inch square and one 8‑inch round cake):
- 2 ⅔ cups sifted cake flour
- 2 teaspoons baking powder
- ½ teaspoon fine salt
- 1 cup unsalted butter room‑temperature
- 1 ¾ cups granulated sugar
- 4 large eggs room‑temperature
- 1 tablespoon pure vanilla extract
- 1 cup whole milk room‑temperature
- Optional chocolate variation: swap ½ cup flour for Dutch‑process cocoa to create a dual‑tone flavor contrast.
Buttercream & filling:
- 1 ½ cups unsalted butter softened
- 6 cups confectioners’ sugar sifted
- ¼ cup heavy cream plus a splash more as needed
- 1 tablespoon vanilla bean paste
- Pink gel coloring for that retro vibe
- ½ cup smooth strawberry jam for a bright middle note
Instructions
Mix & bake.
- Cream butter and sugar until fluffy, beat in eggs one at a time, then alternate dry ingredients with milk. Divide batter equally into your prepared square and round tins; bake at 350 °F (175 °C) for 26‑30 minutes. Cool 10 minutes, turn out, and chill flat.
- Carve the shape.
- Slice the round in half, butt the halves against two adjacent sides of the square to form the classic curve, then trim the points so all edges align.
Build structure.
- Level domes with a serrated knife, brush syrup, spread jam, and stack. Lock crumbs under a thin layer of frosting—the crucial crumb coat—and chill 15 minutes.
Final frost.
- Cover the entire surface in pink buttercream, smoothing the sides and top with a bench scraper.
Pipe & finish.
- Using a star tip, pipe a graceful shell border, then dot rosettes across the top of the cake. Add dragees and berry fans for sparkle. The result is a fully frosted cake ready to wow any gathering.
Frequently Asked Questions
Q1. How many layers for a heart cake?
Most decorators build a heart shaped cake with two or three sponge layers. Two layers give a tidy profile that’s easy to crumb‑coat, while three add height for dramatic slicing. Just be sure every layer is trimmed level so the finished heart-shaped cake keeps its clean silhouette.
Q2. Which cake is best for heart patients?
For guests watching cholesterol or saturated fat, choose a lighter sponge made with vegetable oil, reduced sugar, and whole‑grain flour. Angel‑food or chiffon baked in a heart‑shaped pan delivers festive flair with less fat. Finish with fresh fruit and a whisper‑thin dollop of yogurt instead of buttercream to keep the treat cardiac‑friendly.
Q3. How to make heart‑shaped cake without mold?
Bake one square and one round layer of equal diameter. Cut the round layer in half, then join those halves to two adjacent sides of the square—instant heart‑shaped cake template! Cover the seams with frosting, tinting it light pink if you’re aiming for a classic vintage look.
Q4. How many people does a heart cake serve?
An 8‑inch two‑layer heart shaped cake (assembled from the square‑plus‑circle method) yields about 12 party‑sized slices. Upsize to 10 inches—or stack a third tier—if you need 20 to 24 servings. Always cut inward from the curve to keep the point intact for that perfect final piece.