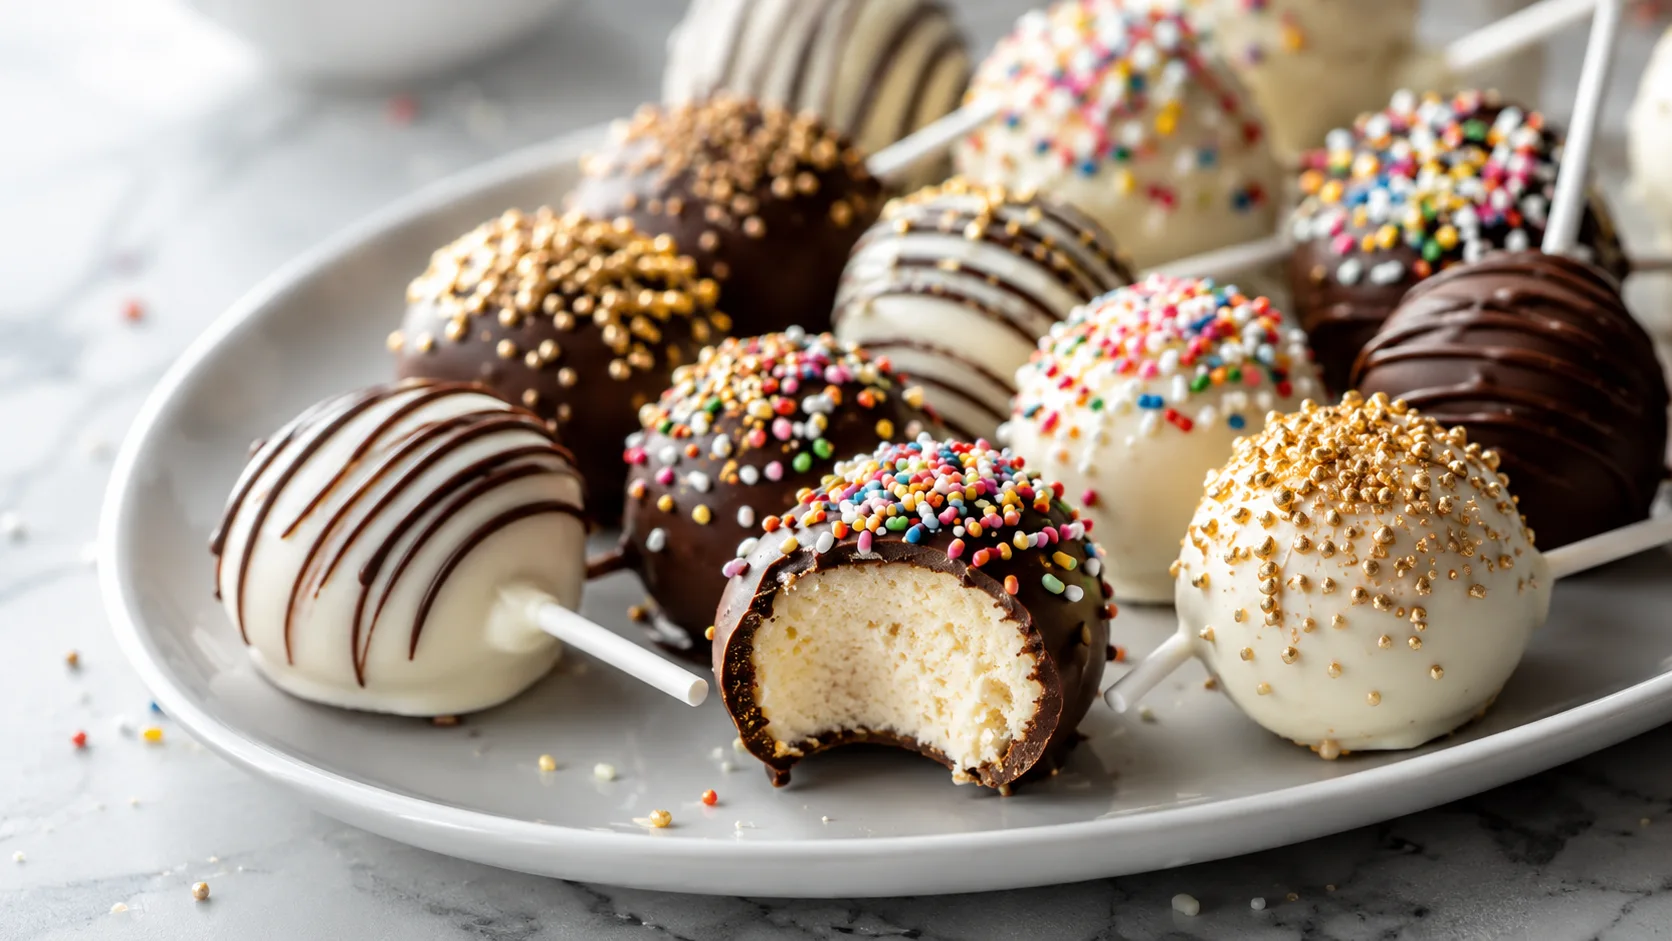


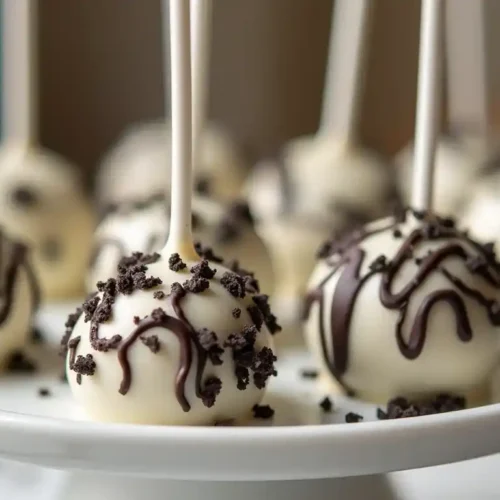
If you’re a fan of cookies and cream desserts, these bite-sized treats will quickly become your new favorite! Imagine the rich flavor of Oreo cookies blended into a moist cake, held together with creamy frosting, then dipped in velvety chocolate—pure bliss in every bite.
Perfect for parties, gifts, or just a sweet craving, this easy cake pop recipe is a fun way to turn simple ingredients into a stunning, homemade dessert. Whether you’re making them for a special occasion or just because, these chocolate-dipped cake pops will impress everyone. Ready to create a treat that’s as delicious as it is adorable? Let’s get started!
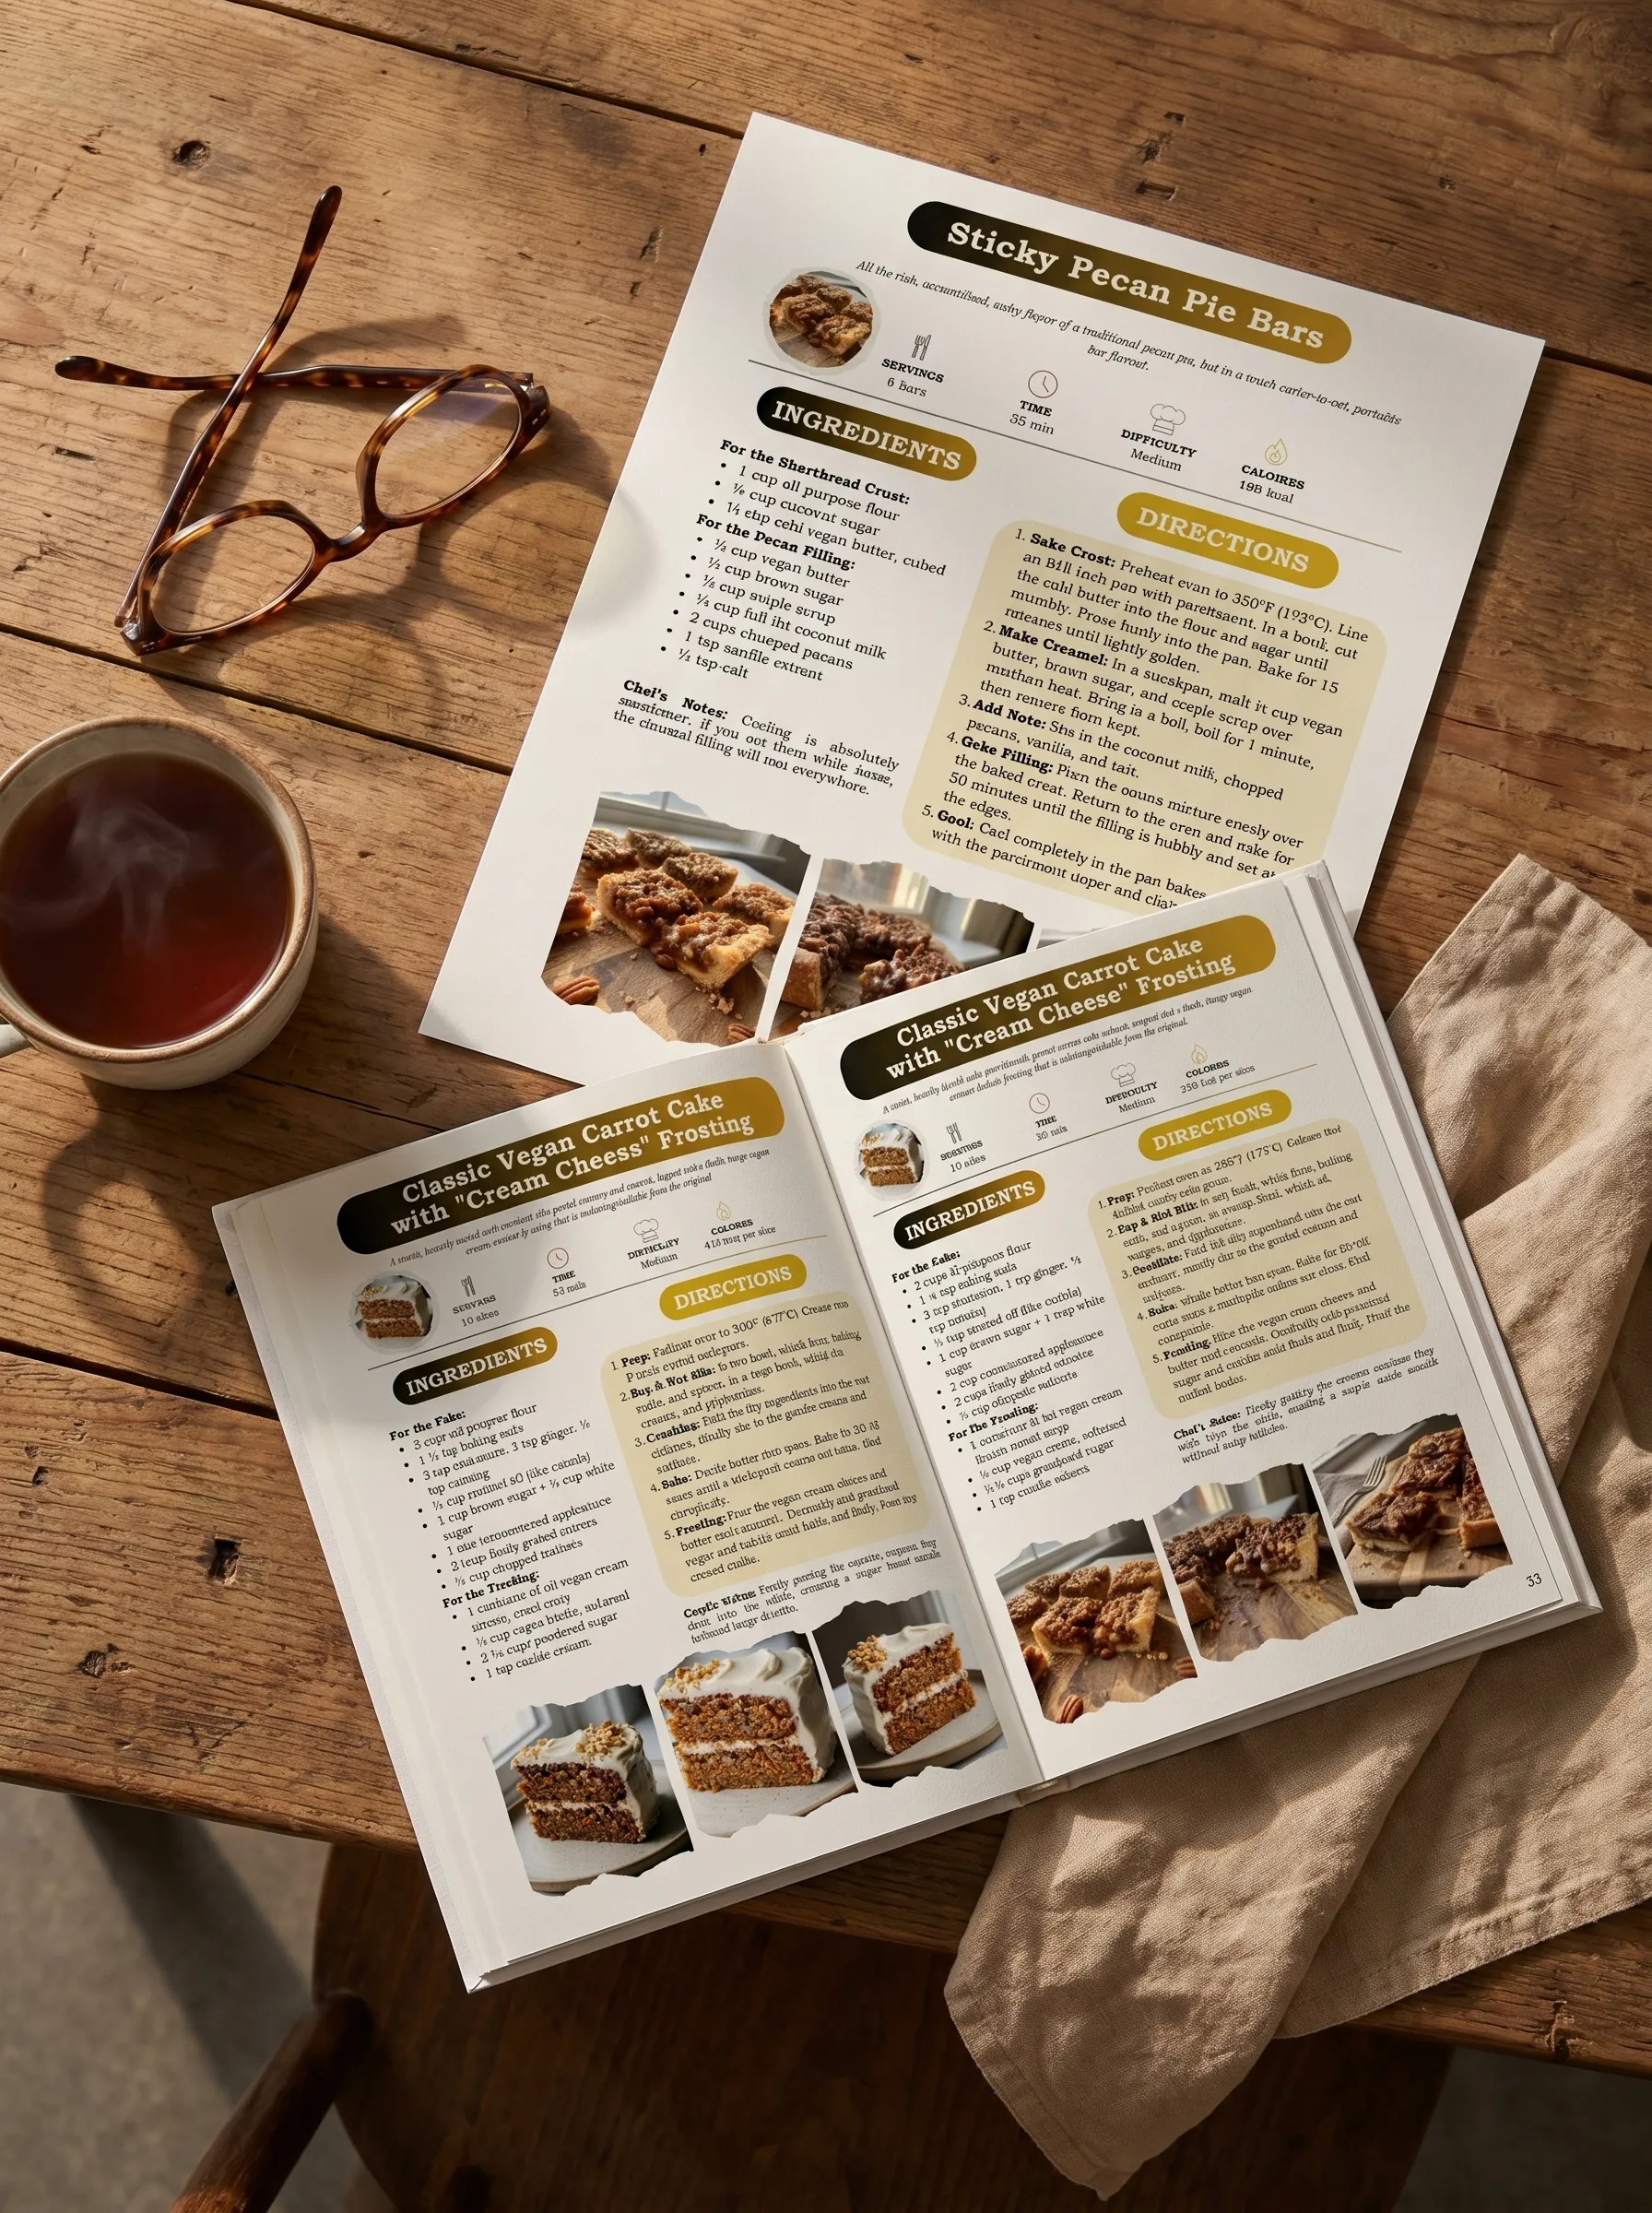
Table of Contents
Why You’ll Love These Cookie and Cream Cake Pops
These cookie and cream cake pops aren’t just a dessert—they’re a bite-sized indulgence that brings joy with every bite. Whether you’re making them for a party, a gift, or a fun treat at home, these homemade cake pops check all the right boxes.

Key Benefits of This Recipe
✔ Irresistible Flavor: The rich, chocolatey taste of crushed Oreo cookies combined with soft, moist cake and a creamy filling creates a cookies and cream dessert dream.
✔ Fun and Easy to Make: No special baking skills needed! If you can crumble cookies and mix frosting, you can make these easy cake pops without breaking a sweat.
✔ Perfect for Any Occasion: Whether you’re making them for birthdays, holidays, or simply treating yourself, these bite-sized treats make any moment special.
✔ Customizable and Versatile: Swap out flavors, use different coatings, or get creative with toppings—these chocolate-dipped cake pops offer endless possibilities.
✔ Kid-Friendly Fun: If you have little helpers in the kitchen, this is a great recipe to make together. Rolling the cake balls, dipping them in chocolate, and decorating with sprinkles turns baking into a fun family activity!
With their crunchy yet creamy texture, rich chocolate coating, and adorable presentation, these homemade cake pops are guaranteed to be a crowd-pleaser. Now, let’s dive into what you need to bring them to life!
Ingredients for Cookie and Cream Cake Pops
Before we dive into making these delicious cookie and cream cake pops, let’s gather all the essentials. You don’t need anything fancy—just a few simple ingredients to create a treat that’s bursting with flavor and texture.
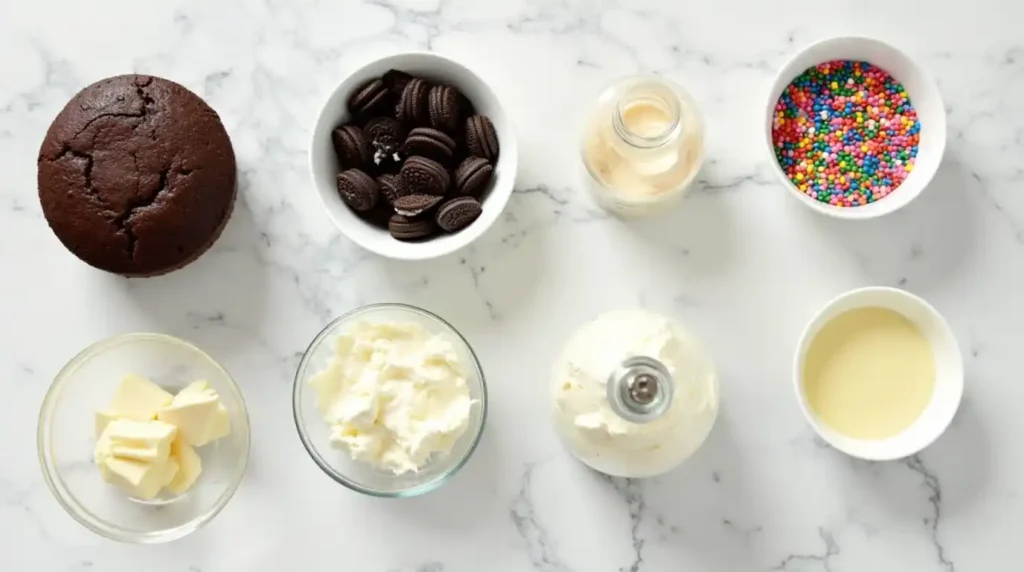
What You’ll Need:
For the Cake Base:
- 1 box of chocolate or vanilla cake mix (or homemade cake, if preferred)
- Ingredients required for the cake mix (usually eggs, oil, and water)
For the Cookie and Cream Filling:
- 10-12 Oreo cookies, finely crushed (for that classic cookies and cream flavor)
- ½ cup cream cheese (softened, for a smooth and creamy texture)
- 2 tablespoons vanilla buttercream frosting (adds extra sweetness and helps bind the mixture)
For the Chocolate Coating:
- 12 oz white chocolate or candy melts (for dipping)
- 1 tablespoon coconut oil (optional, but helps create a smooth, glossy finish)
For Decorating:
- Extra crushed Oreo cookies (for a textured topping)
- Sprinkles, chocolate drizzle, or cookie crumbs (for added flair)
- Cake pop sticks (essential for easy handling)
Pro Tip:
If you want a richer chocolate flavor, you can swap out the white chocolate for dark or milk chocolate. Similarly, if you prefer a softer texture, replace the cream cheese with additional frosting.
Now that you’ve got everything ready, let’s move on to creating these irresistible cake pops step by step!
Step-by-Step Instructions for Cookie and Cream Cake Pops
Let’s get baking! Follow these simple steps to make delicious cookie and cream cake pops that are sure to impress.
1. Bake the Cake
- Prepare the Cake Mix: Follow the instructions on the box to prepare your chocolate or vanilla cake. Use a mixing bowl to combine the ingredients—eggs, oil, and water—and mix until smooth.
- Bake and Cool: Pour the batter into a greased baking pan and bake according to package directions. Once done, let the cake cool completely on a wire rack. This step is crucial—warm cake will make the mixture too soft.
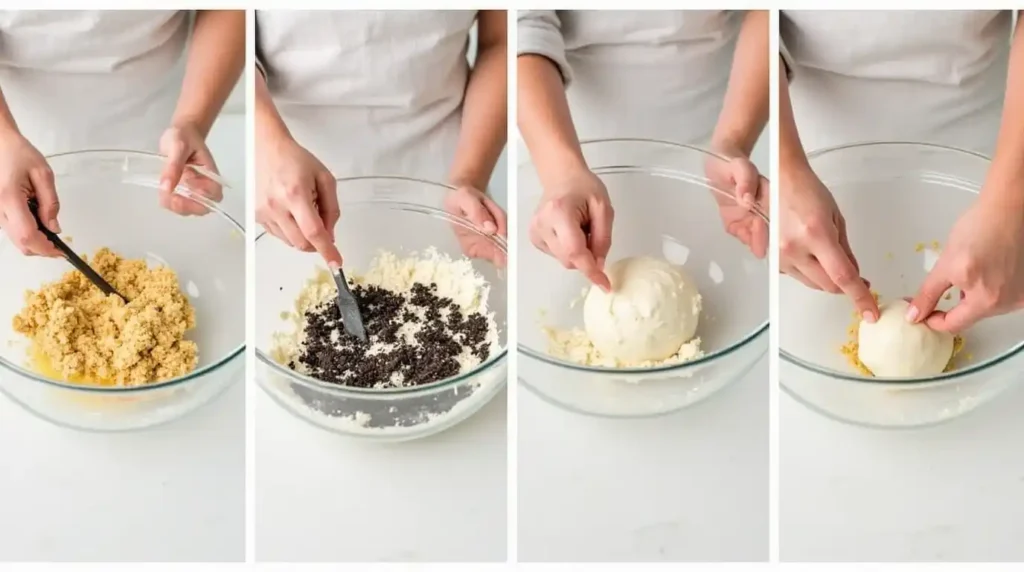
2. Crumble the Cake
- Crumble to Perfection: Once the cake is completely cooled, crumble it into fine crumbs using your hands or a fork. Transfer the crumbs to a large mixing bowl.
3. Mix in the Cookie and Cream Filling
- Combine Ingredients: Add the softened cream cheese, crushed Oreo cookies, and vanilla buttercream frosting to the bowl with cake crumbs.
- Mix Well: Use a spatula or your hands to thoroughly mix until the ingredients are fully combined. The mixture should hold together when pressed—this ensures your cake pops won’t fall apart.
4. Shape the Cake Pops
- Roll into Balls: Scoop out small portions of the mixture (about 1 tablespoon each) and roll them into smooth, even-sized balls. Place them on a baking sheet lined with parchment paper.
- Chill: Pop the baking sheet into the refrigerator for about 30 minutes. Chilling helps the cake pops firm up, making them easier to handle and dip later.
5. Melt the Chocolate Coating
- Prepare the Coating: In a microwave-safe bowl, melt the white chocolate or candy melts in 30-second intervals, stirring in between, until smooth. For a glossy finish, stir in a tablespoon of coconut oil.
6. Assemble the Cake Pops
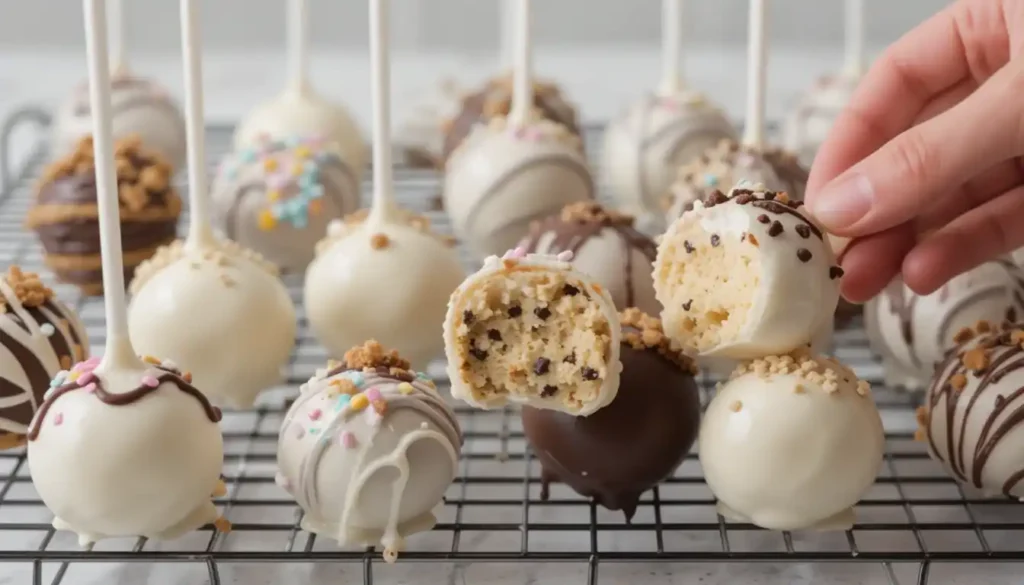
- Insert the Sticks: Dip one end of a cake pop stick into the melted chocolate, then gently insert it halfway into a chilled cake ball. This acts as a glue to keep the cake pop secure. Repeat for all cake balls.
- Dip and Decorate: Holding the stick, dip each cake pop into the melted chocolate, gently twirling to coat evenly. Let the excess chocolate drip off before placing it back on the parchment paper.
7. Add the Final Touches
- Decorate: While the chocolate is still wet, sprinkle crushed Oreos, add a drizzle of melted chocolate, or top with colorful sprinkles. Get creative!
- Let Set: Allow the cake pops to set by placing them in the refrigerator for another 15-20 minutes until the chocolate is firm.
Pro Tip:
If you find the coating too thick, add a little more coconut oil to thin it out. For a perfectly smooth finish, tap your wrist gently while dipping to remove excess chocolate.
And that’s it! You’ve just made your own batch of delicious cookie and cream cake pops. Up next—some tips and variations to make this recipe even more versatile!
If you love rich, decadent desserts, be sure to check out our Chocolate Cream Cheese Pound Cake—a moist, velvety cake with the perfect balance of chocolate and cream cheese. Click here to get the recipe and bake it today!
Pro Tips and Variations for Perfect Cookie and Cream Cake Pops
Making cookie and cream cake pops is already fun and easy, but with a few pro tips and creative variations, you can take them to the next level! Whether you want to perfect the dipping process, explore new flavors, or troubleshoot common issues, these insights will help you make the best cake pops every time.
Pro Tips for Perfect Cake Pops
Use the Right Cake-to-Frosting Ratio
- The key to soft yet sturdy cake pops is getting the right consistency. Too much frosting will make them too sticky, while too little will cause them to fall apart. A good rule of thumb is to start with ½ cup of frosting per baked cake and adjust as needed.
Chill, but Don’t Freeze
- Refrigerating the cake balls for 30 minutes before dipping helps them hold their shape.
- Avoid freezing them for too long, as frozen cake pops can crack when dipped in warm chocolate.
Thin Your Chocolate for a Smooth Coating
- If your melted chocolate is too thick, add 1 teaspoon of coconut oil or vegetable shortening at a time to create a smooth consistency.
- For best results, melt chocolate in short intervals in the microwave or use a double boiler to prevent burning.
Use a Sturdy Stick & Secure It Properly
- Dip the end of the cake pop stick into melted chocolate before inserting it into the cake ball—this helps act as a glue so the cake pop stays intact.
Tap Gently for a Perfect Finish
- After dipping the cake pop, gently tap your wrist or the stick against the bowl to remove excess chocolate without causing cracks or uneven coating.
Creative Variations to Try
Looking to switch things up? Try these fun variations to customize your cookie and cream cake pops for different tastes and occasions!
1. Chocolate Lovers’ Delight
- Use a chocolate cake base instead of vanilla for an extra-rich flavor.
- Dip in dark chocolate and drizzle with melted milk chocolate for a stunning finish.
2. Mint Cookies and Cream Cake Pops
- Add ½ teaspoon of peppermint extract to the frosting mixture for a cool, refreshing twist.
- Coat with white chocolate and sprinkle with crushed mint-flavored Oreos.
3. Peanut Butter Oreo Cake Pops
- Mix in 2 tablespoons of peanut butter with the frosting for a nutty, creamy texture.
- Decorate with a drizzle of melted peanut butter chips for extra indulgence.
4. Birthday Cake Pops
- Swap out regular Oreos for Golden Oreos for a lighter vanilla flavor.
- Stir in rainbow sprinkles to the cake mixture for a funfetti effect.
5. Vegan & Dairy-Free Option
- Use a dairy-free cake mix and vegan buttercream frosting.
- Substitute regular chocolate with dairy-free white or dark chocolate for dipping.
Troubleshooting Common Cake Pop Issues
Cake Pops Keep Falling Off the Stick?
Ensure your cake balls aren’t too heavy—roll them to about 1 inch in diameter.
Always dip the stick in chocolate before inserting it into the cake ball.
Chill the cake pops before dipping to help them stay firm.
Chocolate Coating is Cracking?
Let the chilled cake pops sit at room temperature for 5 minutes before dipping.
Make sure your melted chocolate isn’t too hot—let it cool slightly before dipping.
Chocolate is Too Thick for Dipping?
Stir in 1 teaspoon of coconut oil or vegetable shortening to thin it out.
Avoid overheating the chocolate, as it can cause clumping.
With these pro tips, creative variations, and troubleshooting hacks, you’re now equipped to make flawless, irresistible cookie and cream cake pops every time! Up next—how to serve and present them beautifully.
Serving Suggestions for Cookie and Cream Cake Pops
Now that you’ve mastered making cookie and cream cake pops, it’s time to serve and present them in style! These bite-sized treats are not only delicious but also incredibly versatile. Whether you’re serving them at a party, gifting them to a friend, or simply treating yourself, here are some fun and creative ways to display and enjoy them.

Perfect Occasions for Cake Pops
These chocolate-dipped cake pops are a hit at:
✔ Birthday Parties – A fun, mess-free treat that kids and adults love.
✔ Holidays & Special Events – Customize them with festive colors or themed decorations.
✔ Gifting & Party Favors – Wrap them individually in clear bags and tie them with ribbons.
✔ Afternoon Snacks & Dessert Tables – Serve alongside coffee, tea, or hot chocolate.
✔ Bake Sales & Fundraisers – Eye-catching and easy to grab on the go!
How to Serve Cake Pops Creatively
1. Classic Cake Pop Stand Display
- If serving at a party, use a cake pop stand or foam block to keep them upright.
- Arrange them in rows or tiers to create a beautiful dessert display.
2. Elegant Cake Pop Bouquets
- Insert cake pops into a decorative mason jar, small vase, or basket filled with sugar, rice, or candy to hold them in place.
- Tie ribbons around the sticks for a stylish, gift-worthy presentation.
3. Mini Dessert Platters
- Place cake pops on a serving platter, mixing and matching different coatings (white chocolate, dark chocolate, and sprinkles) for a colorful spread.
- Drizzle extra melted chocolate over the platter for a gourmet touch.
4. Pairing with Drinks
- These cookie and cream cake pops pair perfectly with:
✔ Coffee or espresso – A bold contrast to the sweet chocolate coating.
✔ Milkshakes or hot cocoa – A rich, indulgent combination.
✔ Vanilla or cookies and cream ice cream – A dreamy dessert pairing.
Storing and Keeping Cake Pops Fresh
To keep your cake pops fresh and delicious, follow these simple storage tips:
✔ At Room Temperature:
- Store in an airtight container for up to 2 days if the coating is fully set.
✔ Refrigerated:
- Keep in the fridge for up to 1 week. Place parchment paper between layers to prevent sticking.
✔ Frozen for Long-Term Storage:
- Store cake pops in an airtight container or freezer-safe bag for up to 3 months.
- Let them thaw at room temperature before serving to maintain their texture.
Decorating Ideas to Impress
If you want to elevate the look of your cake pops, try these decoration techniques:
✔ Drizzle with Melted Chocolate: Use a contrasting chocolate (white over dark or vice versa) for a sleek finish.
✔ Roll in Crushed Oreos: Coat the cake pops in extra crushed cookies for extra crunch and visual appeal.
✔ Sprinkles & Edible Glitter: A simple way to match any theme or occasion.
✔ Marbled Effect: Swirl two different colors of melted chocolate together before dipping for a stunning marble effect.
Gift-Wrapping Cake Pops for Special Occasions
Want to gift your homemade cake pops? Here’s how to package them beautifully:
✔ Individually Wrapped: Place each cake pop in a clear cellophane bag and tie with a ribbon.
✔ Decorative Box: Arrange them in a cute gift box with tissue paper for a more luxurious feel.
✔ Personalized Tags: Add a small handwritten note or tag with a sweet message.
Final Thought
No matter how you choose to serve them, these cookie and cream cake pops will always be a crowd-pleaser! From birthdays to bake sales, they make the perfect sweet treat for any occasion. Now, let’s wrap things up and answer some frequently asked questions about cake pops! 🎂🍡
Conclusion: The Perfect Sweet Treat for Any Occasion
Congratulations! You’ve just mastered the art of making cookie and cream cake pops, a treat that’s as fun to make as it is to eat. These bite-sized delights are perfect for any celebration, whether it’s a birthday, holiday, or just a sweet craving that needs to be satisfied.

With their creamy Oreo-infused filling, rich chocolate coating, and endless decorating possibilities, these cake pops are sure to impress. Plus, they’re completely customizable, so you can experiment with different flavors, toppings, and even dietary adaptations to make them truly your own.
Why You’ll Keep Coming Back to This Recipe
✔ Easy and Fun to Make: No advanced baking skills required—just mix, roll, dip, and decorate!
✔ Perfect for Gifting & Sharing: These cake pops make wonderful homemade gifts and party favors.
✔ Kid-Friendly and Crowd-Pleasing: A treat that both kids and adults will love.
✔ Endless Flavor Possibilities: From mint chocolate to peanut butter, the variations are endless.
Final Pro Tip: Make-Ahead for Convenience
If you’re making these for an event, you can prepare them in advance! Cake pops store well in the fridge for up to a week or in the freezer for three months, so you’ll always have a sweet treat ready to go.
So, what are you waiting for? Grab your ingredients, unleash your creativity, and enjoy making these cookie and cream cake pops for your next special occasion—or just because!
Now, let’s dive into some frequently asked questions to help you perfect your cake pops even further!
FAQs: Everything You Need to Know About Cookie and Cream Cake Pops
Cake pops may seem simple, but sometimes a few common questions arise during the process. Here are answers to the most frequently asked questions to help you perfect your cookie and cream cake pops every time!
1. Why are my cake pops falling off the sticks?
This can happen for a few reasons:
✔ Cake balls are too heavy – Make sure they are about 1-inch in diameter for the best balance.
✔ The stick wasn’t secured properly – Dip the end of the stick in melted chocolate before inserting it into the cake ball. This acts like glue to keep it in place.
✔ Chilling is key – Let the cake pops firm up in the refrigerator for at least 30 minutes before dipping them in chocolate.
2. How do I get a smooth chocolate coating?
A silky, even coating makes cake pops look professional. Here’s how to achieve it:
✔ Melt the chocolate properly – Heat in short bursts in the microwave, stirring in between, or use a double boiler for more control.
✔ Thin the chocolate if needed – Add 1 teaspoon of coconut oil or vegetable shortening to create a smooth, dippable consistency.
✔ Tap off excess coating gently – After dipping, tap the stick against your wrist instead of the bowl to prevent cracking.
3. Can I make cake pops in advance?
Absolutely! Cake pops are great for making ahead. Here’s how to store them:
✔ Refrigerator: Store fully coated cake pops in an airtight container for up to 1 week.
✔ Freezer: Freeze for up to 3 months—just let them thaw in the fridge before serving.
✔ Room temperature: If coated properly, cake pops can last 1-2 days at room temperature in an airtight container.
4. What’s the best chocolate to use for dipping?
The right chocolate makes all the difference!
✔ Candy melts: The easiest option, as they melt smoothly and harden quickly.
✔ White or dark chocolate bars: High-quality chocolate (like Ghirardelli) gives a rich flavor but may need coconut oil to thin it out.
✔ Chocolate chips: Avoid using these alone, as they tend to be too thick—mix with a little oil for a better consistency.
5. How can I make cake pops without cream cheese?
If you prefer to skip cream cheese, try these alternatives:
✔ Vanilla buttercream frosting – A sweeter, lighter option.
✔ Chocolate ganache – Adds a rich, decadent taste.
✔ Nut butter or cookie butter – A unique twist for extra flavor.
6. Can I make these cake pops without a cake pop stand?
Yes! Try these easy DIY alternatives:
✔ Use a styrofoam block – Simply poke the sticks into it to hold the cake pops upright.
✔ Egg cartons (flipped upside down) – Poke small holes to insert the sticks.
✔ A colander or cooling rack – The holes work perfectly to hold cake pops in place.
7. How do I decorate cake pops for different occasions?
Get creative with these fun ideas!
✔ Birthdays: Add rainbow sprinkles or edible glitter.
✔ Holidays: Use red and green sprinkles for Christmas or pastel colors for Easter.
✔ Weddings: Drizzle white chocolate and top with gold dust or pearls.
✔ Themed Parties: Match sprinkles, colors, and drizzles to fit your theme.
8. How can I make a healthier version of these cake pops?
For a lighter version, try these swaps:
✔ Use a whole wheat or gluten-free cake mix to reduce refined flour.
✔ Replace cream cheese with Greek yogurt for a protein-packed filling.
✔ Opt for dark chocolate instead of white chocolate for a lower sugar content.
Now that you’re armed with all the best tips, tricks, and troubleshooting advice, you’re ready to make the perfect cookie and cream cake pops every time. Enjoy your baking, and don’t forget to get creative with your flavors and decorations!
cookie and cream cake pop recipe
Ingredients
What You’ll Need:
For the Cake Base:
- 1 box of chocolate or vanilla cake mix or homemade cake, if preferred
- Ingredients required for the cake mix usually eggs, oil, and water
- For the Cookie and Cream Filling:
- 10-12 Oreo cookies finely crushed (for that classic cookies and cream flavor)
- ½ cup cream cheese softened, for a smooth and creamy texture
- 2 tablespoons vanilla buttercream frosting adds extra sweetness and helps bind the mixture
For the Chocolate Coating:
- 12 oz white chocolate or candy melts for dipping
- 1 tablespoon coconut oil optional, but helps create a smooth, glossy finish
For Decorating:
- Extra crushed Oreo cookies for a textured topping
- Sprinkles chocolate drizzle, or cookie crumbs (for added flair)
- Cake pop sticks essential for easy handling
Instructions
Bake the Cake
- Prepare the Cake Mix: Follow the instructions on the box to prepare your chocolate or vanilla cake. Use a mixing bowl to combine the ingredients—eggs, oil, and water—and mix until smooth.
- Bake and Cool: Pour the batter into a greased baking pan and bake according to package directions. Once done, let the cake cool completely on a wire rack. This step is crucial—warm cake will make the mixture too soft.
Crumble the Cake
- Crumble to Perfection: Once the cake is completely cooled, crumble it into fine crumbs using your hands or a fork. Transfer the crumbs to a large mixing bowl.
- Mix in the Cookie and Cream Filling
- Combine Ingredients: Add the softened cream cheese, crushed Oreo cookies, and vanilla buttercream frosting to the bowl with cake crumbs.
- Mix Well: Use a spatula or your hands to thoroughly mix until the ingredients are fully combined. The mixture should hold together when pressed—this ensures your cake pops won’t fall apart.
Shape the Cake Pops
- Roll into Balls: Scoop out small portions of the mixture (about 1 tablespoon each) and roll them into smooth, even-sized balls. Place them on a baking sheet lined with parchment paper.
- Chill: Pop the baking sheet into the refrigerator for about 30 minutes. Chilling helps the cake pops firm up, making them easier to handle and dip later.
Melt the Chocolate Coating
- Prepare the Coating: In a microwave-safe bowl, melt the white chocolate or candy melts in 30-second intervals, stirring in between, until smooth. For a glossy finish, stir in a tablespoon of coconut oil.
Assemble the Cake Pops
- Insert the Sticks: Dip one end of a cake pop stick into the melted chocolate, then gently insert it halfway into a chilled cake ball. This acts as a glue to keep the cake pop secure. Repeat for all cake balls.
- Dip and Decorate: Holding the stick, dip each cake pop into the melted chocolate, gently twirling to coat evenly. Let the excess chocolate drip off before placing it back on the parchment paper.
Add the Final Touches
- Decorate: While the chocolate is still wet, sprinkle crushed Oreos, add a drizzle of melted chocolate, or top with colorful sprinkles. Get creative!
- Let Set: Allow the cake pops to set by placing them in the refrigerator for another 15-20 minutes until the chocolate is firm.