
Making your own yogurt at home can seem daunting, but with an Instant Pot, it becomes surprisingly simple and incredibly rewarding. This Instant Pot yogurt recipe is your ultimate guide to creating rich, creamy, and probiotic-packed yogurt right in your kitchen. Not only is it significantly cheaper than store-bought options, but you also control every ingredient, ensuring pure, wholesome goodness for your family. Get ready to enjoy the freshest, most delicious yogurt you’ve ever tasted, with minimal effort!
Table of Contents
Why You’ll Love Instant Pot Yogurt Recipe
- Effortlessly Delicious: Your Instant Pot does most of the work, making homemade Instant Pot Yogurt surprisingly simple, even for beginners. Enjoy fresh, creamy results every time.
- Cost-Effective & Customizable: Save money compared to store-bought brands and control every ingredient. Adjust for tanginess, thickness, or add your favorite flavors.
- Packed with Probiotics: Benefit from healthy live active cultures for gut health, knowing exactly what goes into your family’s food without unwanted additives.
- Versatile Kitchen Staple: Perfect for breakfast, smoothies, dips, or as a healthier substitute in recipes. This versatile Instant Pot Yogurt elevates any meal.
Ingredients
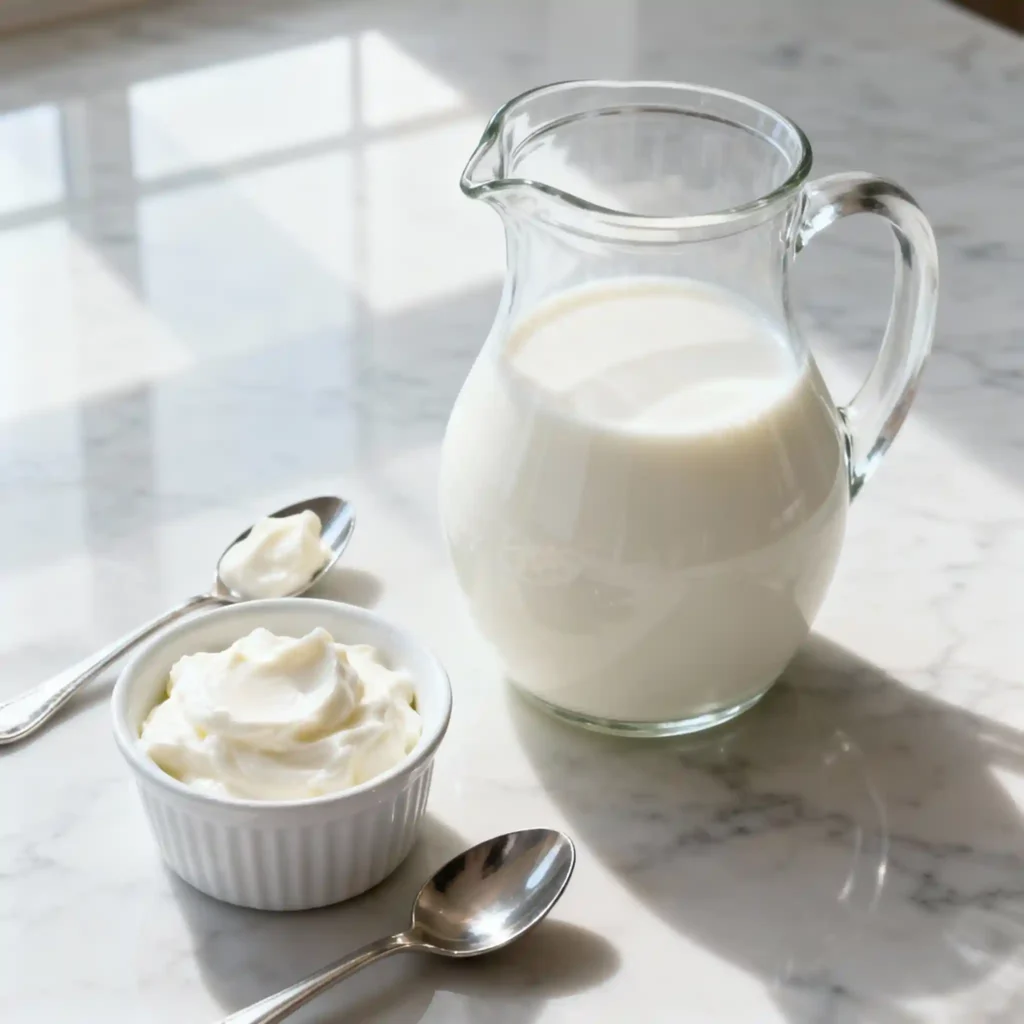
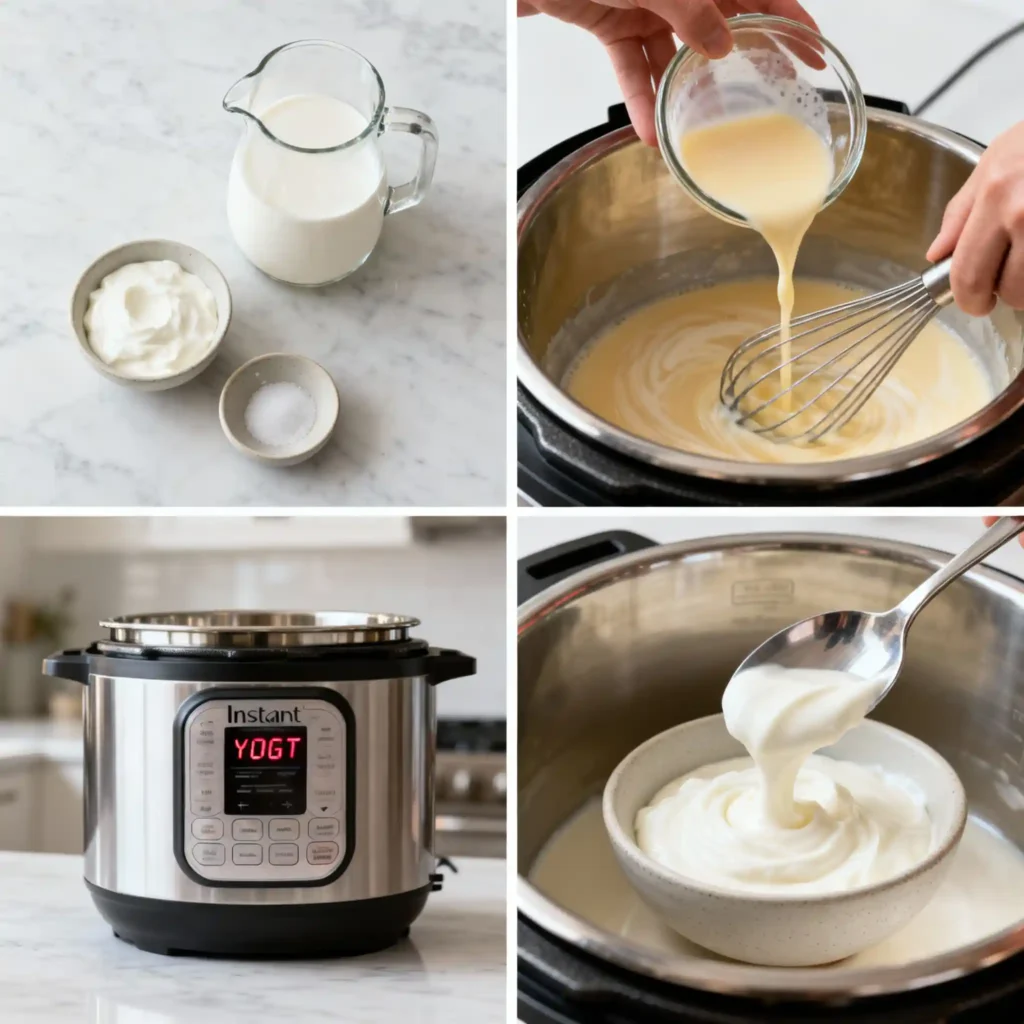
- 8 cups (2 liters) whole milk, for optimal creaminess (or 2% / skim milk for lighter options)
- 2 tablespoons plain yogurt with live active cultures, ensure it’s fresh and unflavored (this acts as your starter)
Instructions
Step 1:
Sanitize Your Instant Pot: Begin by ensuring your 6 or 8-quart Instant Pot’s stainless steel inner pot, lid, and sealing ring are scrupulously clean. Wash thoroughly with hot soapy water, rinse well, and dry with a clean cloth. This critical step eliminates any unwanted bacteria that could interfere with your yogurt culture.
Step 2:
Heat the Milk (Boil Function): Pour the 8 cups of milk into the sanitized Instant Pot inner pot. Secure the lid, leaving the pressure release valve in the ‘Venting’ position (or use a glass lid if preferred). Press the ‘Yogurt’ button, then toggle until ‘Boil’ appears on the display. Press ‘Start’. The Instant Pot will heat the milk to approximately 180-200°F (82-93°C) over 25-40 minutes, denaturing proteins and killing existing bacteria for a fresh start. Once finished, the Instant Pot will beep.
Step 3:
Cool the Milk to 110-115°F: This is a crucial temperature-sensitive step. Carefully remove the inner pot from the Instant Pot. Insert an instant-read thermometer into the milk. Allow the milk to cool naturally on the counter until it reaches 110-115°F (43-46°C). For a quicker cool, place the inner pot in an ice bath in your sink, stirring occasionally, until the target temperature is reached (about 10-15 minutes). Cooling to this precise range prevents killing your starter cultures (too hot) or failing to activate them (too cold).
Step 4:
Temper and Add the Yogurt Starter: Once the milk has cooled, dry the exterior of the inner pot if you used an ice bath. In a small bowl, ladle about 1 cup of the warm milk and whisk in the 2 tablespoons of live culture yogurt starter until completely smooth. This tempering step prevents shocking the delicate cultures. Gently pour this mixture back into the main pot of milk and whisk briefly to combine thoroughly. Avoid over-whisking.
Step 5:
Incubate for Creamy Perfection: Return the inner pot to the Instant Pot. Secure the lid again, ensuring the pressure release valve is set to ‘Venting’. Press the ‘Yogurt’ button once more, then adjust the time to your desired incubation period, typically 8 to 12 hours. Press ‘Start’. Less time yields milder yogurt, while longer incubation (up to 12 hours) produces a tangier, thicker yogurt with more active cultures. The Instant Pot will count up as it incubates, maintaining the ideal temperature for bacterial growth. Do not disturb the pot during this time.
Step 6:
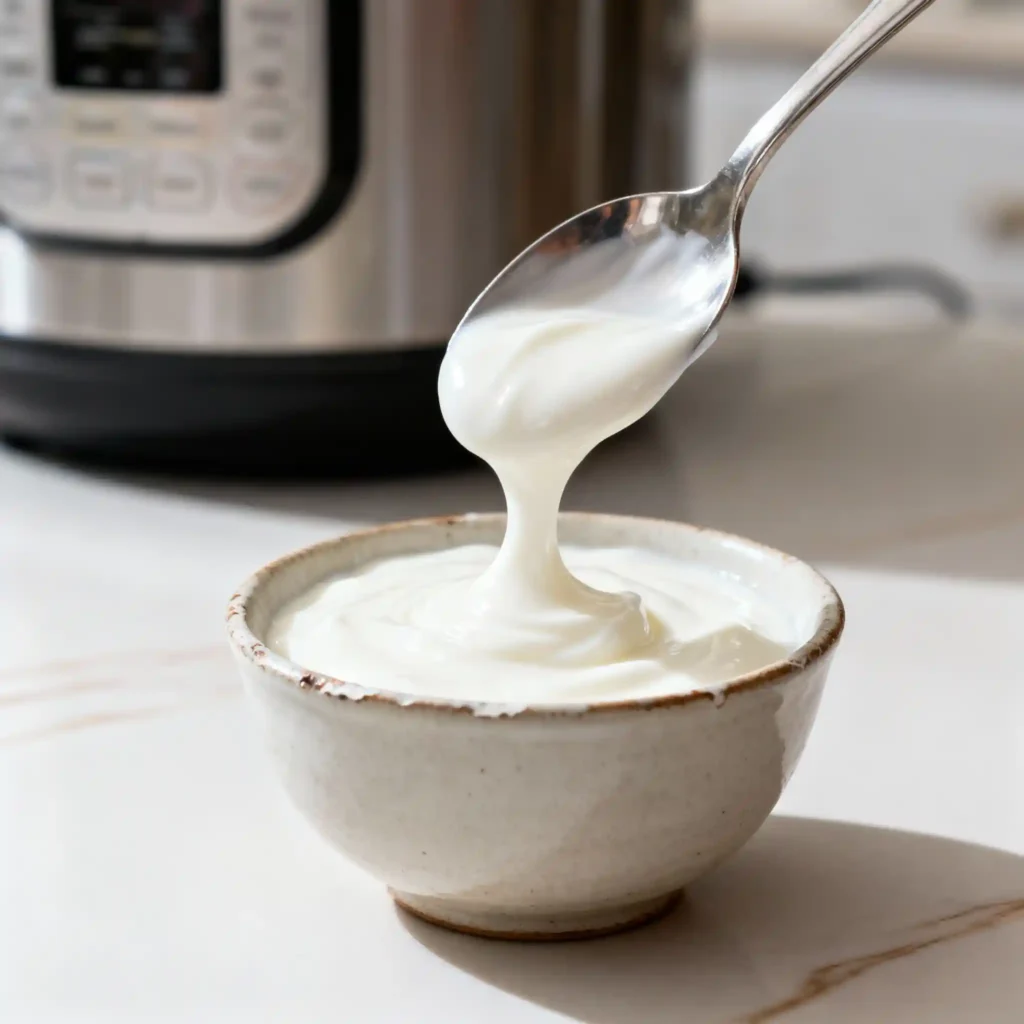
Chill to Set: Once the incubation cycle is complete, the yogurt will appear jiggly and set like a soft custard. Gently remove the inner pot, cover it loosely with plastic wrap or a lid, and refrigerate for at least 4 hours, or preferably overnight. Chilling allows the yogurt to firm up further and fully set its texture, preventing a runny consistency.
Step 7:
Optional: Strain for Greek Yogurt: For thicker, Greek-style yogurt, line a fine-mesh sieve with cheesecloth and place it over a large bowl. Pour the chilled yogurt into the lined sieve. Cover and refrigerate while it strains. Strain for 2-4 hours for standard Greek yogurt, or overnight for an even thicker, more labneh-like consistency. The liquid collected in the bowl is whey, which can be saved for smoothies or baking.
Serving and Storage Tips
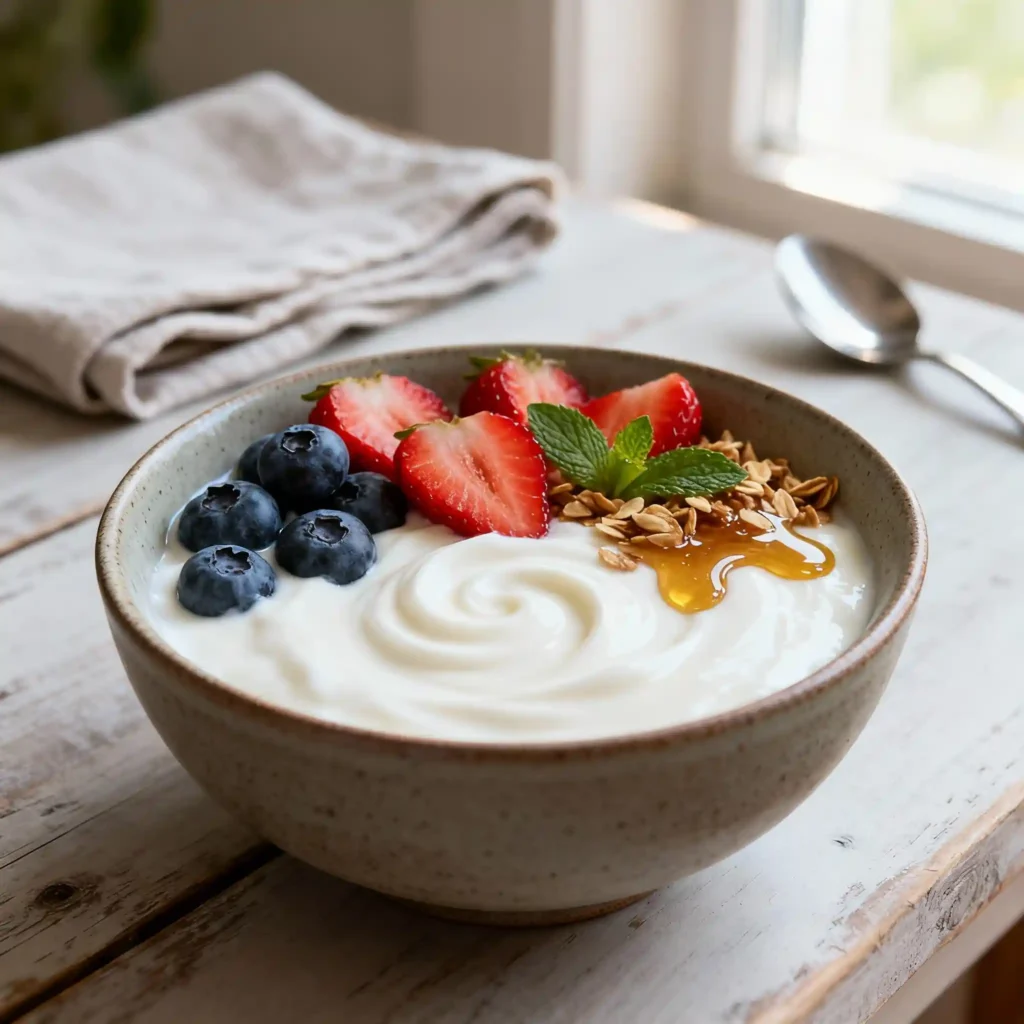
Serving your homemade Instant Pot yogurt is delightfully versatile! Enjoy it plain for a pure taste, or swirl in honey, fresh fruit, granola, or a sprinkle of cinnamon for a gourmet breakfast. It’s also excellent in smoothies, savory dips, or as a healthier substitute for sour cream in recipes. For storage, transfer your freshly made yogurt into clean, airtight containers. Store it in the refrigerator, where it will stay fresh and delicious for 7 to 10 days. Ensure you use a clean spoon each time to prevent contamination and prolong its shelf life. While yogurt can be frozen, its texture may become grainier upon thawing due to the separation of whey. If freezing, use it primarily for smoothies or as a starter for future batches rather than for eating plain. It can last up to a month in the freezer.
Helpful Notes
- Achieving Greek-Style Thickness: For luxuriously thick, Greek-style yogurt, line a fine-mesh sieve with cheesecloth and place it over a bowl. Pour your chilled yogurt into the lined sieve and let it drain in the refrigerator. Strain for 2-4 hours for thick yogurt, or overnight for a very dense, spreadable labneh.
- Flavorful Variations: Once your yogurt is chilled, you can easily add flavors! Stir in vanilla extract, honey, maple syrup, fruit purees, or a touch of zest. Remember to add these after the yogurt has set to prevent interfering with the culturing process.
- Utilizing Leftover Whey: Don’t discard the liquid whey! This nutrient-rich byproduct is excellent in smoothies, adding a protein boost. You can also use it in baking (like for bread or muffins), as a liquid base for fermenting vegetables, or to water your plants.
Conclusion
Mastering the Instant Pot yogurt recipe truly transforms your kitchen into a dairy-making haven. This incredibly simple method delivers consistently creamy, tangy, and probiotic-rich yogurt that far surpasses anything you’ll find in stores. From controlling your ingredients to enjoying the pure taste of homemade goodness, this recipe offers unparalleled satisfaction and health benefits for your entire family. Ready to make your own delicious, healthy, homemade yogurt? We hope you love this easy Instant Pot yogurt recipe as much as we do! Please leave a comment below to share your experience, give us a star rating, and don’t forget to share your creamy creations with friends and family on social media!

Instant Pot Yogurt Recipe
Ingredients
- 8 cups 2 liters whole milk, for optimal creaminess (or 2% / skim milk for lighter options)
- 2 tablespoons plain yogurt with live active cultures ensure it’s fresh and unflavored (this acts as your starter)
Instructions
Step 1:
- Sanitize Your Instant Pot: Begin by ensuring your 6 or 8-quart Instant Pot’s stainless steel inner pot, lid, and sealing ring are scrupulously clean. Wash thoroughly with hot soapy water, rinse well, and dry with a clean cloth. This critical step eliminates any unwanted bacteria that could interfere with your yogurt culture.
Step 2:
- Heat the Milk (Boil Function): Pour the 8 cups of milk into the sanitized Instant Pot inner pot. Secure the lid, leaving the pressure release valve in the ‘Venting’ position (or use a glass lid if preferred). Press the ‘Yogurt’ button, then toggle until ‘Boil’ appears on the display. Press ‘Start’. The Instant Pot will heat the milk to approximately 180-200°F (82-93°C) over 25-40 minutes, denaturing proteins and killing existing bacteria for a fresh start. Once finished, the Instant Pot will beep.
Step 3:
- Cool the Milk to 110-115°F: This is a crucial temperature-sensitive step. Carefully remove the inner pot from the Instant Pot. Insert an instant-read thermometer into the milk. Allow the milk to cool naturally on the counter until it reaches 110-115°F (43-46°C). For a quicker cool, place the inner pot in an ice bath in your sink, stirring occasionally, until the target temperature is reached (about 10-15 minutes). Cooling to this precise range prevents killing your starter cultures (too hot) or failing to activate them (too cold).
Step 4:
- Temper and Add the Yogurt Starter: Once the milk has cooled, dry the exterior of the inner pot if you used an ice bath. In a small bowl, ladle about 1 cup of the warm milk and whisk in the 2 tablespoons of live culture yogurt starter until completely smooth. This tempering step prevents shocking the delicate cultures. Gently pour this mixture back into the main pot of milk and whisk briefly to combine thoroughly. Avoid over-whisking.
Step 5:
- Incubate for Creamy Perfection: Return the inner pot to the Instant Pot. Secure the lid again, ensuring the pressure release valve is set to ‘Venting’. Press the ‘Yogurt’ button once more, then adjust the time to your desired incubation period, typically 8 to 12 hours. Press ‘Start’. Less time yields milder yogurt, while longer incubation (up to 12 hours) produces a tangier, thicker yogurt with more active cultures. The Instant Pot will count up as it incubates, maintaining the ideal temperature for bacterial growth. Do not disturb the pot during this time.
Step 6:
- Chill to Set: Once the incubation cycle is complete, the yogurt will appear jiggly and set like a soft custard. Gently remove the inner pot, cover it loosely with plastic wrap or a lid, and refrigerate for at least 4 hours, or preferably overnight. Chilling allows the yogurt to firm up further and fully set its texture, preventing a runny consistency.
Step 7:
- Optional: Strain for Greek Yogurt: For thicker, Greek-style yogurt, line a fine-mesh sieve with cheesecloth and place it over a large bowl. Pour the chilled yogurt into the lined sieve. Cover and refrigerate while it strains. Strain for 2-4 hours for standard Greek yogurt, or overnight for an even thicker, more labneh-like consistency. The liquid collected in the bowl is whey, which can be saved for smoothies or baking.
Notes
Nutritional Information (Estimated)
Note: These values are per serving and are approximate.| Nutrient | Amount |
|---|---|
| Calories | 120 kcal |
| Fat | 5g |
| Carbohydrates | 11g |
| Protein | 8g |
| Sugar | 12g |
| Sodium | 112mg |
Frequently Asked Questions (FAQ)
Why is my Instant Pot yogurt runny?
Runny yogurt can be due to a few factors. Ensure your milk was heated to the correct temperature (180-200°F) and cooled precisely (110-115°F) before adding the starter. Heating too high or adding starter to milk that’s too hot can kill the live active cultures. Also, insufficient incubation time (less than 8 hours) or using old/inactive starter can result in thinner yogurt.
Can I make Greek yogurt in my Instant Pot?
Absolutely! While the Instant Pot makes the base yogurt, achieving a thick Greek-style consistency requires an extra step: straining. After your yogurt is chilled, simply strain it through a cheesecloth-lined sieve in the refrigerator for several hours until it reaches your desired thickness. The longer you strain, the thicker it will become.
What if my Instant Pot doesn’t have a ‘Yogurt’ button?
No problem! You can still make delicious homemade yogurt. Use the ‘Sauté’ function to heat your milk to the required temperature (180-200°F), stirring frequently. After cooling, you can then use a different incubation method, such as placing the pot in an oven with just the light on, or using a warm cooler with hot water bottles, to maintain the ideal culturing temperature for 8-12 hours.
What can I do with the liquid whey leftover from straining?
Don’t throw it out! Liquid whey is packed with nutrients. It’s excellent for adding to smoothies for an extra protein boost, using in baking recipes (like bread or pancakes), or even as a starter for lacto-fermented vegetables. You can also use it to water your acid-loving plants.