Craving a snack that’s both bold and satisfying? These Salt and Vinegar Chips deliver just that—crispy, tangy, and packed with a flavor explosion you’ll love. Whether you’re enjoying them on a lazy afternoon or serving them at a party, these homemade chips are a perfect way to elevate your snack game. The combination of vinegar and seasoning creates a bold flavor that’s addictive, and the crunchy texture is sure to please any chip lover. Plus, making them from scratch means you can customize the seasoning to your taste, ensuring a snack that’s both delicious and satisfying. Ready to dive into this tasty, healthy chips recipe? Let’s get started!
1. Key Benefits

When you make your own Salt and Vinegar Chips, you’re not just creating a delicious snack; you’re also enjoying several key benefits that take your snack game to the next level. Here’s why these homemade chips are a winner:
- Customization at Your Fingertips: One of the best things about homemade chips is the ability to adjust the seasoning exactly to your liking. Want more tang? Add extra vinegar. Prefer a milder flavor? Use a little less. The choice is yours.
- Healthier Option: Store-bought chips can be loaded with preservatives and unhealthy oils. Making your own chips gives you full control over the ingredients, so you can use healthy oils like olive oil or coconut oil, making this a snack you can feel good about.
- No Artificial Additives: Say goodbye to the mystery ingredients found in pre-packaged chips. With just a few simple, whole-food ingredients, these chips are pure, clean, and delicious.
- Fresh and Crispy: There’s something unbeatable about crispy homemade chips. The fresh taste and perfect crunch will have you hooked after just one bite.
- Budget-Friendly: Making chips at home is surprisingly affordable. Instead of buying overpriced bags of chips, you can use simple potatoes to create a snack that’s both cost-effective and delicious.
These benefits make Salt and Vinegar Chips the perfect snack for any occasion—whether you’re watching a movie, hosting friends, or just need something to munch on between meals. Plus, they’re a fun and easy way to impress your guests with your culinary skills!
2. Ingredients
Making your own Salt and Vinegar Chips is simple and requires only a few key ingredients. Let’s break it down so you can get started on your crispy, tangy creation.

Essential Ingredients:
- 4 medium potatoes – Russet potatoes work best for a crispy texture, but feel free to experiment with other types if you prefer.
- 2 tbsp olive oil – For a light, healthier option, you can also use avocado oil or coconut oil. This helps crisp up the chips without adding unnecessary grease.
- 2 tbsp white vinegar – This is the secret ingredient that gives these chips their irresistible tangy flavor. You can swap it out for apple cider vinegar for a milder, slightly sweeter taste.
- 1 tsp salt – This enhances the flavor of the chips and balances the acidity from the vinegar.
- 1/2 tsp garlic powder – This is optional but adds a wonderful depth of flavor that complements the tanginess of the vinegar.
- 1/2 tsp paprika – Another optional ingredient that gives your chips a nice color and an extra kick.
Optional Seasonings:
- Black pepper – Freshly ground for a little spice.
- Dried herbs – Try adding thyme, rosemary, or parsley for a herby twist that pairs perfectly with the tangy vinegar.
These ingredients come together to create the perfect flavor explosion with just the right balance of salt, vinegar, and crunch. Now that you have everything you need, it’s time to move on to the next step: cooking your crispy, homemade chips!
3. Instructions
Ready to dive in and make your own Salt and Vinegar Chips? Follow these easy steps, and you’ll be snacking on crispy, flavorful chips in no time. Let’s get started!
Step 1: Prepare the Potatoes
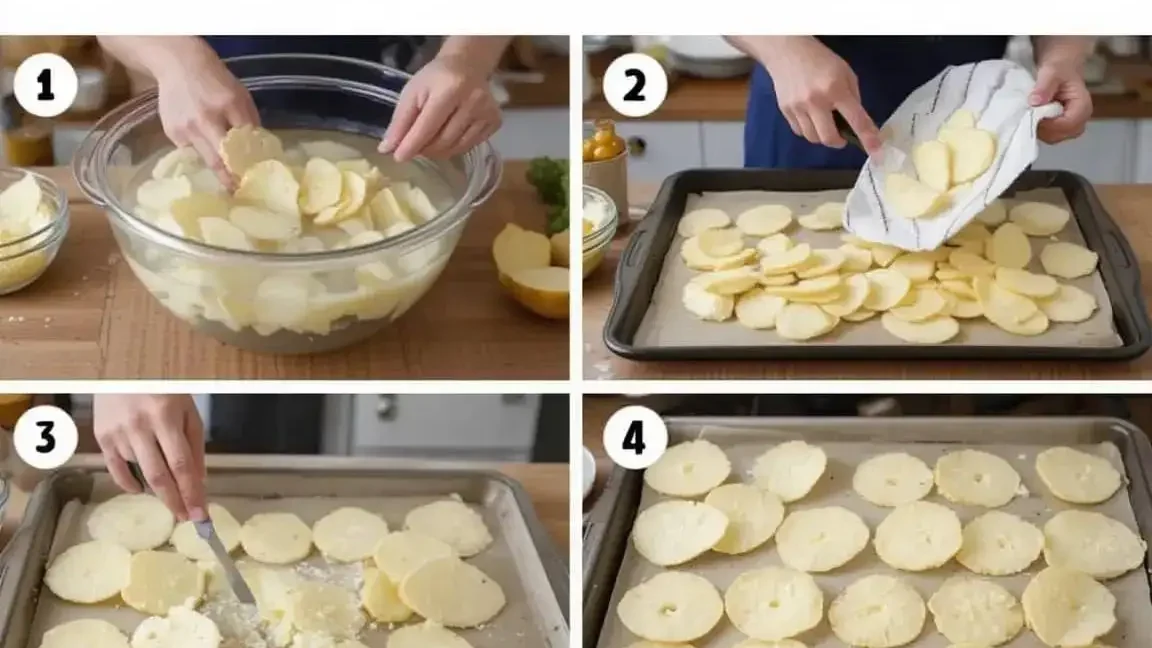
- Start by washing and scrubbing your potatoes thoroughly to remove any dirt. Since you’ll be keeping the skins on, you want them nice and clean.
- Slice the potatoes into thin, even rounds. Aim for about 1/8 inch thick – this will help your chips crisp up perfectly. If you have a mandoline slicer, this is the time to use it for consistent slices!
- Place the potato slices into a bowl of cold water to soak for at least 30 minutes. This helps remove excess starch, which ensures the chips are crispy rather than soggy.
Step 2: Season the Potatoes
- After soaking, drain the potato slices and pat them dry with a clean towel or paper towels. The drier the slices, the crispier your chips will be!
- Transfer the slices to a large bowl, then drizzle with olive oil. Toss them gently to coat each slice evenly.
- Add the vinegar, salt, and any additional seasonings like garlic powder and paprika. Toss again to ensure all the slices are evenly coated with the tangy, flavorful mixture.
Step 3: Bake or Fry the Chips
- For baking: Preheat your oven to 400°F (200°C). Line a baking sheet with parchment paper or a silicone mat for easy cleanup. Spread the potato slices out in a single layer on the baking sheet. Make sure they’re not overlapping – this ensures they cook evenly.
- Bake for 25-30 minutes, flipping the chips halfway through to ensure both sides get golden and crispy. Keep an eye on them toward the end, as they can brown quickly. Remove them from the oven once they’re golden brown and crispy.
- For frying: Heat about 1-2 inches of oil in a deep pan over medium-high heat (around 350°F/175°C). Working in small batches, fry the potato slices for about 3-4 minutes or until golden and crispy. Remove with a slotted spoon and place them on paper towels to drain the excess oil.
Step 4: Final Touches
- Once your chips are cooked, sprinkle them with a little extra salt while they’re still hot for the perfect finishing touch.
- Let them cool slightly before serving. This allows them to crisp up even more!
Now, you’ve got a batch of homemade Salt and Vinegar Chips that are crunchy, tangy, and downright addictive. Whether you bake or fry them, you’re in for a treat that’s perfect for snacking or sharing with friends. Enjoy!
4. Pro Tips and Variations
Want to make your Salt and Vinegar Chips even better? Here are some pro tips and fun variations to customize the recipe and take your chips to the next level. Let’s dive in!

Pro Tips for Perfect Chips:
- Slice Evenly: Consistent slices are key to achieving that perfect crispiness. A mandoline slicer ensures every slice is the same thickness, but if you’re using a knife, try to keep them as uniform as possible.
- Soak for Extra Crunch: Don’t skip the soaking step! Soaking the potato slices in cold water helps remove excess starch, which results in crunchier chips. The longer you soak, the crisper they’ll get, so aim for at least 30 minutes.
- Dry Well: After soaking, pat the potatoes completely dry before cooking. Any extra moisture will make the chips soggy, so be sure to dry them thoroughly.
- Don’t Overcrowd the Pan: Whether you’re baking or frying, avoid overcrowding the chips. If they’re stacked on top of each other, they won’t crisp up properly. Work in batches to ensure each chip gets plenty of space.
- Season After Cooking: For the most intense flavor, season the chips immediately after they come out of the oven or fryer. The hot chips will absorb the salt and vinegar better, making every bite burst with flavor.
Fun Variations:
- Cheese Lovers’ Delight: Sprinkle some finely grated parmesan or cheddar over the hot chips after they come out of the oven for a cheesy twist. The salt and vinegar will complement the cheese beautifully.
- Spicy Kick: If you love a little heat, add cayenne pepper or chili flakes to the seasoning mix for an extra kick. You can also dip the chips in a spicy mayo or sriracha for even more heat.
- Herb Infusion: Mix in fresh herbs like thyme, rosemary, or parsley for a fragrant, earthy addition that pairs wonderfully with the tangy vinegar.
- Sweet and Tangy: Try adding a bit of brown sugar to the vinegar and salt mixture to create a sweet-and-salty version of these chips. It’s a fun way to experiment with flavors!
- Vegan Version: For a completely plant-based snack, use coconut oil or avocado oil instead of butter, and make sure the seasoning is free from dairy products. These chips will still be just as crispy and delicious!
These tips and variations make it easy to personalize your Salt and Vinegar Chips to suit your tastes. Whether you stick to the classic recipe or get creative with flavor twists, you’ll always end up with a snack that’s sure to impress!
5. Serving Suggestions

Now that your Salt and Vinegar Chips are perfectly crispy and full of flavor, it’s time to enjoy them! Here are some serving suggestions to help you elevate your snack game and make the most of these homemade chips.
Simple and Classic
- On their own: Sometimes, the best way to enjoy your chips is just as they are. The bold, tangy flavor of the vinegar paired with the crispy texture is enough to satisfy any craving. Serve them in a bowl or plate, and dig in!
- With a refreshing dip: Pair your salt and vinegar chips with a creamy dip like guacamole, sour cream, or a tangy yogurt dip. The creaminess of the dip balances out the sharpness of the vinegar, creating a delightful contrast.
Party-Ready
- For appetizers: Serve these chips as part of a larger appetizer spread. They pair wonderfully with other finger foods like mini sliders, vegetable crudités, and cheese platters.
- With sandwiches: These chips are the perfect side dish to serve with any sandwich. Whether it’s a classic turkey and cheese or a hearty veggie sandwich, the crispy chips will add that extra crunch to each bite.
Creative Combinations
- Loaded chips: Want to turn your salt and vinegar chips into a full meal? Try loading them with toppings! Add shredded cheese, chopped onions, and a drizzle of sour cream for a fun, nacho-inspired twist.
- Salad topping: Crush the chips and sprinkle them over a salad for some extra crunch and flavor. They’re a great alternative to croutons, adding a delicious tangy kick to your greens.
For Sweet Tooths
- Sweet pairing: If you’re in the mood for something sweet and salty, serve your chips with a side of fresh fruit or a light dessert. The sweetness of the fruit complements the salty, tangy chips beautifully.
These Salt and Vinegar Chips are incredibly versatile and can be enjoyed in a variety of ways, whether you’re keeping it simple or creating a more elaborate dish. With these suggestions, you can take your homemade chips to the next level and make them the star of any meal or snack time. Enjoy!
6. Conclusion

There’s nothing quite like the satisfaction of making your own Salt and Vinegar Chips. Whether you’re craving a crunchy snack or looking for a crowd-pleasing appetizer, this recipe delivers bold flavor, crispy texture, and a tangy kick that’s sure to hit the spot. The best part? You have full control over the ingredients, so you can make them as healthy, crispy, or flavorful as you like. Plus, making chips from scratch is easier than you might think!
From baking to frying, the method is simple and flexible, allowing you to choose the cooking style that works best for you. And with endless ways to customize the seasoning—whether you’re adding herbs, a spicy kick, or a cheesy twist—you’ll never get bored with this recipe.
Looking for more delicious potatoes Chips recipes ? Check out our amazing Spicy Chips recipe.
So, the next time you’re in the mood for a snack that’s both satisfying and flavorful, skip the store-bought bags and make your own homemade Salt and Vinegar Chips. Trust me, you’ll love the results. Happy snacking!
7. FAQs
Got questions about making Salt and Vinegar Chips? You’re not alone! Here are some of the most common queries to help you get the perfect batch every time.
1. Can I use any type of potato for this recipe?
Yes! While Russet potatoes are the most commonly used for their high starch content and ability to crisp up nicely, you can experiment with other types like Yukon Gold or even sweet potatoes for a unique twist. Just keep in mind that different varieties may vary in texture, so adjust the cooking time as needed.
2. How can I make these chips extra crispy?
For ultra-crispy chips, follow these tips:
Soak the potatoes: Soaking the slices in cold water for at least 30 minutes removes excess starch, which helps the chips crisp up better.
Pat the slices dry: After soaking, make sure to dry the potato slices completely with a towel. This is a crucial step to prevent sogginess.
Cook in batches: If you’re frying, avoid overcrowding the pan. This ensures each chip has enough space to crisp up properly. If you’re baking, spread the slices out in a single layer.
3. Can I make these chips ahead of time?
Yes, you can make the chips in advance! If you’re planning to serve them later, store your chips in an airtight container once they’ve cooled. For the crispiest results, it’s best to eat them within a day or two. If they lose their crunch, simply reheat them in the oven for a few minutes to bring back that crispy texture.
4. What can I use if I don’t have white vinegar?
If you’re out of white vinegar, no worries! You can swap it for apple cider vinegar, which has a milder flavor but still adds that tangy punch. Rice vinegar also works well, offering a subtle sweetness along with the acidity.
5. Can I make these chips in an air fryer?
Absolutely! Air frying is a great method for making crispy chips with less oil. Preheat the air fryer to 375°F (190°C), then place the potato slices in a single layer in the basket. Cook for about 12-15 minutes, shaking the basket halfway through. Keep an eye on them to avoid burning.
6. How do I make these chips spicy?
If you love a little heat, add cayenne pepper or chili powder to your seasoning mix before baking or frying. You can also dip the chips in a spicy sauce like sriracha mayo or hot sauce to turn up the heat even more.
7. Why are my chips not crispy?
There are a few reasons why your chips might not be as crispy as you’d like:
Moisture: Make sure you soak the potatoes, pat them dry, and cook them at the right temperature. Too much moisture will result in soggy chips.
Thickness: If the slices are too thick, they may take longer to cook and won’t get as crispy. Aim for 1/8-inch thickness for the best crunch.
Making Salt and Vinegar Chips is a fun and rewarding process. With these tips and answers to your questions, you’re now ready to create the perfect batch every time. Enjoy your crispy, tangy, homemade snack!
____________________

salt and vinegar chips
Ingredients
Essential Ingredients:
- 4 medium potatoes – Russet potatoes work best for a crispy texture but feel free to experiment with other types if you prefer.
- 2 tbsp olive oil – For a light healthier option, you can also use avocado oil or coconut oil. This helps crisp up the chips without adding unnecessary grease.
- 2 tbsp white vinegar – This is the secret ingredient that gives these chips their irresistible tangy flavor. You can swap it out for apple cider vinegar for a milder slightly sweeter taste.
- 1 tsp salt – This enhances the flavor of the chips and balances the acidity from the vinegar.
- 1/2 tsp garlic powder – This is optional but adds a wonderful depth of flavor that complements the tanginess of the vinegar.
- 1/2 tsp paprika – Another optional ingredient that gives your chips a nice color and an extra kick.
Optional Seasonings:
- Black pepper – Freshly ground for a little spice.
- Dried herbs – Try adding thyme rosemary, or parsley for a herby twist that pairs perfectly with the tangy vinegar.
Instructions
Step 1: Prepare the Potatoes
- Start by washing and scrubbing your potatoes thoroughly to remove any dirt. Since you’ll be keeping the skins on, you want them nice and clean.
- Slice the potatoes into thin, even rounds. Aim for about 1/8 inch thick – this will help your chips crisp up perfectly. If you have a mandoline slicer, this is the time to use it for consistent slices!
- Place the potato slices into a bowl of cold water to soak for at least 30 minutes. This helps remove excess starch, which ensures the chips are crispy rather than soggy.
Step 2: Season the Potatoes
- After soaking, drain the potato slices and pat them dry with a clean towel or paper towels. The drier the slices, the crispier your chips will be!
- Transfer the slices to a large bowl, then drizzle with olive oil. Toss them gently to coat each slice evenly.
- Add the vinegar, salt, and any additional seasonings like garlic powder and paprika. Toss again to ensure all the slices are evenly coated with the tangy, flavorful mixture.
Step 3: Bake or Fry the Chips
- For baking: Preheat your oven to 400°F (200°C). Line a baking sheet with parchment paper or a silicone mat for easy cleanup. Spread the potato slices out in a single layer on the baking sheet. Make sure they’re not overlapping – this ensures they cook evenly.
- Bake for 25-30 minutes, flipping the chips halfway through to ensure both sides get golden and crispy. Keep an eye on them toward the end, as they can brown quickly. Remove them from the oven once they’re golden brown and crispy.
- For frying: Heat about 1-2 inches of oil in a deep pan over medium-high heat (around 350°F/175°C). Working in small batches, fry the potato slices for about 3-4 minutes or until golden and crispy. Remove with a slotted spoon and place them on paper towels to drain the excess oil.
Step 4: Final Touches
- Once your chips are cooked, sprinkle them with a little extra salt while they’re still hot for the perfect finishing touch.
- Let them cool slightly before serving. This allows them to crisp up even more!
Notes
Nutrition Information (per serving):
- Calories: 175 kcal
- Fat: 8g
- Saturated Fat: 1g
- Trans Fat: 0g
- Carbohydrates: 22g
- Fiber: 2g
- Sugars: 1g
- Protein: 3g
- Sodium: 300mg
- Cholesterol: 0mg
- Potassium: 700mg


