


Have you ever craved sushi but didn’t want to spend hours rolling each piece? This sushi bake recipe is the ultimate game-changer—combining the bold, umami-rich flavors of your favorite rolls with the ease of a baked sushi casserole.
Imagine layers of perfectly seasoned sushi rice, creamy Kani (imitation crab) and seafood filling, and a golden, bubbly topping drizzled with spicy mayo and unagi sauce. It’s rich, savory, and incredibly satisfying—perfect for family dinners, potlucks, or casual get-togethers.
The best part? No rolling, no stress, just pure sushi goodness in every bite. Serve it with crispy nori sheets for a fun, scoopable experience, or customize it with your favorite seafood. Whether you’re a sushi lover or trying it for the first time, this homemade sushi bake will have everyone coming back for more!
Table of Contents
Key Benefits of Sushi Bake
If you love sushi but don’t have the time (or patience) to roll each piece, sushi bake is the perfect solution. It takes all the best elements of sushi—fluffy sushi rice, creamy seafood filling, savory seasonings, and crispy nori sheets—and layers them into a warm, baked dish that’s easy to assemble and even easier to share.

Why You’ll Love This Recipe
Effortless & Beginner-Friendly – No rolling, no special sushi tools, and no prior sushi-making experience needed! Just layer, bake, and enjoy.
Packed with Umami Flavor – A combination of Kani (imitation crab), spicy mayo, furikake, and unagi sauce creates an irresistible mix of savory, creamy, and slightly sweet flavors.
Customizable & Versatile – Swap out the seafood, adjust the spice level, or make it extra cheesy for a unique twist. This recipe works with shrimp, salmon, real crab, or even a vegetarian alternative like tofu.
Perfect for Any Occasion – Whether it’s a casual family dinner, potluck, or party, sushi bake is always a crowd-pleaser. It’s easy to prepare in advance and can be served straight from the oven.
Fun to Eat – Scoop up your sushi bake with crispy nori sheets for a handheld sushi experience or enjoy it with chopsticks for a deconstructed sushi bowl.
What Makes This Sushi Bake Special?
Unlike traditional sushi, this baked sushi casserole is warm and comforting, making it an excellent option for those who love the flavors of sushi but prefer a heartier, melt-in-your-mouth texture. The golden, bubbly topping adds the perfect contrast to the seasoned rice, while the drizzle of spicy mayo and unagi sauce ties everything together with a rich, creamy finish.
If you’re looking for an easy, satisfying way to enjoy sushi at home, this homemade sushi bake will absolutely blow your mind! Now, let’s dive into what you’ll need to bring this dish to life.
Ingredients for the Ultimate Sushi Bake
Before we dive into assembling this irresistible sushi bake, let’s make sure you have everything you need. This recipe keeps things simple yet flavorful, using easy-to-find ingredients that bring out the signature umami-rich taste of sushi.
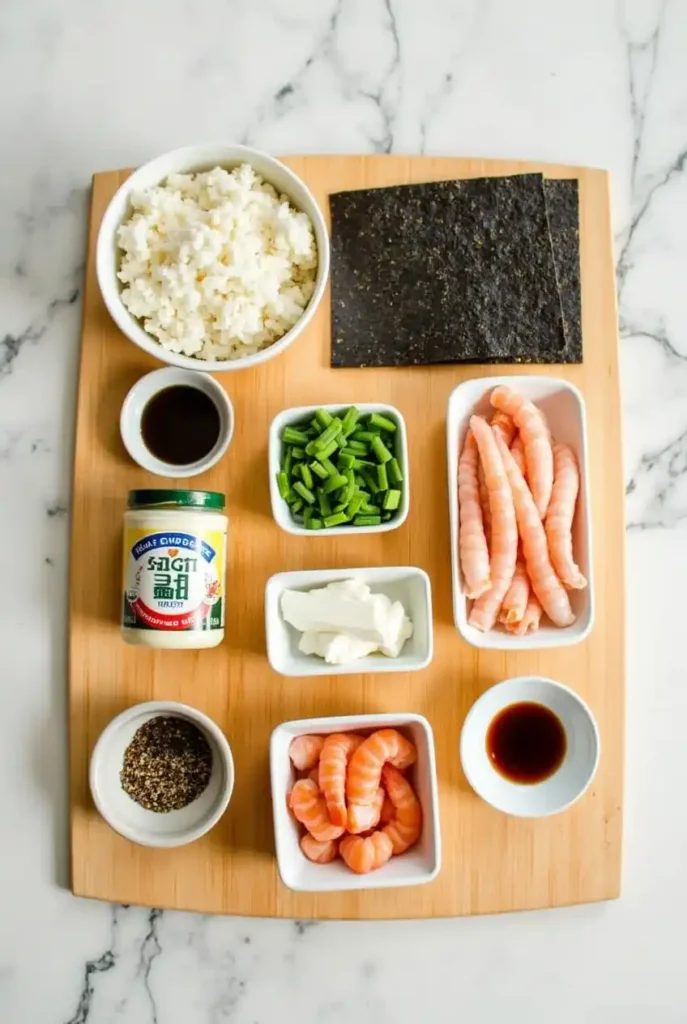
For the Sushi Rice Base:
The foundation of any great sushi dish is the perfectly seasoned rice. Here’s what you’ll need:
- 2 cups sushi rice – Short-grain Japanese rice gives the best texture. Avoid long-grain rice, as it won’t stick properly.
- 2 ½ cups water – For cooking the rice to the perfect fluffy consistency.
- ¼ cup rice vinegar – Adds that signature tang and balances the flavors.
- 1 tablespoon sugar – Slightly sweetens the rice for a more authentic taste.
- ½ teaspoon salt – Enhances the flavor of the rice.
Pro Tip: Rinse your sushi rice 2–3 times until the water runs clear. This removes excess starch and helps achieve a light yet sticky texture.
For the Creamy Seafood Layer:
This flavor-packed topping is the heart of the sushi bake, combining creamy, savory, and slightly spicy elements.
- 8 oz imitation crab (Kani), shredded – A classic sushi bake ingredient with a mild, sweet flavor.
- 8 oz cooked shrimp or salmon, flaked – Adds more seafood depth. You can also use real crab meat!
- ½ cup Japanese mayo (Kewpie) – Rich and slightly sweet, giving the mixture its creamy texture. Regular mayo works, but Kewpie makes a difference!
- 1 tablespoon sriracha – For a mild heat kick. Adjust based on your spice preference.
- 1 teaspoon soy sauce – Adds a savory umami boost.
- 4 oz cream cheese, softened – For extra creaminess and a luscious texture.
Customization Tip: Not a seafood fan? Swap in shredded chicken, tofu, or even mushrooms for a unique take on sushi bake!
For the Toppings:
These final touches add crunch, flavor, and that signature sushi experience.
- 2 tablespoons furikake seasoning – A blend of sesame seeds, seaweed, and dried fish flakes for an authentic umami finish.
- 2 tablespoons unagi sauce (eel sauce) – Sweet and savory, this thick glaze adds a restaurant-style touch.
- 2 tablespoons spicy mayo (mayo + sriracha mix) – A creamy drizzle that ties everything together.
- 1 teaspoon sesame seeds – For extra nuttiness and texture.
- Chopped green onions – A fresh, flavorful garnish.
For Serving:
- Nori sheets (seaweed snacks) – Cut into squares for scooping up the sushi bake.
- Pickled ginger & wasabi (optional) – Classic sushi condiments for an authentic touch.
- Extra soy sauce – For dipping, if desired.
Why These Ingredients Work Together
The sushi rice provides a slightly tangy, sticky base that holds everything together. The seafood mixture is ultra-creamy with just the right amount of spice, and the furikake, sesame seeds, and sauces add layers of umami, crunch, and sweetness.
When served with crispy nori sheets, each bite mimics the flavors of sushi—without the hassle of rolling!
Now that we have everything ready, let’s move on to assembling and baking this deliciously addictive sushi bake!
Step-by-Step Instructions for the Perfect Sushi Bake
Now that you have all your fresh ingredients ready, it’s time to bring this sushi bake masterpiece to life! Follow these simple steps, and in no time, you’ll have a warm, creamy, and utterly addictive dish ready to enjoy.
Step 1: Prepare the Sushi Rice
A great sushi bake starts with perfectly seasoned sushi rice. Here’s how to get it just right:
- Rinse the rice – Place the sushi rice in a bowl and rinse it under cold water 2–3 times until the water runs clear. This removes excess starch and ensures a fluffy, non-gummy texture.
- Cook the rice – Use a rice cooker for the easiest, foolproof method, or cook it on the stovetop with 2 ½ cups of water. Once done, let it rest, covered, for about 10 minutes.
- Season the rice – In a small bowl, mix ¼ cup rice vinegar, 1 tablespoon sugar, and ½ teaspoon salt until dissolved. Gently fold this mixture into the cooked rice using a rice paddle or wooden spoon. Be careful not to mash the rice!
- Let it cool – Spread the seasoned rice onto a plate or baking dish and let it cool slightly while you prepare the filling.
Pro Tip: Use a fan or gently stir the rice while cooling to give it that signature glossy sushi texture.
Step 2: Make the Creamy Seafood Mixture
This layer is where all the rich, umami flavors come together!
- Shred the crab – Use your hands or a fork to pull apart 8 oz of imitation crab (Kani) into thin strands. If using shrimp or salmon, chop or flake it into small pieces.
- Mix the filling – In a bowl, combine the shredded crab, cooked seafood, ½ cup Kewpie mayo, 1 tablespoon sriracha, 1 teaspoon soy sauce, and 4 oz softened cream cheese. Stir until everything is well incorporated.
- Taste & adjust – Want it spicier? Add more sriracha. Need more umami? A splash of soy sauce can do wonders!
Customization Tip: If you love extra texture, mix in some diced cucumbers, avocado, or tobiko (fish roe) for a little pop of flavor!
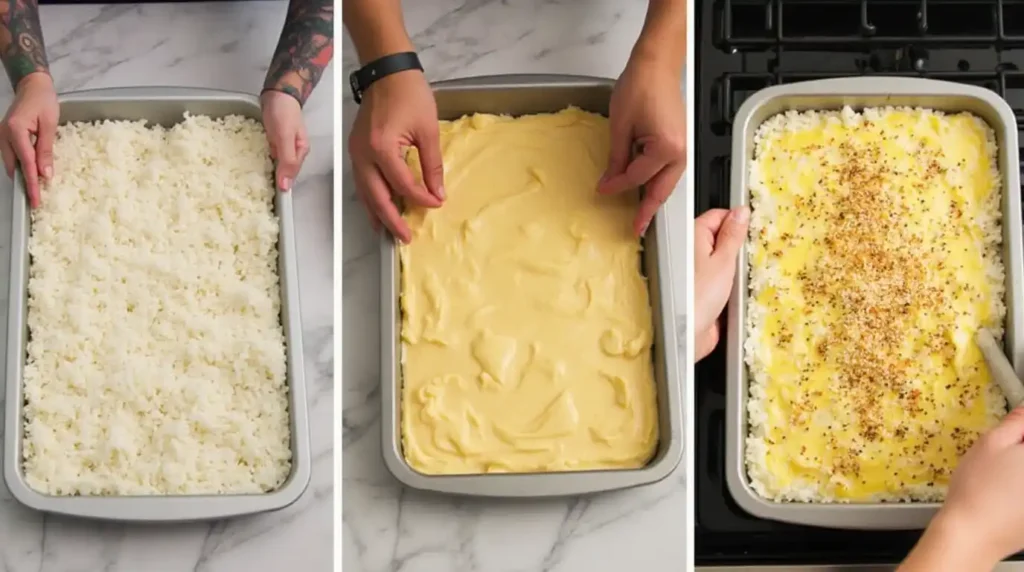
Step 3: Assemble the Sushi Bake
Now, let’s layer everything into a delicious baked sushi casserole!
- Preheat your oven to 375°F (190°C) to get it ready for baking.
- Layer the rice – Spread the seasoned sushi rice evenly into a lightly greased 9×9-inch baking dish (or similar size). Press it down gently to create a firm base.
- Add the seafood mixture – Spread the creamy seafood filling over the rice in an even layer. Smooth it out using a spatula for uniform baking.
- Sprinkle with furikake – Generously top the seafood layer with 2 tablespoons of furikake seasoning for that classic sushi flavor.
Texture Tip: Want a cheesy sushi bake? Add a layer of shredded mozzarella or cheddar before baking for a golden, bubbly crust!
Step 4: Bake to Perfection
- Bake uncovered at 375°F (190°C) for 15–20 minutes or until the top is slightly golden and the edges are bubbling.
- Broil for extra crispiness – If you love a bit of char, switch to broil mode for the last 2–3 minutes until lightly browned. Watch closely to prevent burning!
- Cool slightly – Let the sushi bake rest for 5 minutes before adding the finishing touches.
Step 5: Add the Final Toppings & Serve
The magic is in the toppings—this is where your sushi bake really comes to life!
- Drizzle with sauces – Use a spoon or squeeze bottle to drizzle spicy mayo and unagi sauce over the top for extra creaminess and a sweet-savory finish.
- Garnish for extra flavor – Sprinkle with sesame seeds and chopped green onions for a burst of freshness.
- Serve with nori sheets – Cut nori sheets into squares and use them to scoop up each delicious bite.
Pro Serving Tip: Serve with pickled ginger, soy sauce, and wasabi on the side for the full sushi experience!
And That’s It!
With every scoop of this warm, creamy, umami-packed sushi bake, you’ll experience all the flavors of sushi—without the hassle of rolling! Now that you’ve mastered the basics, get creative and make it your own. Next up, let’s dive into some pro tips and fun variations to customize your sushi bake even further.
Pro Tips and Variations for the Best Sushi Bake
Now that you’ve mastered the basics of making sushi bake, let’s take it to the next level! Whether you want to enhance the flavors, adjust the texture, or create unique variations, these expert tips will help you customize your dish to suit your taste.

Pro Tips for Perfect Sushi Bake
Use the Right Rice for the Best Texture
- Short-grain sushi rice is ideal because it’s naturally sticky, which helps the layers hold together.
- Rinse the rice thoroughly before cooking to remove excess starch and achieve a light, fluffy texture.
Balance the Creaminess
- If you prefer a lighter, less creamy seafood layer, reduce the cream cheese slightly or swap it for Greek yogurt.
- Love it extra creamy? Increase the Kewpie mayo for a richer, more indulgent texture.
Layer with Intent for Even Baking
- Press the rice layer down gently but don’t compact it too much, or it may turn dense instead of fluffy.
- Spread the seafood mixture evenly to ensure that every bite is packed with flavor.
Enhance the Flavor with Furikake
- Furikake seasoning is a game-changer! It adds an authentic umami boost with seaweed, sesame seeds, and dried fish flakes.
- If you don’t have furikake, try substituting it with a mix of crushed nori, toasted sesame seeds, and a pinch of salt.
Get That Perfect Golden Top
- To achieve a slightly crispy, golden-brown topping, broil the sushi bake for the last 2–3 minutes.
- Keep an eye on it—broiling works fast, and you don’t want to burn the top!
Let It Rest Before Serving
- After baking, allow your sushi bake to rest for 5 minutes before serving. This helps the layers set properly and makes it easier to scoop.
Serve It the Right Way
- Sushi bake is best enjoyed with nori sheets—simply scoop, wrap, and eat like a mini sushi taco!
- Serve with traditional pickled ginger, soy sauce, and wasabi to complete the sushi experience.
Fun Variations to Try
Vegetarian Sushi Bake
- Swap the seafood for diced tofu, sautéed mushrooms, or marinated jackfruit.
- Add thinly sliced avocado for a creamy, buttery texture.
- Use a blend of vegan mayo and plant-based cream cheese for the same rich, tangy flavor.
Spicy Volcano Sushi Bake
- Amp up the heat by adding extra sriracha or chopped jalapeños to the seafood mix.
- Drizzle with dynamite sauce (a mix of Kewpie mayo, sriracha, and a dash of lemon juice).
- Garnish with crushed spicy tempura flakes for an added crunch.
Cheesy Sushi Bake
- Love cheese? Sprinkle a generous layer of shredded mozzarella or cheddar on top before baking.
- Broil for an extra melty, bubbly, golden-brown finish.
Poke-Inspired Sushi Bake
- Instead of baking, try a cold sushi bake version by using fresh, diced raw tuna or salmon.
- Mix the seafood with soy sauce, sesame oil, and green onions for a poke-style twist.
- Serve chilled over sushi rice and garnish with tobiko (fish roe) and crispy shallots.
California Roll Sushi Bake
- Turn your sushi bake into a deconstructed California roll by adding diced avocado and cucumber to the seafood mix.
- Use real crab meat for a more premium taste!
Smoked Salmon Sushi Bake
- For a smoky, gourmet touch, replace the imitation crab with smoked salmon.
- Add a squeeze of lemon juice and capers for a fresh, tangy contrast.
Shrimp Tempura Sushi Bake
- Layer crispy, pre-cooked shrimp tempura on top of the seafood mixture before baking.
- Drizzle with eel sauce and spicy mayo for that sweet-savory crunch!
Make It Your Own!
Sushi bake is one of those fun, flexible dishes that you can customize to your heart’s content. Whether you go spicy, cheesy, or classic, these variations will help you create the perfect sushi bake that fits your cravings.
Next up—let’s talk about how to serve this dish for the ultimate sushi experience!
Serving Suggestions for the Ultimate Sushi Bake
Now that your sushi bake is golden, creamy, and packed with umami goodness, it’s time to serve it up in the most delicious way possible! Whether you’re enjoying it as a quick weeknight dinner, sharing it at a potluck, or serving it at a gathering, these serving tips will help you maximize flavor, texture, and presentation.

How to Serve Sushi Bake
Scoop, Wrap, and Enjoy!
- The most popular way to eat sushi bake is by scooping it onto nori sheets (dried seaweed) and eating it taco-style.
- Use a spoon to portion out a bite-sized amount of the sushi bake, place it on a square-cut nori sheet, and fold it up like a mini sushi wrap.
Pro Tip: Use crispy roasted nori instead of soft nori sheets for extra crunch!
Enjoy It as a Sushi Bowl
- Want a deconstructed sushi experience? Serve the sushi bake in a bowl over extra sushi rice.
- Garnish with avocado slices, cucumber, and a sprinkle of sesame seeds for added texture and freshness.
- Drizzle with extra unagi sauce or soy sauce for a flavor boost.
Make It a Complete Meal
Pairing your homemade sushi bake with the right side dishes can elevate the entire experience! Here are some great options:
Perfect Side Dishes for Sushi Bake
Miso Soup – A warm, comforting bowl of miso soup complements the creamy, savory flavors of sushi bake.
Japanese Seaweed Salad – A light, refreshing seaweed salad with sesame dressing adds a nice contrast to the rich sushi bake.
Cucumber Sunomono Salad – This tangy, vinegary Japanese cucumber salad cleanses the palate and balances the richness of the dish.
Tempura Vegetables or Shrimp – Add a crispy element to your meal with lightly battered, deep-fried tempura.
Green Tea or Sake – A warm cup of matcha green tea or a small glass of sake pairs beautifully with the umami notes in sushi bake.
Creative Toppings & Extra Garnishes
Want to take your sushi bake to the next level? Try these toppings for extra flavor and texture:
Extra Spicy Kick: Drizzle with more sriracha, wasabi mayo, or chili oil for heat lovers.
Bright & Fresh: Add a squeeze of fresh lemon juice to enhance the flavors.
Crispy Texture: Top with crispy fried onions, tempura flakes, or tobiko (fish roe) for an added crunch.
Creamy Twist: Serve with fresh avocado slices or a dollop of guacamole.
How to Store & Reheat Sushi Bake
Got leftovers? No problem! Sushi bake stores well and tastes just as good the next day.
Storage Tips:
- Refrigerate: Store leftovers in an airtight container in the fridge for up to 3 days.
- Freeze (Optional): While sushi bake is best enjoyed fresh, you can freeze it for up to 1 month in a sealed container. Just note that the texture may change slightly after thawing.
Reheating Tips:
- Oven: Preheat to 350°F (175°C) and bake for 10–15 minutes until warmed through.
- Air Fryer: Heat at 350°F for 5–7 minutes for a crispy top.
- Microwave: Use short 30-second bursts to avoid drying it out.
Pro Tip: If reheating in the microwave, add a small cup of water inside the microwave to keep the rice from drying out!
Final Thoughts on Serving Sushi Bake
No matter how you serve it—wrapped in crispy nori, in a sushi bowl, or paired with delicious sides—this easy and flavorful sushi bake is guaranteed to be a hit. With so many ways to customize, serve, and enjoy it, there’s no wrong way to dig in!
Now that you know how to serve it like a pro, let’s wrap things up with some final thoughts and frequently asked questions to ensure your sushi bake turns out perfect every time!
Conclusion: Why This Sushi Bake Recipe Will Be Your New Favorite
Congratulations—you’ve just mastered the ultimate sushi bake recipe! Whether you’re a seasoned sushi lover or new to the world of Japanese-inspired dishes, this warm, creamy, and flavor-packed creation is sure to become a go-to favorite in your home.

Unlike traditional sushi, this baked sushi casserole is effortless to make—no rolling, no special tools, just layer, bake, and enjoy! Every bite delivers a perfect balance of umami flavors, from the tangy seasoned rice to the rich and creamy seafood mixture, topped with furikake, spicy mayo, and unagi sauce for that signature sushi taste.
What makes sushi bake truly special is its versatility. Whether you love it extra cheesy, super spicy, or packed with different seafood options, you can customize it to match your cravings. Plus, it’s an easy dish to prepare ahead of time, making it perfect for meal prep, family dinners, and special occasions.
Why You Should Try This Sushi Bake Recipe
Beginner-friendly – No need for sushi-making experience! Just layer and bake.
Crowd-pleaser – Perfect for potlucks, parties, or even a cozy night in.
Customizable – Adjust the seafood, spice level, or toppings to make it your own.
Great for leftovers – Easy to store and reheat for a quick and delicious meal.
Fun to eat! – Scoop it up with crispy nori sheets or enjoy it in a sushi bowl.
So whether you’re making this for the first time or the tenth, you’ll love how simple yet incredibly delicious this sushi bake is. It’s proof that you don’t need to be a sushi chef to create an unforgettable dish at home!
If you loved this recipe, don’t forget to share it with friends and family, leave a comment below with your favorite variations, and tag your sushi bake creations on social media.
Ready to dive in? Grab your nori sheets, scoop up a bite, and enjoy the mind-blowing flavors of homemade sushi bake!
Now, let’s move on to some frequently asked questions to make sure you get the best results every time!
Looking for the perfect seasoning for your seafood? Try our Salmon Asian Rub Recipe for a bold, flavorful blend that takes your salmon to the next level!
FAQs: Everything You Need to Know About Sushi Bake
Got questions about making the perfect sushi bake? You’re not alone! Here are some of the most commonly asked questions to ensure your sushi bake turns out delicious every single time.
1. Can I use real crab instead of imitation crab?
Absolutely! Real crab meat adds a more delicate, fresh seafood flavor. If using fresh crab, make sure it’s fully cooked and flake it into small pieces before mixing it with the creamy seafood blend. Lump crab meat or canned crab also works well as a substitute.
2. What type of rice is best for sushi bake?
The best rice for sushi bake is short-grain or medium-grain sushi rice. It has the perfect sticky texture to hold everything together. Avoid using long-grain rice like basmati or jasmine, as they don’t have the same binding quality and can make the dish fall apart.
👉 Pro Tip: If you can’t find sushi rice, Calrose rice is a good alternative!
3. How long does sushi bake last in the fridge?
Sushi bake can be stored in an airtight container in the fridge for up to 3 days. To keep it fresh, let it cool completely before refrigerating. Avoid leaving it at room temperature for too long, as seafood and mayo-based mixtures can spoil quickly.
4. Can I freeze sushi bake?
While sushi bake is best enjoyed fresh, you can freeze it for up to 1 month in a sealed container. However, note that the texture may change slightly after thawing, as mayo and cream cheese can separate.
👉 Freezing Tip: If planning to freeze, avoid adding the toppings (spicy mayo, unagi sauce, and furikake) until after reheating for better consistency.
5. What’s the best way to reheat sushi bake?
To bring your sushi bake back to life, follow these reheating methods:
🔥 Oven (Best for Texture):
Preheat oven to 350°F (175°C).
Cover the sushi bake with foil to prevent drying out.
Bake for 10–15 minutes until heated through.
💨 Air Fryer (For a Crispier Top):
Reheat at 350°F for 5–7 minutes until the top is slightly crispy.
⚡ Microwave (Quickest Method):
Place a damp paper towel over the sushi bake to retain moisture.
Heat in 30-second intervals until warm.
👉 Pro Tip: If reheating in the microwave, place a small cup of water inside the microwave to prevent the rice from drying out!
6. Can I make sushi bake without seafood?
Of course! If you prefer a non-seafood version, try these alternatives: Chicken Sushi Bake – Use shredded rotisserie chicken or grilled chicken breast.
Vegetarian Sushi Bake – Substitute seafood with diced tofu, sautéed mushrooms, or marinated jackfruit.
Egg & Avocado Sushi Bake – A mix of scrambled eggs, avocado, and a drizzle of spicy mayo makes for a delicious twist.
7. What can I use instead of Kewpie mayo?
Kewpie mayo is a Japanese mayonnaise that’s richer and slightly sweeter than regular mayo. If you can’t find it, use: Regular mayo + a dash of rice vinegar and sugar for a similar taste.
Greek yogurt for a lighter, tangy alternative.
8. What can I serve with sushi bake?
Sushi bake is delicious on its own, but pairing it with the right sides makes it even better! Try serving it with:
Nori sheets (a must-have for scooping!)
Miso soup for a warm, comforting side
Javanese cucumber salad for a refreshing contrast
Shrimp or veggie tempura for a crispy addition
9. Can I make sushi bake ahead of time?
Yes! If preparing ahead: Assemble the sushi rice and seafood layer, then cover and refrigerate.
Add the furikake, sauces, and garnishes just before baking to keep everything fresh.
When ready to serve, bake as usual and enjoy!
10. How can I make my sushi bake extra flavorful?
For even more umami and depth, try these tricks:
✔ Marinate the seafood in soy sauce, sesame oil, and a pinch of sugar before mixing.
✔ Add tobiko (fish roe) for a pop of texture and salty-sweet flavor.
✔ Use a mix of unagi sauce and sriracha for a perfect balance of sweet and spicy.
✔ Garnish with crispy fried onions or tempura flakes for added crunch.
Final Thoughts
Sushi bake is one of those easy, fun, and customizable dishes that you can tweak to fit your taste. Whether you’re making it for a family dinner, potluck, or a quick meal prep, it’s a crowd-pleaser every single time.
Got more questions? Drop them in the comments below, and let’s talk all things sushi bake!

sushi bake recipe
Ingredients
For the Sushi Rice Base:
- The foundation of any great sushi dish is the perfectly seasoned rice. Here’s what you’ll need:
- 2 cups sushi rice – Short-grain Japanese rice gives the best texture. Avoid long-grain rice as it won’t stick properly.
- 2 ½ cups water – For cooking the rice to the perfect fluffy consistency.
- ¼ cup rice vinegar – Adds that signature tang and balances the flavors.
- 1 tablespoon sugar – Slightly sweetens the rice for a more authentic taste.
- ½ teaspoon salt – Enhances the flavor of the rice.
👉 Pro Tip: Rinse your sushi rice 2–3 times until the water runs clear. This removes excess starch and helps achieve a light yet sticky texture.
For the Creamy Seafood Layer:
- This flavor-packed topping is the heart of the sushi bake combining creamy, savory, and slightly spicy elements.
- 8 oz imitation crab Kani, shredded – A classic sushi bake ingredient with a mild, sweet flavor.
- 8 oz cooked shrimp or salmon flaked – Adds more seafood depth. You can also use real crab meat!
- ½ cup Japanese mayo Kewpie – Rich and slightly sweet, giving the mixture its creamy texture. Regular mayo works, but Kewpie makes a difference!
- 1 tablespoon sriracha – For a mild heat kick. Adjust based on your spice preference.
- 1 teaspoon soy sauce – Adds a savory umami boost.
- 4 oz cream cheese softened – For extra creaminess and a luscious texture.
👉 Customization Tip: Not a seafood fan? Swap in shredded chicken, tofu, or even mushrooms for a unique take on sushi bake!
For the Toppings:
- These final touches add crunch flavor, and that signature sushi experience.
- 2 tablespoons furikake seasoning – A blend of sesame seeds seaweed, and dried fish flakes for an authentic umami finish.
- 2 tablespoons unagi sauce eel sauce – Sweet and savory, this thick glaze adds a restaurant-style touch.
- 2 tablespoons spicy mayo mayo + sriracha mix – A creamy drizzle that ties everything together.
- 1 teaspoon sesame seeds – For extra nuttiness and texture.
- Chopped green onions – A fresh flavorful garnish.
Instructions
Step 1: Prepare the Sushi Rice
- A great sushi bake starts with perfectly seasoned sushi rice. Here’s how to get it just right:
- Rinse the rice – Place the sushi rice in a bowl and rinse it under cold water 2–3 times until the water runs clear. This removes excess starch and ensures a fluffy, non-gummy texture.
- Cook the rice – Use a rice cooker for the easiest, foolproof method, or cook it on the stovetop with 2 ½ cups of water. Once done, let it rest, covered, for about 10 minutes.
- Season the rice – In a small bowl, mix ¼ cup rice vinegar, 1 tablespoon sugar, and ½ teaspoon salt until dissolved. Gently fold this mixture into the cooked rice using a rice paddle or wooden spoon. Be careful not to mash the rice!
- Let it cool – Spread the seasoned rice onto a plate or baking dish and let it cool slightly while you prepare the filling.
- 👉 Pro Tip: Use a fan or gently stir the rice while cooling to give it that signature glossy sushi texture.
Step 2: Make the Creamy Seafood Mixture
- This layer is where all the rich, umami flavors come together!
- Shred the crab – Use your hands or a fork to pull apart 8 oz of imitation crab (Kani) into thin strands. If using shrimp or salmon, chop or flake it into small pieces.
- Mix the filling – In a bowl, combine the shredded crab, cooked seafood, ½ cup Kewpie mayo, 1 tablespoon sriracha, 1 teaspoon soy sauce, and 4 oz softened cream cheese. Stir until everything is well incorporated.
- Taste & adjust – Want it spicier? Add more sriracha. Need more umami? A splash of soy sauce can do wonders!
- 👉 Customization Tip: If you love extra texture, mix in some diced cucumbers, avocado, or tobiko (fish roe) for a little pop of flavor!
Step 3: Assemble the Sushi Bake
- Now, let’s layer everything into a delicious baked sushi casserole!
- Preheat your oven to 375°F (190°C) to get it ready for baking.
- Layer the rice – Spread the seasoned sushi rice evenly into a lightly greased 9×9-inch baking dish (or similar size). Press it down gently to create a firm base.
- Add the seafood mixture – Spread the creamy seafood filling over the rice in an even layer. Smooth it out using a spatula for uniform baking.
- Sprinkle with furikake – Generously top the seafood layer with 2 tablespoons of furikake seasoning for that classic sushi flavor.
- 👉 Texture Tip: Want a cheesy sushi bake? Add a layer of shredded mozzarella or cheddar before baking for a golden, bubbly crust!
Step 4: Bake to Perfection
- Bake uncovered at 375°F (190°C) for 15–20 minutes or until the top is slightly golden and the edges are bubbling.
- Broil for extra crispiness – If you love a bit of char, switch to broil mode for the last 2–3 minutes until lightly browned. Watch closely to prevent burning!
- Cool slightly – Let the sushi bake rest for 5 minutes before adding the finishing touches.
Step 5: Add the Final Toppings & Serve
- The magic is in the toppings—this is where your sushi bake really comes to life!
- Drizzle with sauces – Use a spoon or squeeze bottle to drizzle spicy mayo and unagi sauce over the top for extra creaminess and a sweet-savory finish.
- Garnish for extra flavor – Sprinkle with sesame seeds and chopped green onions for a burst of freshness.
- Serve with nori sheets – Cut nori sheets into squares and use them to scoop up each delicious bite.
- 👉 Pro Serving Tip: Serve with pickled ginger, soy sauce, and wasabi on the side for the full sushi experience!
Notes
Nutrition Information (Per Serving)
- Calories: ~380 kcal
- Protein: 18g
- Carbohydrates: 42g
- Fat: 16g
- Saturated Fat: 6g
- Cholesterol: 40mg
- Sodium: 580mg
- Fiber: 2g
- Sugar: 3g