

Tired of store-bought syrups lacking that vibrant, fresh berry taste? Get ready to elevate your culinary game with this ultimate homemade blueberry syrup recipe! Whether you dream of a luscious, thick syrup cascading over fluffy pancakes or a smooth, bright addition to your morning matcha or favorite cocktail, we’ve got you covered. This easy-to-follow guide will show you how to create the best blueberry syrup, perfectly tailored to your preference, using simple ingredients and minimal effort.
Table of Contents
Why You’ll Love Homemade Blueberry Syrup
- Unmatched Versatility: Easily create both a luscious, thick syrup perfect for pancakes and a smooth, vibrant thin syrup ideal for drinks, all from one recipe.
- Superior Fresh Flavor: Say goodbye to artificial tastes! This syrup bursts with natural blueberry goodness, far surpassing any store-bought alternative.
- Effortlessly Simple: With just a few basic ingredients and minimal cooking time, you’ll have delicious homemade syrup ready in no time.
- Customizable to Your Liking: Adjust sweetness, explore different berry types, and even use alternative sweeteners to perfectly match your dietary needs and taste preferences.
- Zero Waste, Full Flavor: Learn how to transform the leftover blueberry pulp into delightful treats, ensuring every bit of berry goodness is savored.
Ingredients

- 2 cups fresh or frozen blueberries (wild blueberries preferred for intense flavor)
- 1 cup granulated sugar (or honey/maple syrup for variation)
- 1 cup water
- 1 tablespoon fresh lemon juice
- 1 tablespoon cornstarch (for thick syrup, optional)
- 2 tablespoons cold water (for cornstarch slurry, if making thick syrup)
Instructions
Step1
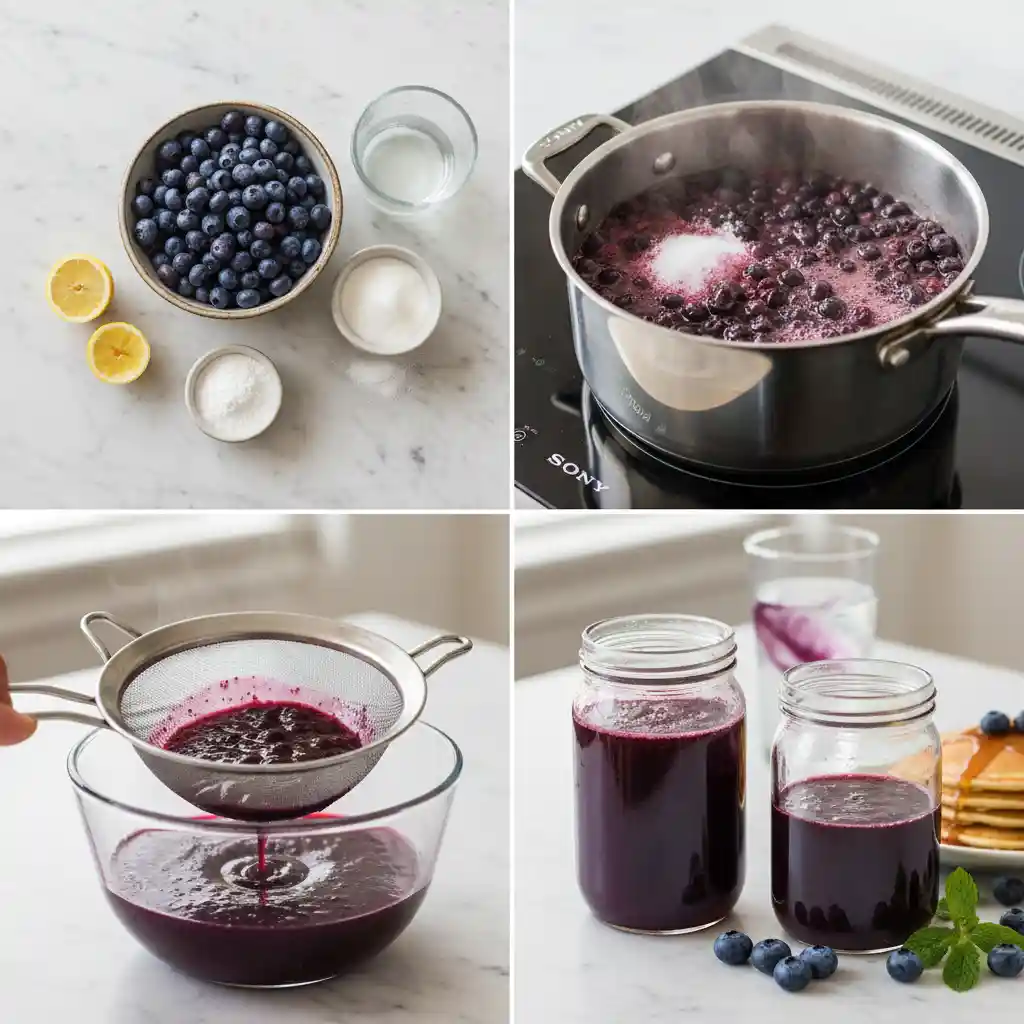
- Combine & Simmer: In a medium saucepan, combine the blueberries, granulated sugar, and 1 cup of water. Bring the mixture to a gentle boil over medium-high heat, stirring occasionally to help dissolve the sugar evenly.
Step2
- Cook Down & Mash: Reduce the heat to medium-low and let the mixture simmer for 8-10 minutes. During this time, the blueberries will soften and burst. Use a potato masher or the back of a spoon to gently mash the berries against the side of the pan, releasing more juice and color. Simmer until the liquid has slightly reduced and intensified in color.
Step3
- Add Lemon Juice: Remove the saucepan from the heat and stir in the fresh lemon juice. This essential step brightens the flavor profile and helps to preserve the vibrant purple-red hue of the blueberry syrup.
- Choose Your Consistency: At this point, you have two options depending on your desired syrup texture. Follow only one method below:
Step4
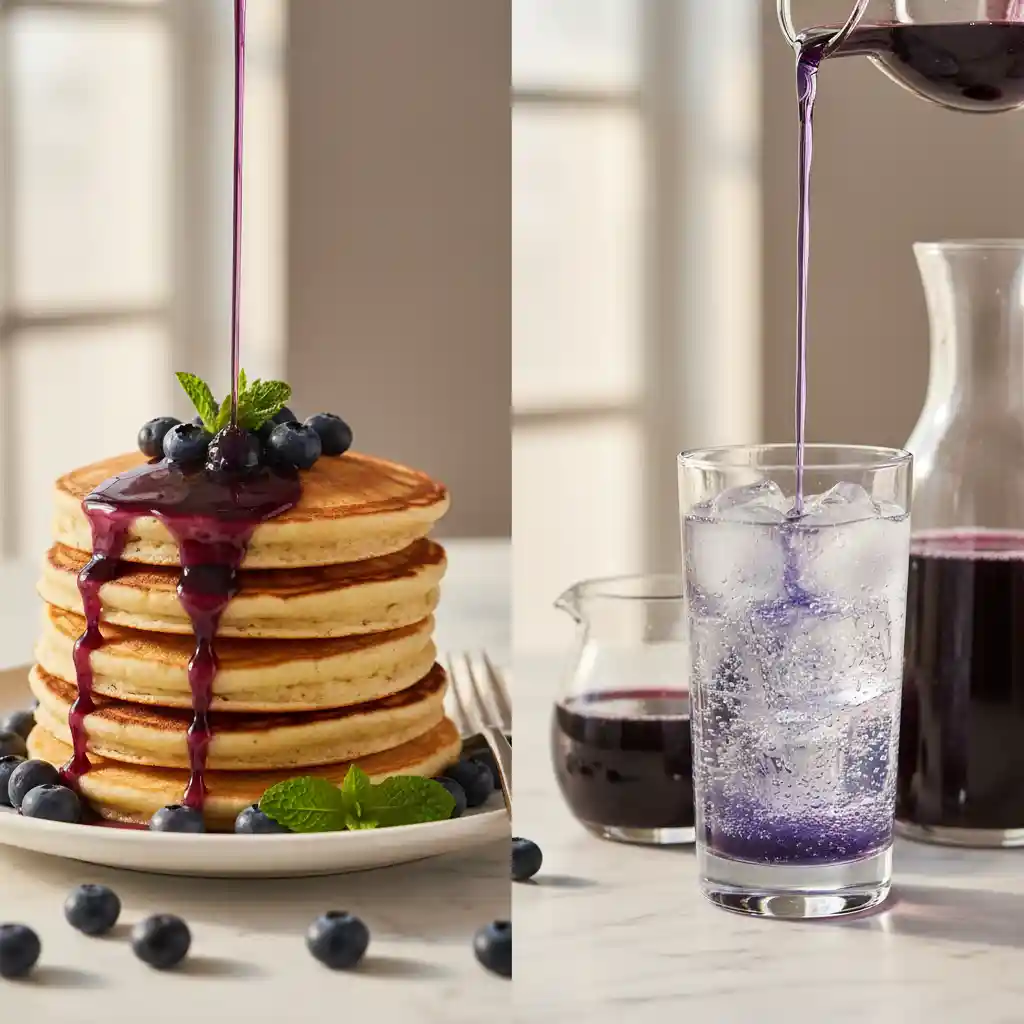
- For a Smooth, Thin Syrup (Ideal for Drinks, Coffee, Matcha): Carefully pour the syrup mixture through a fine-mesh sieve set over a heatproof bowl. Use the back of a spoon to press down on the solids in the sieve to extract as much liquid as possible, ensuring a rich flavor. Discard the leftover pulp, or save it for baking like in muffins or oatmeal.
Step5
- For a Thick, Velvety Syrup (Perfect for Pancakes, Waffles, Desserts): In a small bowl, whisk together the cornstarch and 2 tablespoons of cold water until completely smooth to create a slurry. Return the blueberry mixture (without straining) to medium heat. Slowly pour the cornstarch slurry into the simmering blueberry mixture, stirring constantly. Continue to cook, stirring for 1-2 minutes, until the syrup visibly thickens to your desired consistency. For an even smoother thick syrup, you can briefly blend it with an immersion blender before the cornstarch step.
Step6
- Cool & Store: Allow the blueberry syrup to cool completely before transferring it to an airtight container or glass jar. As it cools, the syrup will thicken further (especially the cornstarch-thickened version). Store in the refrigerator for up to 2-3 weeks. Enjoy!
Serving and Storage Tips

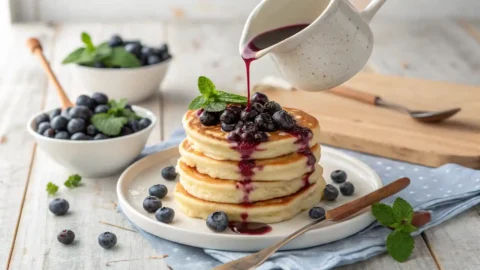
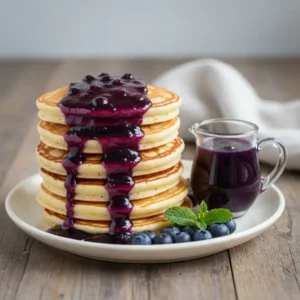
This versatile blueberry syrup is a game-changer! Drizzle the thick version over fluffy pancakes, waffles, French toast, or even ice cream for a decadent dessert. The thinner syrup brightens up morning yogurt, oatmeal, and is a fantastic addition to cocktails, iced tea, or lemonade. To store, transfer your cooled blueberry syrup to an airtight container or jar. It will keep beautifully in the refrigerator for up to 2-3 weeks. For longer preservation, you can freeze the syrup in freezer-safe containers for up to 3 months. Thaw in the refrigerator overnight before use. When ready to serve, gently warm the syrup on the stovetop over low heat or in the microwave for a few seconds until it reaches your desired temperature and consistency. Stir well before serving.
Helpful Notes
- Berry Best Practices: While fresh blueberries are wonderful, frozen wild blueberries truly intensify the flavor and color of your syrup. No need to thaw them before cooking!
- Sweetener Swap: Granulated sugar is classic, but feel free to experiment with honey or maple syrup for a different flavor profile. Adjust the amount to your taste, as natural sweeteners vary in intensity.
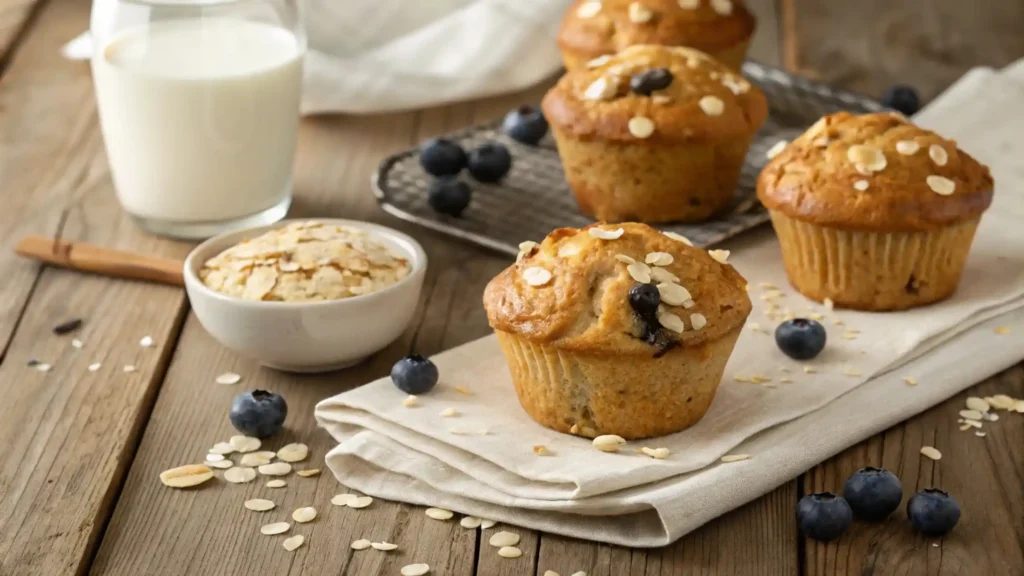
- Pulp Power: Don’t discard the leftover blueberry pulp if you’ve strained your syrup! It’s fantastic stirred into oatmeal, blended into smoothies, baked into muffins, or even made into a quick jam.
Conclusion
There you have it – your ultimate guide to crafting the most delicious, versatile, and simply irresistible homemade blueberry syrup. Whether you’re aiming for a rich, thick pour for your breakfast staples or a light, bright addition to your beverages, this recipe delivers on all fronts. Its simplicity, combined with the pure, fresh flavor of blueberries, makes it a winning addition to any kitchen. Now it’s your turn to experience the magic! Try this recipe out, and don’t forget to come back and share your creations in the comments below. We’d love to hear how you enjoyed it and what delicious dishes you paired it with. Please leave a star rating to let us know what you think, and be sure to share this ultimate guide with your friends and family on social media. Happy syrupy adventures!
The Ultimate Homemade Blueberry Syrup: Thick & Thin Perfection
Ingredients
- 2 cups fresh or frozen blueberries wild blueberries preferred for intense flavor
- 1 cup granulated sugar or honey/maple syrup for variation
- 1 cup water
- 1 tablespoon fresh lemon juice
- 1 tablespoon cornstarch for thick syrup, optional
- 2 tablespoons cold water for cornstarch slurry, if making thick syrup
Instructions
- Combine & Simmer: In a medium saucepan, combine the blueberries, granulated sugar, and 1 cup of water. Bring the mixture to a gentle boil over medium-high heat, stirring occasionally to help dissolve the sugar evenly.
- Cook Down & Mash: Reduce the heat to medium-low and let the mixture simmer for 8-10 minutes. During this time, the blueberries will soften and burst. Use a potato masher or the back of a spoon to gently mash the berries against the side of the pan, releasing more juice and color. Simmer until the liquid has slightly reduced and intensified in color.
- Add Lemon Juice: Remove the saucepan from the heat and stir in the fresh lemon juice. This essential step brightens the flavor profile and helps to preserve the vibrant purple-red hue of the blueberry syrup.
- Choose Your Consistency: At this point, you have two options depending on your desired syrup texture. Follow only one method below:
- For a Smooth, Thin Syrup (Ideal for Drinks, Coffee, Matcha): Carefully pour the syrup mixture through a fine-mesh sieve set over a heatproof bowl. Use the back of a spoon to press down on the solids in the sieve to extract as much liquid as possible, ensuring a rich flavor. Discard the leftover pulp, or save it for baking like in muffins or oatmeal.
- For a Thick, Velvety Syrup (Perfect for Pancakes, Waffles, Desserts): In a small bowl, whisk together the cornstarch and 2 tablespoons of cold water until completely smooth to create a slurry. Return the blueberry mixture (without straining) to medium heat. Slowly pour the cornstarch slurry into the simmering blueberry mixture, stirring constantly. Continue to cook, stirring for 1-2 minutes, until the syrup visibly thickens to your desired consistency. For an even smoother thick syrup, you can briefly blend it with an immersion blender before the cornstarch step.
- Cool & Store: Allow the blueberry syrup to cool completely before transferring it to an airtight container or glass jar. As it cools, the syrup will thicken further (especially the cornstarch-thickened version). Store in the refrigerator for up to 2-3 weeks. Enjoy!
Notes
Nutritional Information (Estimated)
Approximate values per serving (2 tablespoons): Calories: 65 Total Fat: 0g Sodium: 0mg Total Carbohydrates: 17g Sugars: 15g Protein: 0g. Note: These values are approximate and can vary based on specific ingredients, brands, and serving sizes.Frequently Asked Questions (FAQ)
Can I use frozen blueberries instead of fresh?
Absolutely! Frozen blueberries work perfectly and often provide an even deeper, more concentrated flavor and color, especially wild blueberries. There’s no need to thaw them beforehand; just add them directly to the pot.
How long does homemade blueberry syrup last?
When stored in an airtight container in the refrigerator, your homemade blueberry syrup will typically stay fresh for 2 to 3 weeks. For longer storage, it can be frozen for up to 3 months.
What can I do with the leftover blueberry pulp after straining?
Don’t throw it away! The leftover blueberry pulp is packed with fiber and flavor. You can stir it into oatmeal, yogurt, blend it into smoothies, or even use it as a base for quick muffins or a simple fruit leather.
Can I make this syrup sugar-free or with a different sweetener?
Yes, you can! For a sugar-free version, substitute granulated sugar with an equivalent amount of your preferred sugar alternative, such as erythritol or stevia. You can also use honey or maple syrup for a different nuanced sweetness; adjust to taste.