


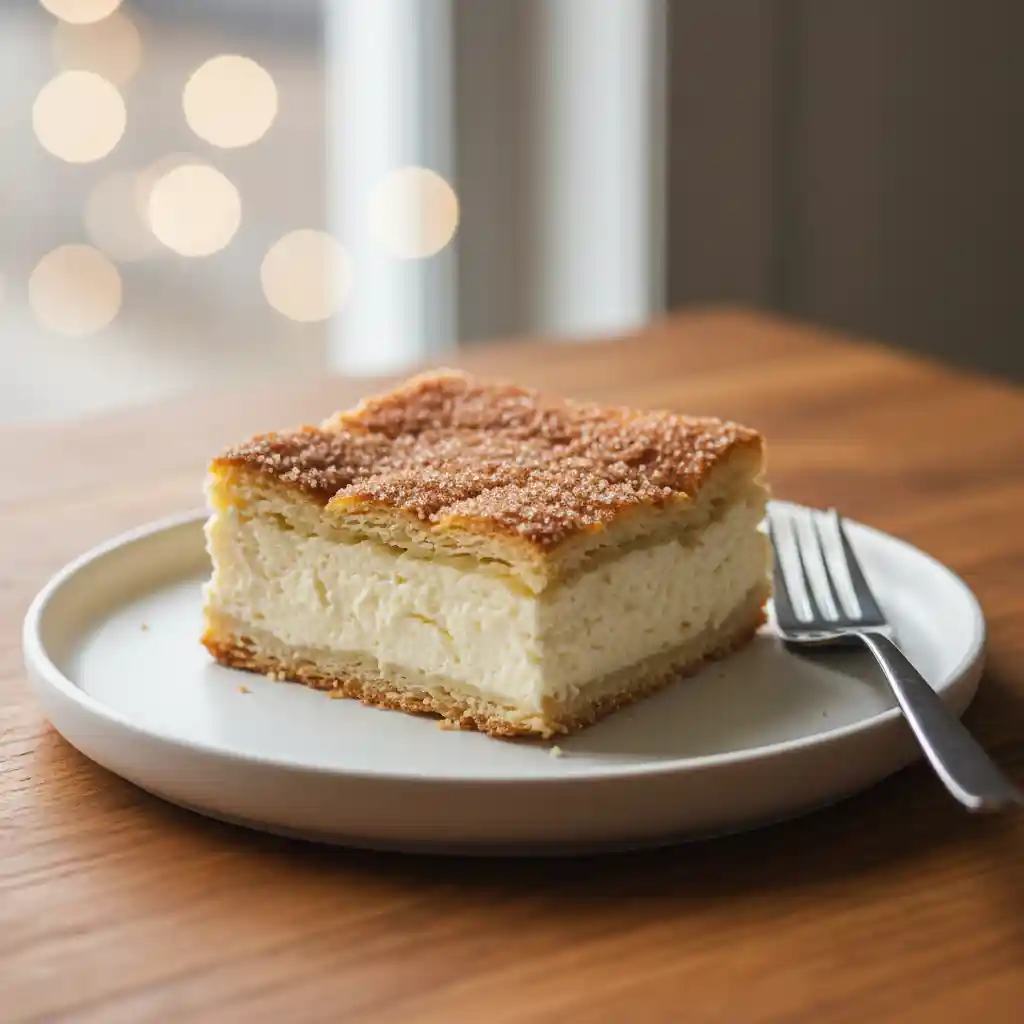
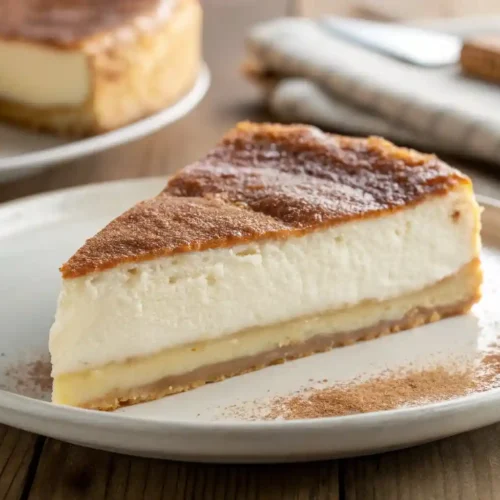
If you’re searching for an effortlessly impressive dessert that tastes like a dream, look no further than this incredible Sopapilla Cheesecake recipe. Combining the irresistible crunch of a traditional sopapilla with the creamy luxury of cheesecake, this dish is a true crowd-pleaser. Best of all, it utilizes convenient Pillsbury crescent rolls, making it astonishingly simple to whip up without sacrificing any flavor. Get ready to fall in love with this sweet, cinnamon-kissed treat that brings a touch of Mexican-inspired magic to your table!
Table of Contents
Why You’ll Love sopapilla cheesecake
- Effortlessly Delicious: Forget complicated baking! With Pillsbury crescent rolls, this dessert comes together in a snap, delivering incredible flavor with minimal effort.
- Unforgettable Texture: Experience the perfect harmony of crispy, cinnamon-sugar topping and a rich, creamy cheesecake filling that melts in your mouth.
- Ultimate Crowd-Pleaser: Whether it’s a potluck, family dinner, or a special celebration, this sopapilla cheesecake is guaranteed to impress everyone who takes a bite.
- Budget-Friendly Indulgence: Made with common, affordable ingredients, this recipe allows you to create a luxurious dessert without breaking the bank.
- Versatile Charm: Serve it warm from the oven or chilled, plain or with a drizzle of caramel – it’s delightful any way you slice it.
Ingredients
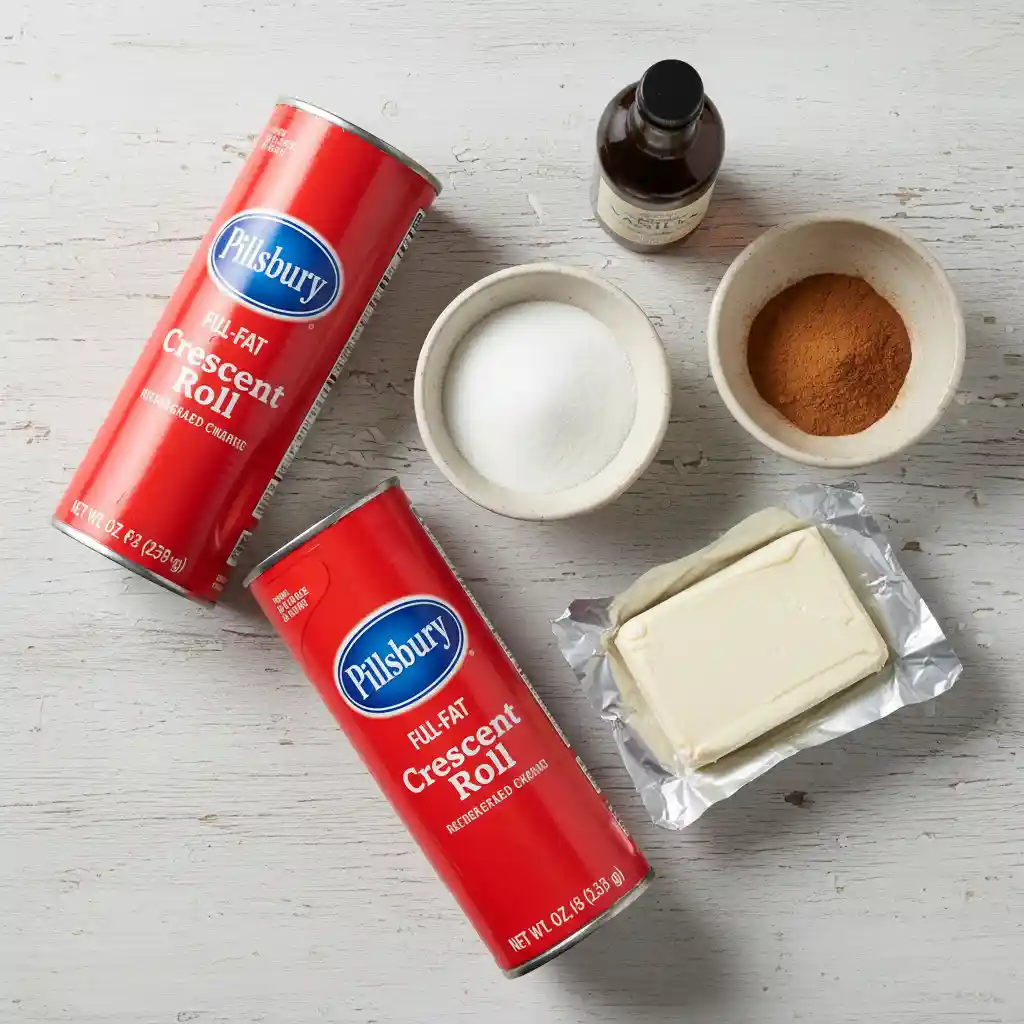
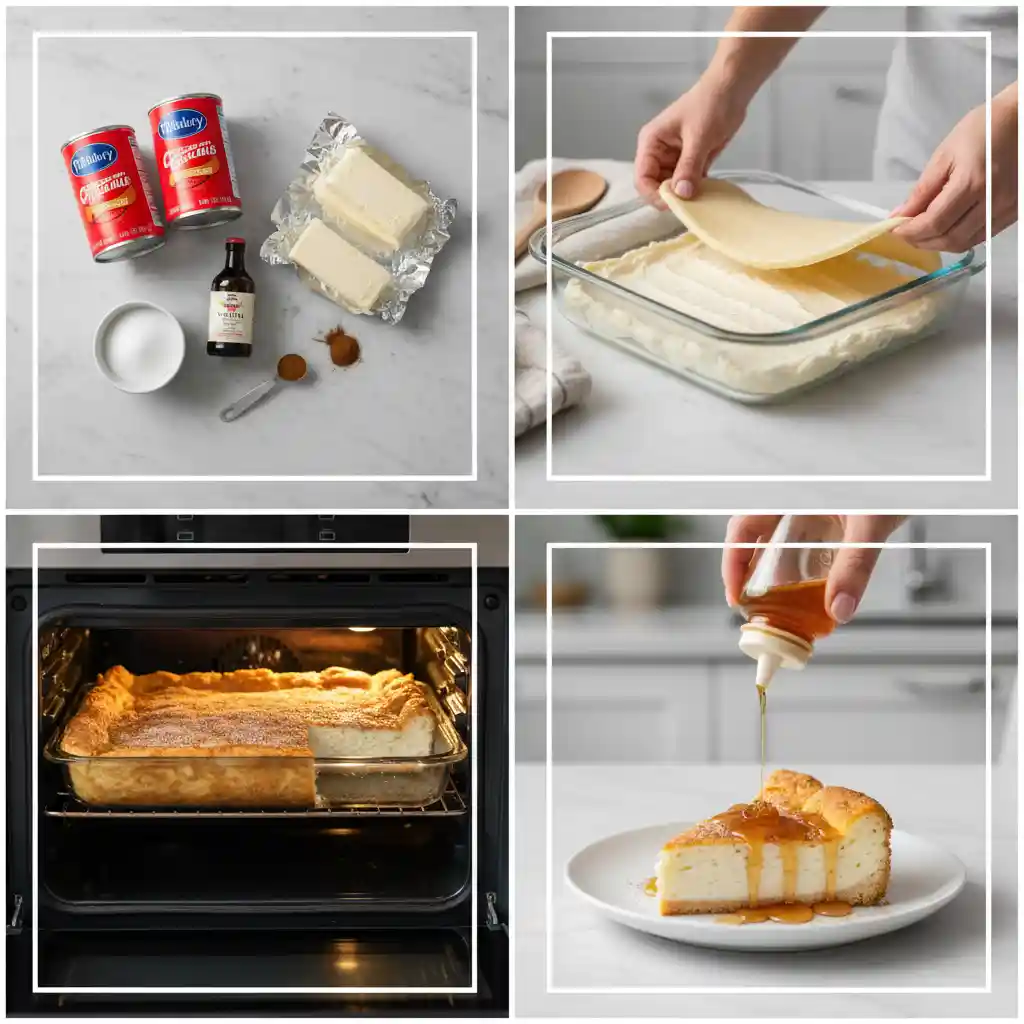
- 2 (8-ounce) cans refrigerated crescent roll dough (Pillsbury recommended)
- 2 (8-ounce) blocks full-fat cream cheese, softened to room temperature
- 1 1/2 cups granulated sugar, divided
- 1 teaspoon pure vanilla extract
- 1 teaspoon ground cinnamon
- 1/4 cup (4 tablespoons) unsalted butter, melted
Instructions
Step1
- Preheat your oven to 350°F (175°C). Lightly grease a 9×13-inch baking dish with cooking spray or butter. This ensures easy release of the cheesecake after baking.
Step2
- Carefully unroll one can of crescent roll dough. Place it evenly across the bottom of the prepared baking dish. Gently press the seams and perforations together to form a solid, uniform crust layer.
Step3
- In a medium mixing bowl, combine the softened cream cheese, 1 cup of granulated sugar, and the vanilla extract. Beat with an electric mixer on medium speed until the mixture is completely smooth and creamy, with no lumps remaining. Softened cream cheese is key for a silky texture.
Step4
- Spread the cream cheese mixture evenly over the crescent roll dough in the baking dish, reaching all the way to the edges. Use an offset spatula or the back of a spoon for a smooth finish.
Step5
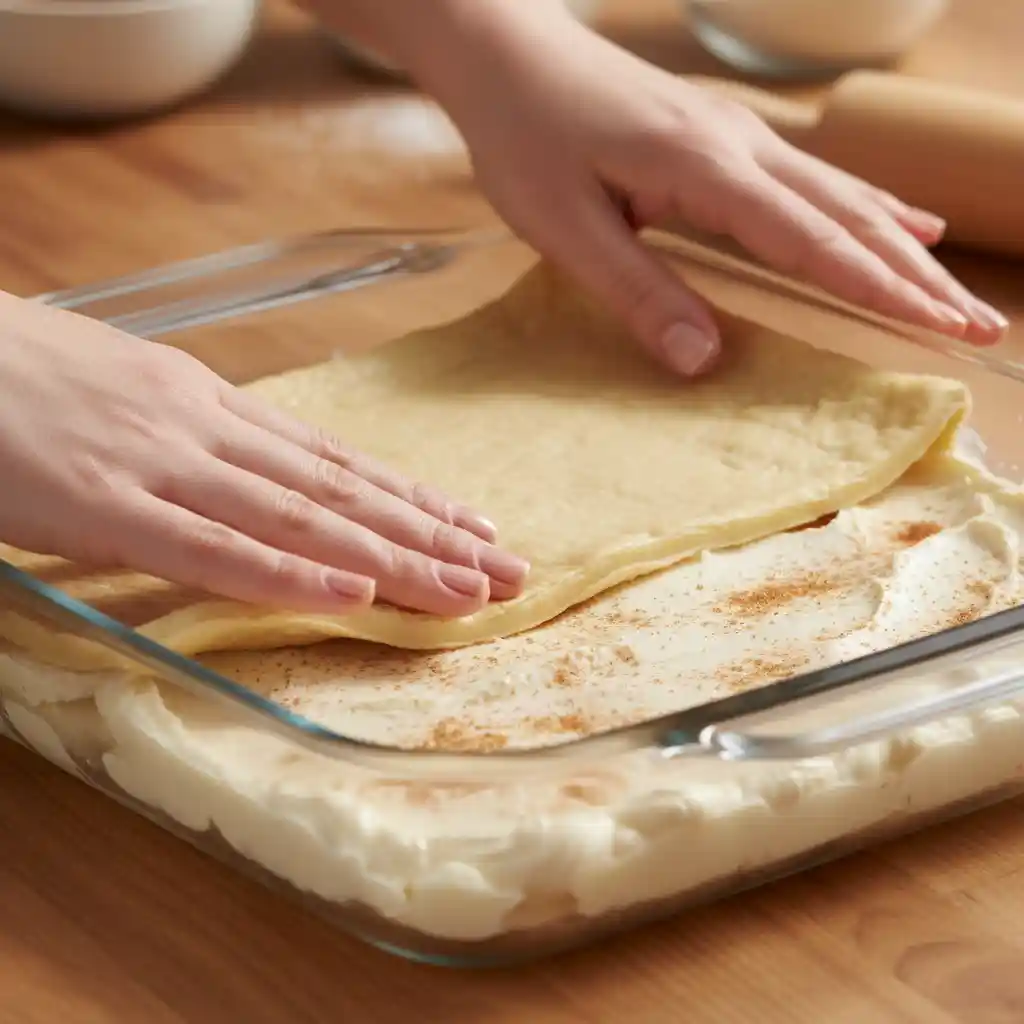
- Unroll the second can of crescent roll dough onto a clean surface, such as parchment paper or a cutting board. Press all the perforations together firmly to create a single sheet of dough. This will serve as the top crust.
Step6
- Carefully transfer the flattened second dough layer on top of the cream cheese filling in the baking dish. Gently stretch and press it down to cover the entire filling layer.
Step7
- Pour the melted butter evenly over the top crescent roll layer, ensuring good coverage. This helps the cinnamon-sugar topping adhere and creates a beautiful golden crust.
Step8
- In a small bowl, whisk together the remaining 1/2 cup of granulated sugar and the ground cinnamon until well combined. Generously sprinkle this cinnamon-sugar mixture over the melted butter layer, creating that iconic sopapilla crunch.
Step9
- Bake for 25-30 minutes, or until the top crust is golden brown and puffy, and the filling is set and bubbly around the edges. Keep an eye on it to prevent over-browning.
Step10
- Remove the Sopapilla Cheesecake from the oven and allow it to cool completely on a wire rack for at least 30 minutes. Then, transfer it to the refrigerator and chill for a minimum of 1-2 hours for the best set and flavor. Slice and serve with a dollop of whipped cream or fresh berries, if desired. Store any leftovers in an airtight container in the refrigerator for up to 3-4 days.
Serving and Storage Tips
Serve this delightful Sopapilla Cheesecake warm from the oven for a truly comforting experience, or chilled for a firmer, more traditional cheesecake texture. It’s fantastic on its own, but a dollop of whipped cream, a scoop of vanilla ice cream, or a drizzle of caramel sauce can elevate it even further. To store leftovers, place any remaining cheesecake in an airtight container and refrigerate for up to 3-4 days. This dessert holds up beautifully, making it perfect for meal prep or enjoying over several days. If you prefer it warm, individual slices can be gently reheated in the microwave for 15-30 seconds or in a preheated oven at 300°F (150°C) for about 5-10 minutes until just warmed through.
Helpful Notes
- Ensure your cream cheese is at room temperature before mixing to achieve a perfectly smooth, lump-free filling. Cold cream cheese will result in a clumpy texture.
- For an extra golden and crisp topping, brush the top layer of crescent dough with a little extra melted butter before sprinkling with the cinnamon sugar mixture.
- Get creative with toppings! A sprinkle of chopped pecans, a drizzle of chocolate syrup, or even fresh berries can add another layer of flavor and visual appeal to your sopapilla cheesecake.
Conclusion
There you have it – the easiest and most irresistibly delicious Sopapilla Cheesecake recipe you’ll ever make! This dessert truly delivers on all fronts, marrying the iconic crispy, cinnamon-sugar coated pastry of sopapillas with a lusciously creamy cheesecake filling. Thanks to the genius shortcut of using Pillsbury crescent rolls, you can whip up this show-stopping treat in a fraction of the time, making it the perfect choice for last-minute gatherings or a simple weeknight indulgence. It’s a guaranteed hit that will have everyone asking for seconds and begging for the recipe! Now it’s your turn! We absolutely love hearing from you, so please leave a comment below and tell us how your Sopapilla Cheesecake turned out. Don’t forget to give this recipe a 5-star rating if you loved it, and share your delicious creations on social media using #SopapillaCheesecake and tagging us! Your feedback and shares help us bring more amazing recipes your way. Enjoy every sweet bite!
Sweet & Simple: Pillsbury Sopapilla Cheesecake Perfection
Ingredients
- 2 8-ounce cans refrigerated crescent roll dough (Pillsbury recommended)
- 2 8-ounce blocks full-fat cream cheese, softened to room temperature
- 1 1/2 cups granulated sugar divided
- 1 teaspoon pure vanilla extract
- 1 teaspoon ground cinnamon
- 1/4 cup 4 tablespoons unsalted butter, melted
Instructions
- Preheat your oven to 350°F (175°C). Lightly grease a 9×13-inch baking dish with cooking spray or butter. This ensures easy release of the cheesecake after baking.
- Carefully unroll one can of crescent roll dough. Place it evenly across the bottom of the prepared baking dish. Gently press the seams and perforations together to form a solid, uniform crust layer.
- In a medium mixing bowl, combine the softened cream cheese, 1 cup of granulated sugar, and the vanilla extract. Beat with an electric mixer on medium speed until the mixture is completely smooth and creamy, with no lumps remaining. Softened cream cheese is key for a silky texture.
- Spread the cream cheese mixture evenly over the crescent roll dough in the baking dish, reaching all the way to the edges. Use an offset spatula or the back of a spoon for a smooth finish.
- Unroll the second can of crescent roll dough onto a clean surface, such as parchment paper or a cutting board. Press all the perforations together firmly to create a single sheet of dough. This will serve as the top crust.
- Carefully transfer the flattened second dough layer on top of the cream cheese filling in the baking dish. Gently stretch and press it down to cover the entire filling layer.
- Pour the melted butter evenly over the top crescent roll layer, ensuring good coverage. This helps the cinnamon-sugar topping adhere and creates a beautiful golden crust.
- In a small bowl, whisk together the remaining 1/2 cup of granulated sugar and the ground cinnamon until well combined. Generously sprinkle this cinnamon-sugar mixture over the melted butter layer, creating that iconic sopapilla crunch.
- Bake for 25-30 minutes, or until the top crust is golden brown and puffy, and the filling is set and bubbly around the edges. Keep an eye on it to prevent over-browning.
- Remove the Sopapilla Cheesecake from the oven and allow it to cool completely on a wire rack for at least 30 minutes. Then, transfer it to the refrigerator and chill for a minimum of 1-2 hours for the best set and flavor. Slice and serve with a dollop of whipped cream or fresh berries, if desired. Store any leftovers in an airtight container in the refrigerator for up to 3-4 days.
Notes
Nutritional Information (Estimated)
Approximate values per serving:- Calories: 420
- Fat: 26g
- Saturated Fat: 15g
- Cholesterol: 75mg
- Sodium: 280mg
- Carbohydrates: 40g
- Sugars: 30g
- Protein: 5g
Frequently Asked Questions (FAQ)
Can I use low-fat cream cheese?
While you can, we highly recommend using full-fat cream cheese for the best creamy texture and rich flavor. Low-fat versions can result in a thinner, less satisfying filling.
Can I make this recipe ahead of time?
Absolutely! This sopapilla cheesecake is wonderful made ahead. In fact, chilling it for several hours or even overnight allows the flavors to meld beautifully and the cheesecake to set perfectly for clean slices.
My crescent dough isn’t sealing well. Any tips?
Make sure the edges are pressed firmly together. A little trick is to use a fork to crimp the seams, which helps create a better seal and adds a nice decorative edge.