
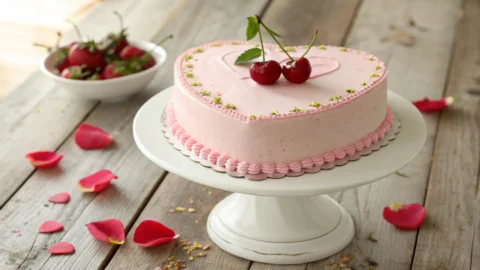
A vintage heart cake combines nostalgic charm with modern flair. In this guide, you’ll learn how to bake and frost a pastel pink, heart-shaped cake that wows every guest. We’ll cover step-by-step instructions, pro tips on vintage piping, and serving ideas that turn a simple dessert into a showstopper. Whether you’re baking for Valentine’s Day, a wedding, or a birthday celebration, these stunning buttercream tricks will elevate your custom confection—and make your kitchen smell like sugar and joy.
Table of Contents
Why You’ll Love Vintage Heart Cake
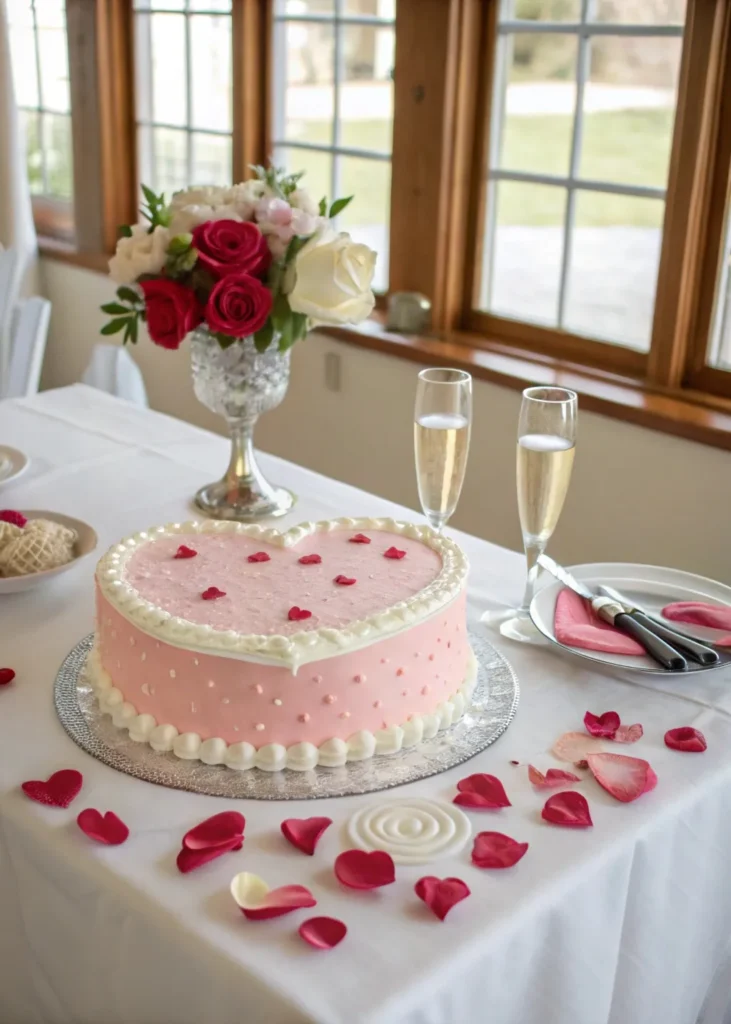
A vintage heart cake brings romance and nostalgia to any table. It stands out among simple round cake designs with its unique shape and ornate piping. Imagine presenting a pastel pink cake, trimmed in white buttercream, topped with a single cherry or delicate bow. This style suits weddings, Valentine’s Day gatherings, baby showers, or even a cozy birthday tea.
Many bakeries offer custom order options, but baking at home cuts costs and adds personal flair. You can adjust flavor and color scheme to match your event palette—perhaps a splash of green leaves piped around the edge, or ivory accents for an elegant wedding dessert. If you prefer, local delivery from a nearby bake shop is also an option. Just place your order early, watch for a sale on pans or decorating supplies, and plan a pickup time that fits your schedule.
Whether you’re a seasoned baker or a passionate beginner, this retro cake design feels accessible. Plus, mastering these stunning buttercream tricks opens the door to more elaborate heart cakes in the future. Ready to elevate your next celebration? Let’s start the recipe.
How to Make Vintage Heart Cake
Follow these clear, concise steps to bake and assemble your heart-shaped cake. This recipe yields two 8-inch layers, perfect for about 10–12 servings.
Ingredients
- 2¼ cups cake flour
- 1½ cups granulated sugar
- 1 cup unsalted butter, room temperature
- 4 large eggs, room temperature
- 2 tsp vanilla extract
- ½ cup milk, room temperature
- ¼ cup sour cream or cream cheese (optional for richness)
- 2 tbsp unsweetened cocoa powder (for chocolate cake variation)
- Pinch of salt
- Pink gel food color
- 4 cups buttercream, tinted pale pink
Tools
- Heart-shaped cake pan (8-inch)
- Mixing bowls and electric mixer
- Offset spatula
- Piping bag with star tip and round tip
- Cooling rack
- Cake turntable or lazy Susan (optional)
- Sifter for sugar dusting
Step-by-Step Instructions
- Prep and Preheat
- Position rack in the center of your oven and preheat to 350°F (175°C).
- Grease the heart-shaped pan with butter, then dust lightly with flour, tapping out excess.
- Mix Dry Ingredients
- In a large bowl, sift together cake flour, salt, and (if making chocolate cake) cocoa powder. Set aside.
- Cream Butter and Sugar
- In your mixer bowl, beat unsalted butter and granulated sugar on medium speed until light and fluffy, about 3–4 minutes. This air incorporation helps your cake layers rise evenly.
- Add Eggs and Flavor
- Crack in eggs one at a time, fully mixing each before adding the next. Scrape down the bowl’s sides to keep your batter uniform. Stir in vanilla extract for classic flavor.
- Combine Wet and Dry
- With mixer on low, alternate adding dry ingredients and milk in three parts: dry–milk–dry–milk–dry. Mix until just combined; overmixing can lead to a dense crumb. For a richer crumb, fold in sour cream or cream cheese here.
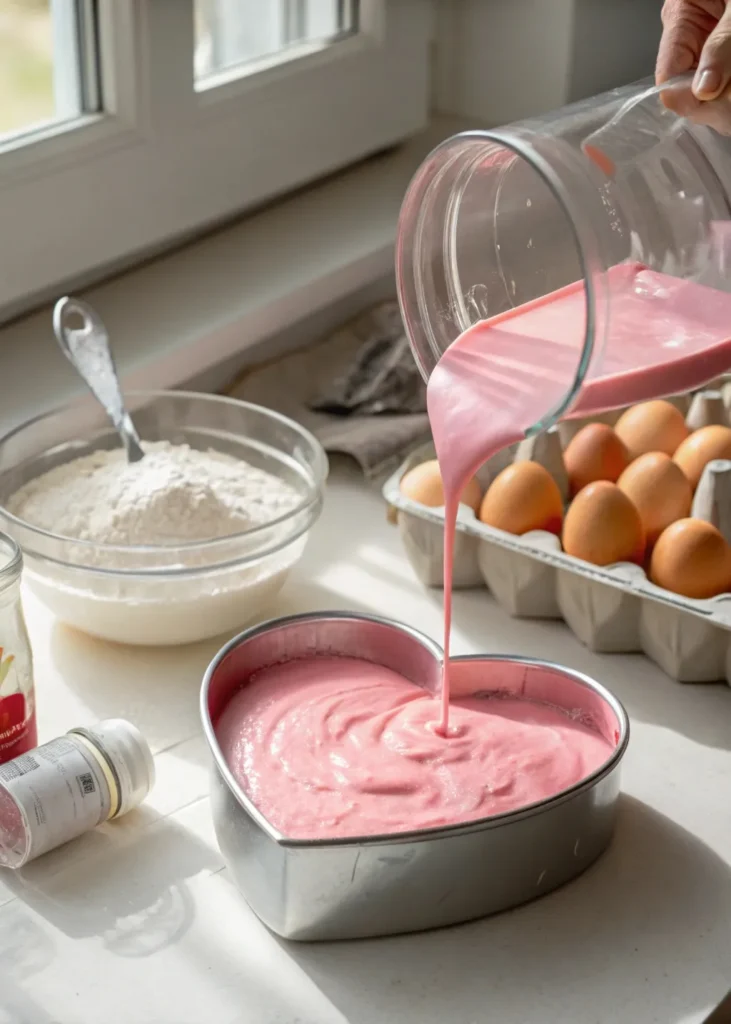
- Color and Bake
- Gently stir in pink gel color until the batter is evenly tinted.
- Pour into the prepared pan, smoothing the top. Tap gently on counter to release air bubbles.
- Bake 30–35 minutes, or until a toothpick inserted in the center comes out clean.
- Remove from oven, let rest in pan for 10 minutes, then invert onto a cooling rack.
- Level and Layer
- Once fully cool, use a serrated knife to level the top of the cake. This ensures even cake layers.
- Slice each layer horizontally for extra height, creating up to three thin cake layers if desired.
- Frosting the Cake
- Place one layer on your cake board or serving plate. Spread a thin coat of buttercream to lock in crumbs. Add a generous swirl of frosting, then top with the next layer. Repeat until all layers are stacked.
- Apply a crumb coat: a thin layer around the sides and top of the cake. Chill in the fridge for 15 minutes to set.
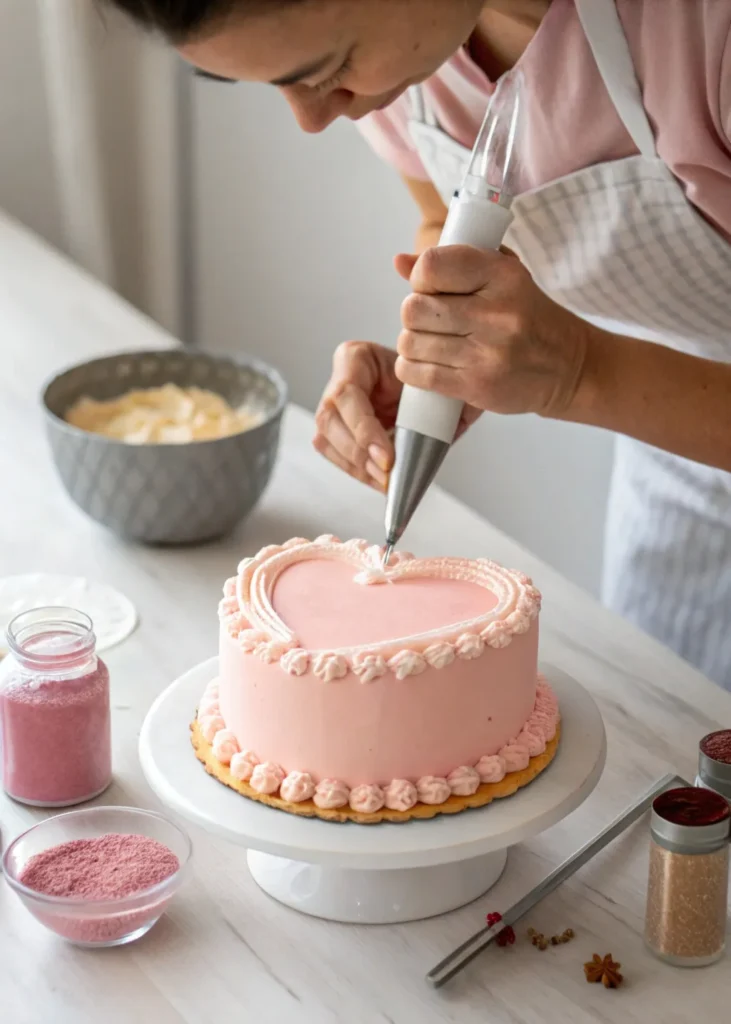
- Final Frost
- Remove cake and apply your smooth final coat. Use an offset spatula to wipe excess frosting from the top of the cake, creating crisp edges along the top of the cake.
- Sugar Dusting
- Lightly dust the top with sifted sugar for a delicate finish. This simple step adds sparkle without hiding your buttercream’s smooth surface.
At this point, your heart shaped cake stands ready for decoration and piping.
Pro Tips and Variations
Unlock next-level charm with these pro tips and flavor twists.
- Shell Border & Vintage Piping
For that antique look, fit a piping bag with a shell border tip. Practice consistent pressure as you pipe scallops along the bottom border of your cake. Once mastered, experiment with a delicate ruffle or star pattern on the top of the cake to frame your heart-shaped canvas. - Flavor Swaps
Swap vanilla extract for ½ tsp almond extract in your buttercream for a nutty undertone. Or stir in 1 tbsp finely grated lemon zest for freshness. For a richer dessert, use cream cheese frosting in place of classic buttercream. - Carrot Cake Variation
Blend shredded carrot and warm spices into your batter. Reduce granulated sugar by 2 tbsp, and add a dash of cinnamon and nutmeg. This creates a moist, spiced vintage cake that pairs beautifully with cream cheese swirl. - Piping Precision
Before decorating, chill your cake so buttercream firms up. This prevents tears when you pipe. Keep your bag at a 45° angle, and use steady, short bursts of pressure. Ready-made couplers help you swap tips mid-design without remaking your bag. - Custom Accent
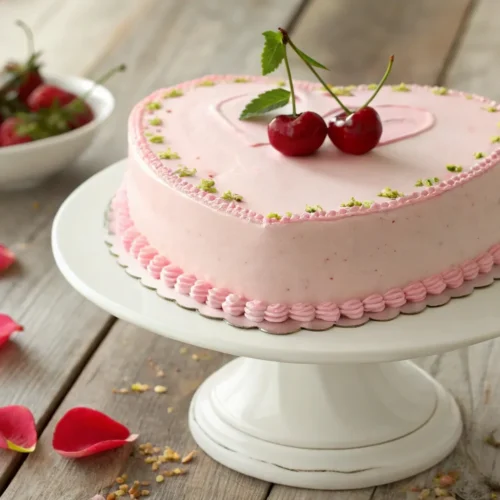
Add a delicate bow made from fondant at the base of your heart. Place a single cherry atop the center for a pop of color. Finish with a light sprinkle of edible glitter at the top of the heart for subtle sparkle.
Looking to craft a heart shaped cake with vintage flair? These techniques ensure your dessert feels like an heirloom piece—perfect for gifting or stealing the show at any party.
Serving Suggestions
Presentation makes your vintage cake feel special. Here are a few ideas:
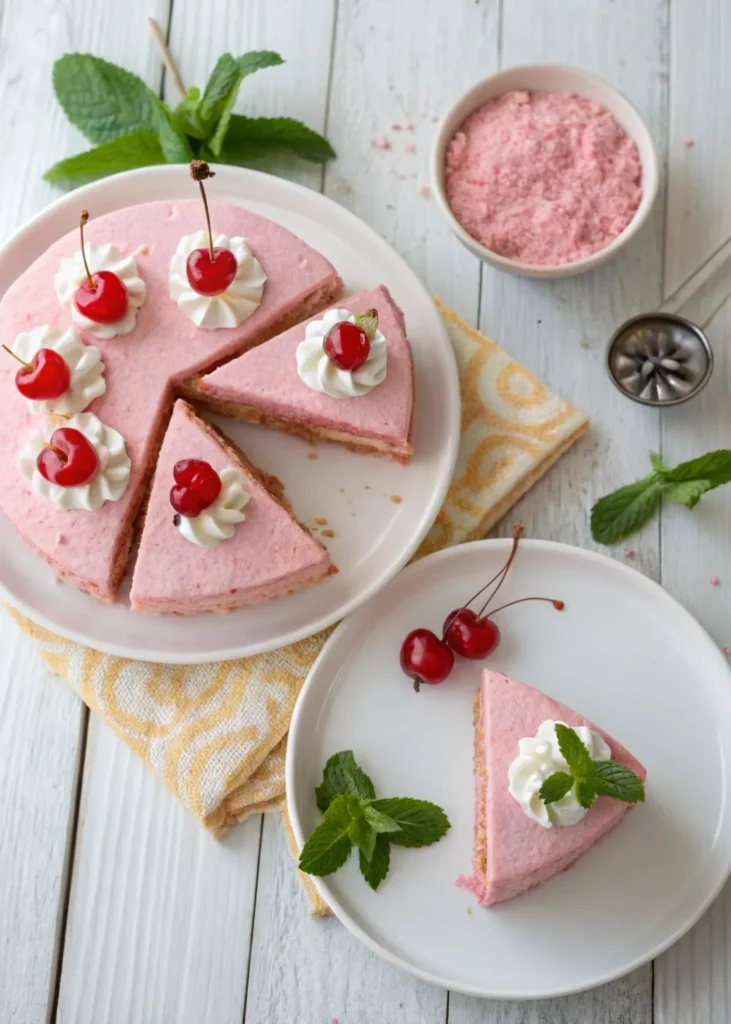
- Cherry & Glitter Garnish
Arrange two fresh cherries side by side at the center. Sprinkle fine edible glitter around the cherries for a playful shine. - Color Scheme Pairing
Contrast pastel pink frosting with tiny leaves piped in soft green. This gentle color scheme evokes garden romance. - Stand & Surround
Place your cake on a white ceramic pedestal to elevate its profile. Surround the base with rose petals or small votive candles for added drama. - Side Accompaniments
Serve slices with a dollop of whipped cream or a drizzle of warm chocolate sauce. A small scoop of vanilla ice cream complements the buttery sweetness.
When you serve this dessert, guests will admire the delicate cake design before tasting its tender crumb.
Conclusion
Crafting a vintage cake is both rewarding and fun. By following these buttercream tricks—shell border piping, crumb coat chills, and simple sugar dusting—you’ll decorate with confidence. Don’t shy from flavor swaps like almond or carrot cake; these small changes add a unique twist. Store any leftovers in an airtight container at room temperature for up to two days, or chill to preserve ornate details for longer. Whether you bake for a wedding, a birthday, or just because, this vintage cake will leave a delicious impression.
FAQs
What is the best icing for vintage heart cakes?
Classic buttercream offers smooth coverage and easy piping. For a tangy contrast, swap in cream cheese frosting. Both hold detailed designs well.
How much should a heart cake cost?
Home-baked heart cakes cost about $5–$10 in ingredients for two layers. A bakery’s custom heart cakes often range $30–$60, depending on size and complexity.
Does Walmart sell heart-shaped cakes?
Yes, Walmart’s bakery section typically offers heart-shaped cakes near major holidays like Valentine’s Day. You can place an online order for pickup or in-store purchase.
How many servings is a vintage heart cake?
An 8-inch heart cake serves about 10–12 slices. If you slice thinly, you can serve up to 14 guests. For larger gatherings, scale up recipe or add extra cake layers.
Vintage Heart Cake
Ingredients
Cake Batter:
- 2¼ cups cake flour
- 1½ cups granulated sugar
- 1 cup unsalted butter room temperature
- 4 large eggs room temperature
- 2 tsp vanilla extract
- ½ cup milk room temperature
- ¼ cup sour cream or cream cheese optional
- Pinch of salt
- Pink gel food color
Optional Variation (Chocolate Layer):
- 2 tbsp unsweetened cocoa powder
Buttercream Frosting:
- 4 cups about 1 lb unsalted butter, room temperature
- 8 cups powdered sugar sifted
- 2 tsp vanilla extract or ½ tsp almond extract
- 2 –4 tbsp milk or cream as needed
- Pinch of salt
- Pink gel food color
- Edible glitter for dusting
- Fresh cherries and piped green leaf accents for garnish
Instructions
Prepare & Preheat
- Position an oven rack in the center. Preheat to 350 °F (175 °C).
- Grease and flour an 8-inch heart-shaped cake pan, tapping out excess.
Mix Dry Ingredients
- In a bowl, whisk together cake flour and salt (and cocoa powder, if using chocolate variation). Set aside.
Cream Butter & Sugar
- In a stand mixer on medium speed, beat unsalted butter and granulated sugar for 3–4 minutes until light and fluffy.
Add Eggs & Flavor
- Add eggs one at a time, mixing fully after each. Scrape bowl sides, then stir in vanilla extract.
Combine Wet & Dry
- With mixer on low, add dry ingredients alternately with milk in three additions: dry–milk–dry–milk–dry. Mix until just combined. Fold in sour cream or cream cheese if using.
Color & Bake
- Stir in pink gel color until uniform.
- Pour batter into the prepared pan, smooth the top, and tap gently to release air bubbles.
- Bake 30–35 minutes, or until a toothpick comes out clean. Let rest 10 minutes in pan, then invert onto a cooling rack.
Level & Slice
- Once cool, level the top with a serrated knife. If desired, slice each layer horizontally to create up to three thinner cake layers for extra height.
Make Buttercream
- In a clean mixer bowl, beat butter for 2 minutes on medium speed. Gradually add powdered sugar, one cup at a time, on low speed.
- Add vanilla extract and salt. Increase speed to medium, adding milk until the frosting is smooth and pipeable. Tint pale pink with gel color.
Assemble & Crumb Coat
- Place first cake layer on your serving plate. Spread a thin “locking” layer of buttercream, then the next layer. Repeat.
- Apply a thin crumb coat around the sides and top. Chill 15 minutes.
Final Frost & Decorate
- Apply a smooth final coat of buttercream. Use an offset spatula to create crisp edges.
- Fit a piping bag with a star tip to pipe a classic shell border around the base and top of the cake.
- Lightly dust the top with edible glitter. Garnish with two fresh cherries at the center and small green leaf accents piped around them.
Serve & Store
- Serve at room temperature for best flavor and texture.
- Store leftovers in an airtight container at room temperature for up to 2 days, or refrigerate to preserve piping details.
Notes
Nutrition Information (per serving)
| Nutrient | Amount |
|---|---|
| Calories | 350 kcal |
| Total Fat | 20 g |
| ▪ Saturated Fat | 12 g |
| Cholesterol | 75 mg |
| Sodium | 180 mg |
| Total Carbohydrates | 40 g |
| ▪ Dietary Fiber | 1 g |
| ▪ Sugars | 25 g |
| Protein | 3 g |