
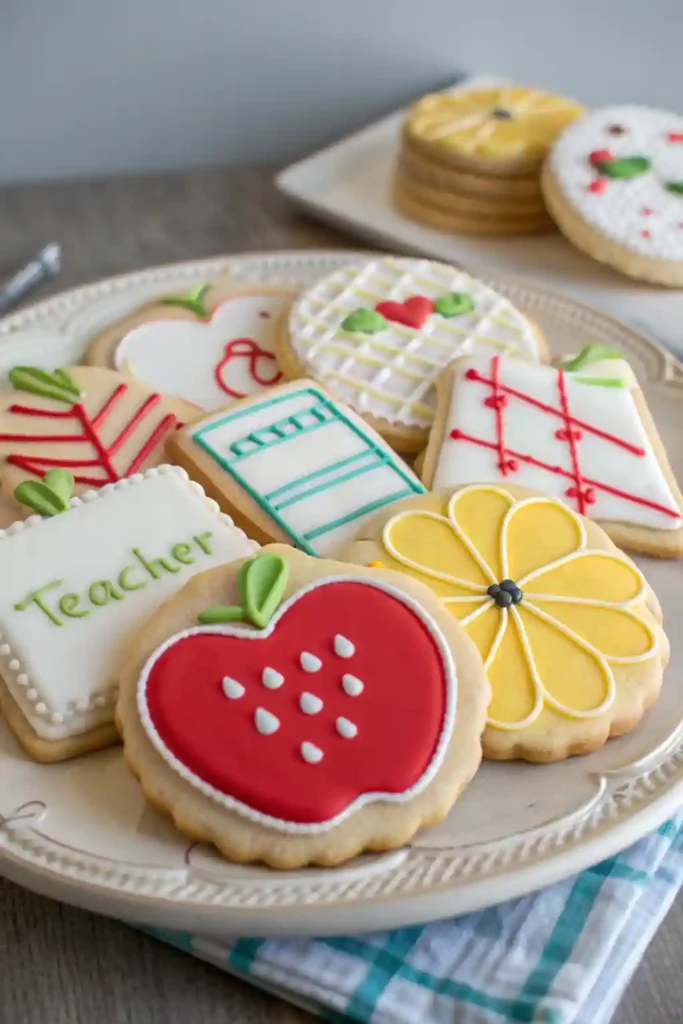
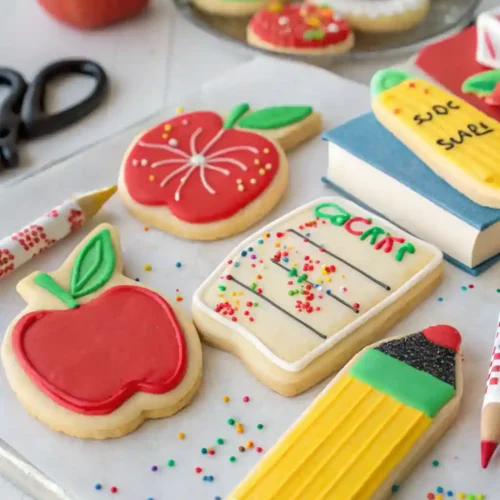
These easy royal icing sugar cookies are more than just a treat—they are a heartfelt gift perfect for showing appreciation to teachers at the start of the school year. This recipe features a delicious, no-spread sugar cookie base that provides the perfect flat canvas for decorating. Topped with a simple and forgiving royal icing, you can create beautiful designs like apples, pencils, or chalkboards, even if you’re a beginner. A batch of these thoughtful, homemade cookies is a wonderful way to say “thank you.”
Table of Contents
Why You’ll Love Royal Icing Decorated Cookies for Teachers
This recipe is designed for beautiful results. The cookies hold their shape perfectly, and the royal icing recipe is simple, using meringue powder for a stable, easy-to-work-with icing that dries hard and glossy.
- The Perfect Gift: A thoughtful, personalized, and delicious way to show gratitude to teachers.
- No-Spread Cookie Base: The cookie recipe is specifically formulated to hold sharp edges, making your cut-out shapes look professional.
- Beginner-Friendly Royal Icing: Meringue powder makes the icing safe (no raw egg whites) and incredibly stable, making decorating much easier.
- Beautiful & Delicious: Not only do these cookies look amazing, but they also have a soft, buttery flavor that is simply divine.
- A Fun Creative Project: Decorating these cookies is a relaxing and rewarding activity for both adults and kids.
Ingredients For Royal Icing Decorated Cookies for Teachers

- For the No-Spread Sugar Cookies:
- 1 batch of dough from the Soft Cut-Out Sugar Cookies recipe (see Recipe #5)
- For the Easy Royal Icing:
- 4 cups powdered sugar, sifted
- 3 tablespoons meringue powder
- ½ teaspoon clear vanilla or almond extract
- 9-12 tablespoons lukewarm water
- Gel food coloring (as needed)
How to Make Royal Icing Decorated Cookies for Teachers
- Bake the Cookies: Prepare and bake one batch of the Soft Cut-Out Sugar Cookies (Recipe #5) using school-themed shapes like apples, circles (for chalkboards), or rectangles (for notebooks). Let them cool completely on a wire rack. This is crucial, as any warmth will melt the icing.
- Prepare the Icing: In the bowl of a stand mixer fitted with a paddle attachment (or using a hand mixer), combine the sifted powdered sugar and meringue powder on low speed.
- Add Water and Flavoring: With the mixer still on low, slowly stream in the extract and 9 tablespoons of the lukewarm water.
- Mix to Stiff Peaks: Once the ingredients are combined, increase the speed to medium-high and beat for 5-7 minutes, or until the icing is very glossy and forms stiff peaks. This is your “stiff” consistency icing, perfect for piping fine details.
- Color and Thin the Icing: Divide the icing into smaller bowls for each color you plan to use. Add a tiny drop of gel food coloring to each and stir well. To create a “flood” consistency (for filling in the cookies), add water ½ teaspoon at a time to a portion of your colored icing, stirring gently, until it reaches the consistency of honey or shampoo.
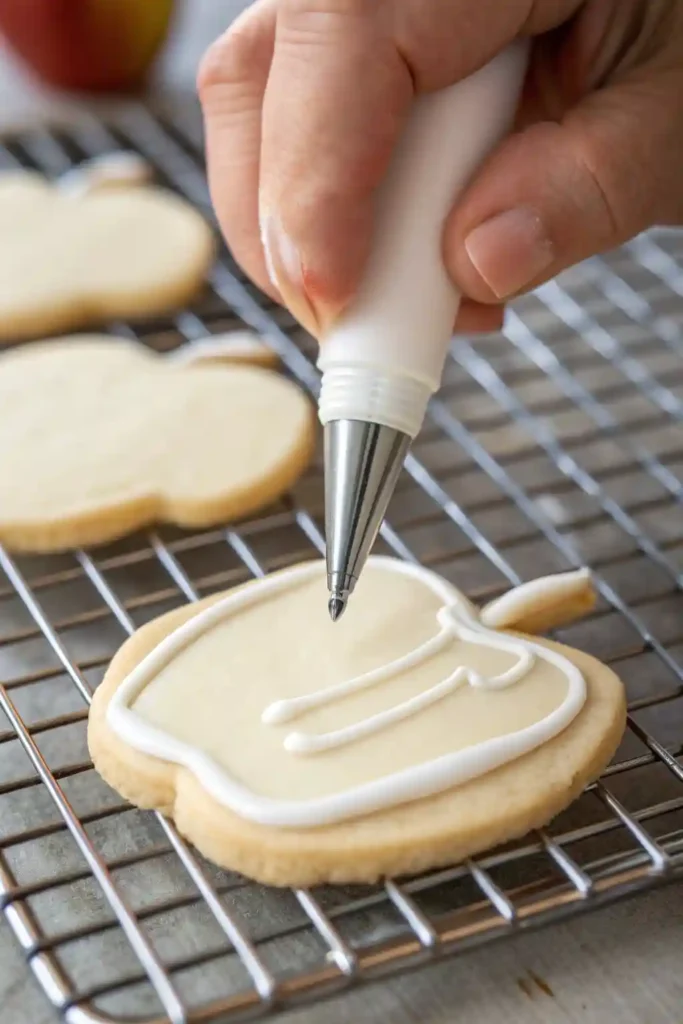
- Decorate the Cookies: Transfer your icing to piping bags. First, use a medium-consistency icing (thicker than flood) to outline your cookie shape. Let the outline set for about 10 minutes.
- Flood the Cookies: Use the thinner, “flood” consistency icing to fill in the outlined area. Use a toothpick or scribe tool to guide the icing into corners and pop any air bubbles.
- Add Details and Let Dry: Let the flooded base dry for at least 1-2 hours before adding finer details (like an apple stem or pencil lines) on top using a thicker icing.
- Dry Completely: Let the decorated cookies air dry, uncovered, for at least 8 hours, or overnight, until the icing is completely hard to the touch.
Serving and Storage Tips
- Serving/Gifting: Once the icing is fully hardened, carefully package the cookies in gift boxes or clear cellophane bags tied with a ribbon. They make a beautiful and memorable teacher gift.
- Storage: Store the cookies in a single layer in an airtight container at room temperature for up to a week. Do not refrigerate, as condensation can ruin the royal icing finish.
Helpful Notes
- Sift Your Sugar: Sifting the powdered sugar is essential to prevent lumps from clogging your piping tip.
- Gel Food Coloring: Use gel-based food coloring instead of liquid, as liquid coloring can alter the consistency of your icing too much.
- Icing Consistency is Key: Mastering “flood” and “outline” consistencies is the secret to beautiful royal icing cookies. Test it by drawing a line through the icing with a knife; it should disappear in about 15-20 seconds for a good flood consistency.
Conclusion
Creating these easy royal icing sugar cookies is a wonderful way to channel your creativity into a beautiful, edible gift. The reliable no-spread cookie and forgiving icing recipe set you up for success, allowing you to focus on the fun of decorating. A homemade gift like this speaks volumes and is sure to make any teacher feel special and appreciated at the start of a new school year. Did you make these for a teacher? We would be thrilled if you shared your experience by leaving a comment and star rating below! Don’t forget to post your beautiful designs on Pinterest!
Easy Royal Icing Sugar Cookies
Ingredients
For the No-Spread Sugar Cookies:
- 1 batch of dough from the Soft Cut-Out Sugar Cookies recipe see Recipe #5
For the Easy Royal Icing:
- 4 cups powdered sugar sifted
- 3 tablespoons meringue powder
- ½ teaspoon clear vanilla or almond extract
- 9-12 tablespoons lukewarm water
- Gel food coloring as needed
Instructions
Bake the Cookies:
- Prepare and bake one batch of the Soft Cut-Out Sugar Cookies (Recipe #5) using school-themed shapes like apples, circles (for chalkboards), or rectangles (for notebooks). Let them cool completely on a wire rack. This is crucial, as any warmth will melt the icing.
Prepare the Icing:
- In the bowl of a stand mixer fitted with a paddle attachment (or using a hand mixer), combine the sifted powdered sugar and meringue powder on low speed.
Add Water and Flavoring:
- With the mixer still on low, slowly stream in the extract and 9 tablespoons of the lukewarm water.
Mix to Stiff Peaks:
- Once the ingredients are combined, increase the speed to medium-high and beat for 5-7 minutes, or until the icing is very glossy and forms stiff peaks. This is your “stiff” consistency icing, perfect for piping fine details.
Color and Thin the Icing:
- Divide the icing into smaller bowls for each color you plan to use. Add a tiny drop of gel food coloring to each and stir well. To create a “flood” consistency (for filling in the cookies), add water ½ teaspoon at a time to a portion of your colored icing, stirring gently, until it reaches the consistency of honey or shampoo.
Decorate the Cookies:
- Transfer your icing to piping bags. First, use a medium-consistency icing (thicker than flood) to outline your cookie shape. Let the outline set for about 10 minutes.
Flood the Cookies:
- Use the thinner, “flood” consistency icing to fill in the outlined area. Use a toothpick or scribe tool to guide the icing into corners and pop any air bubbles.
Add Details and Let Dry:
- Let the flooded base dry for at least 1-2 hours before adding finer details (like an apple stem or pencil lines) on top using a thicker icing.
Dry Completely:
- Let the decorated cookies air dry, uncovered, for at least 8 hours, or overnight, until the icing is completely hard to the touch.
Notes
Nutrition Information (per decorated serving)
- Calories: 180 kcal
- Fat: 7g
- Saturated Fat: 4g
- Carbohydrates: 29g
- Sugar: 20g
- Protein: 1.5g
- Fiber: 0.5g
-
Sodium: 90mg
(Disclaimer: Nutrition information is an estimate and may vary based on ingredients and preparation.)
More Recipes to Explore
The Ultimate Chewy Chocolate Chip Cookie
The ultimate chewy chocolate chip cookie recipe! Perfectly soft centers, golden edges, and gooey chocolate. Your family will love this classic treat.
Easy Peanut Butter Lunchbox Cookies
Bake the best peanut butter lunchbox cookies! This easy recipe delivers rich, chewy cookies that stay fresh all week. The perfect hearty school snack.
Hearty Oatmeal Kitchen Sink Cookies
The best oatmeal kitchen sink cookies recipe! Packed with oats, chocolate & more, these hearty cookies are a guaranteed crowd-pleaser. So delicious!
Frequently Asked Questions (FAQ)
Can I use an alternative ingredient?
Meringue powder is highly recommended for safety and stability. While you can use raw egg whites, meringue powder is much easier for beginners. Clear vanilla extract is used to keep white icing bright, but regular vanilla can be used if you don’t mind a slightly off-white tint.
How do I make this gluten-free?
Use a 1-to-1 gluten-free flour blend for the sugar cookie base recipe. The royal icing ingredients are naturally gluten-free.
Why did my royal icing not harden?
This can happen if the icing was not beaten long enough, if too much water was added, or if the environment is very humid. Beating the icing until it’s stiff and glossy is key. Allowing the cookies to dry in a cool, dry place is also important.
Is this recipe freezer-friendly?
You can freeze the baked, undecorated cookies for up to 3 months. It is generally not recommended to freeze fully decorated royal icing cookies, as condensation during thawing can cause the colors to bleed and the texture to become sticky.
How thick should the consistency be?
You will need multiple consistencies. Outline icing should be like toothpaste. Flood icing should be like honey or syrup—thin enough to settle into a smooth surface but thick enough that it doesn’t run off the cookie.